Open Lab Starter Kit Small Laser V2–an open source Fab lab produced laser cutter
Daniele Ingrassia, Gaia Di Martino, J.C. Mariscal-Melgar, Mohammed Omer, Liane Sayuri Honda, Luisa Lange, Marc Kohlen, Manuel Moritz, Tobias Redlich

TL;DR
The OLSK Small Laser V2 is an open-source laser cutter designed to make digital fabrication accessible and reproducible for everyone.
Contribution
The paper introduces the OLSK Small Laser V2, an open-source laser cutter with comprehensive documentation for easy reproduction.
Findings
The OLSK Small Laser V2 can cut materials like plywood, acrylics, and MDF using a 40 W CO2 laser.
The laser cutter has a cutting area of 400 mm x 600 mm.
Comprehensive documentation supports swift reproduction and user accessibility.
Abstract
The rise of Open Source manufacturing ecosystems is a multifaceted phenomenon, fueled by the proliferation of digital fabrication technologies, the collaborative spirit of the Open Source movement, and the creation of spaces like hackerspaces, and fab-labs. Part of the efforts is the Open Lab Starter Kit (OLSK), a set of machines designed to lower the barriers to entry for everyone. The OLSK Small Laser V2, an integral component of the OLSK, represents the second phase of design and prototyping within the scope of an Open Source Laser Cutter initiative. Being reproducibility and accessibility central goal of the OLSK, great attention was given not only to the design of the hardware, but also to the development of comprehensive documentation. The documentation, encompassing repositories and assembly manuals, assumes a pivotal role within the project framework, aiming to facilitate swift…
Genes, proteins, chemicals, diseases, species, mutations and cell lines named across the full text — each resolved to its canonical identifier and authoritative record.
Click any figure to enlarge with its caption.
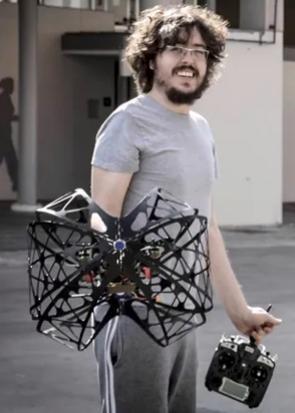 Figure 1
 Figure 2
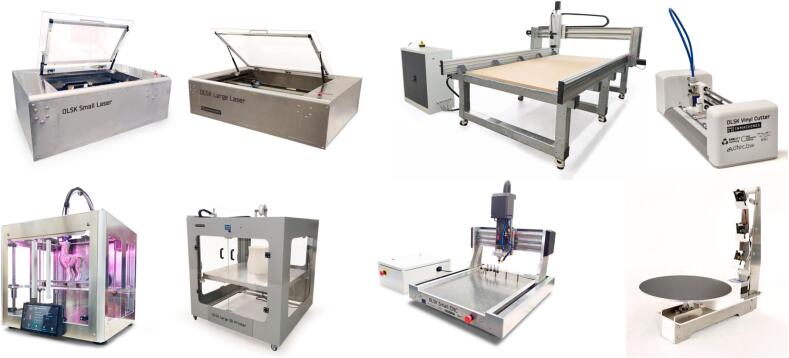 Figure 3
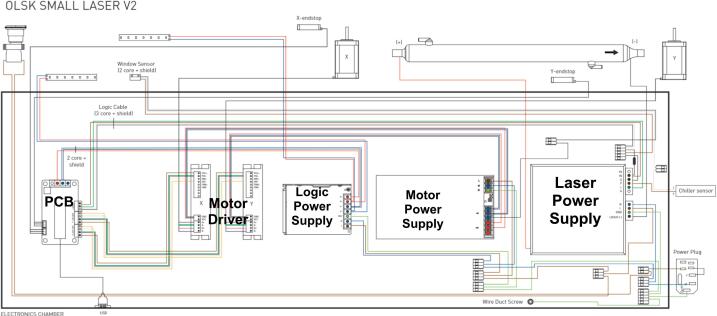 Figure 4
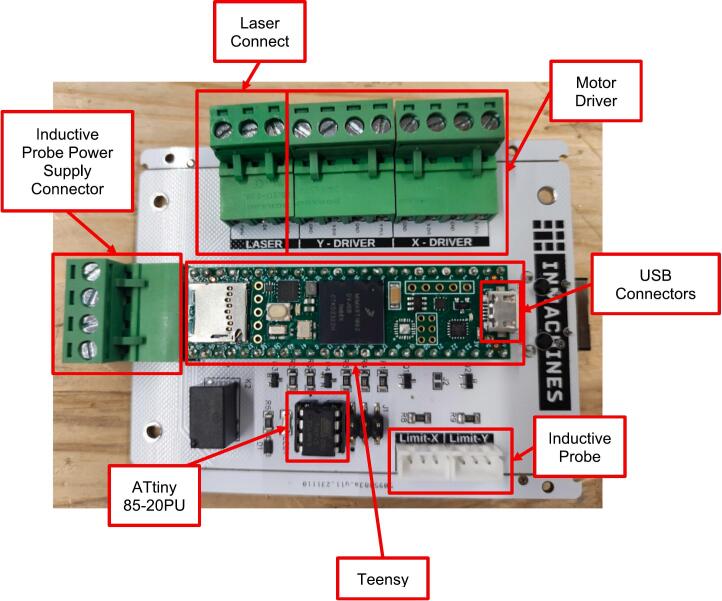 Figure 5
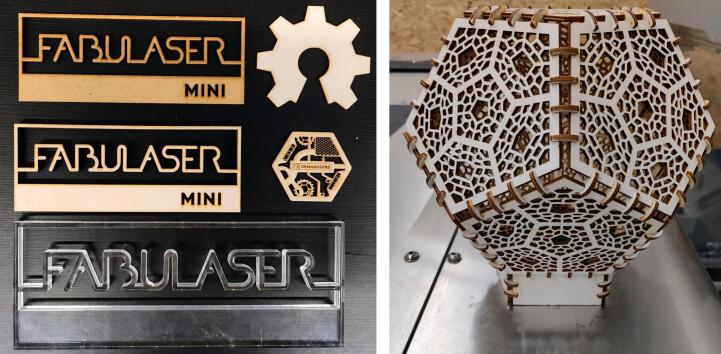 Figure 6
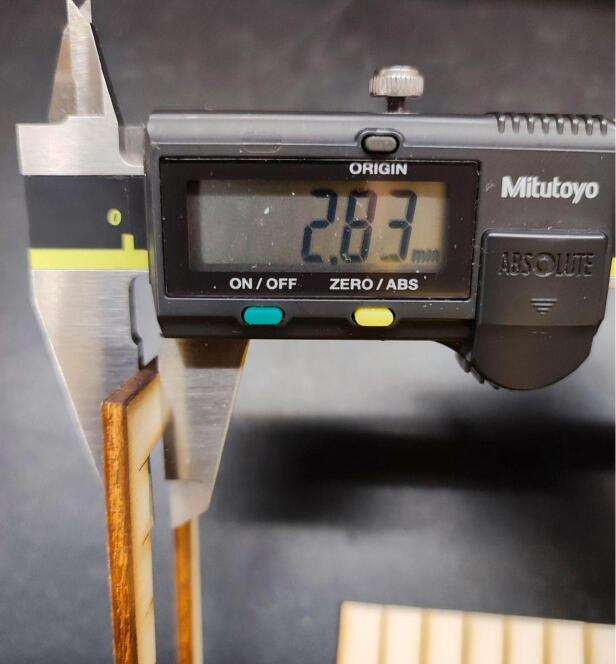 Figure 7
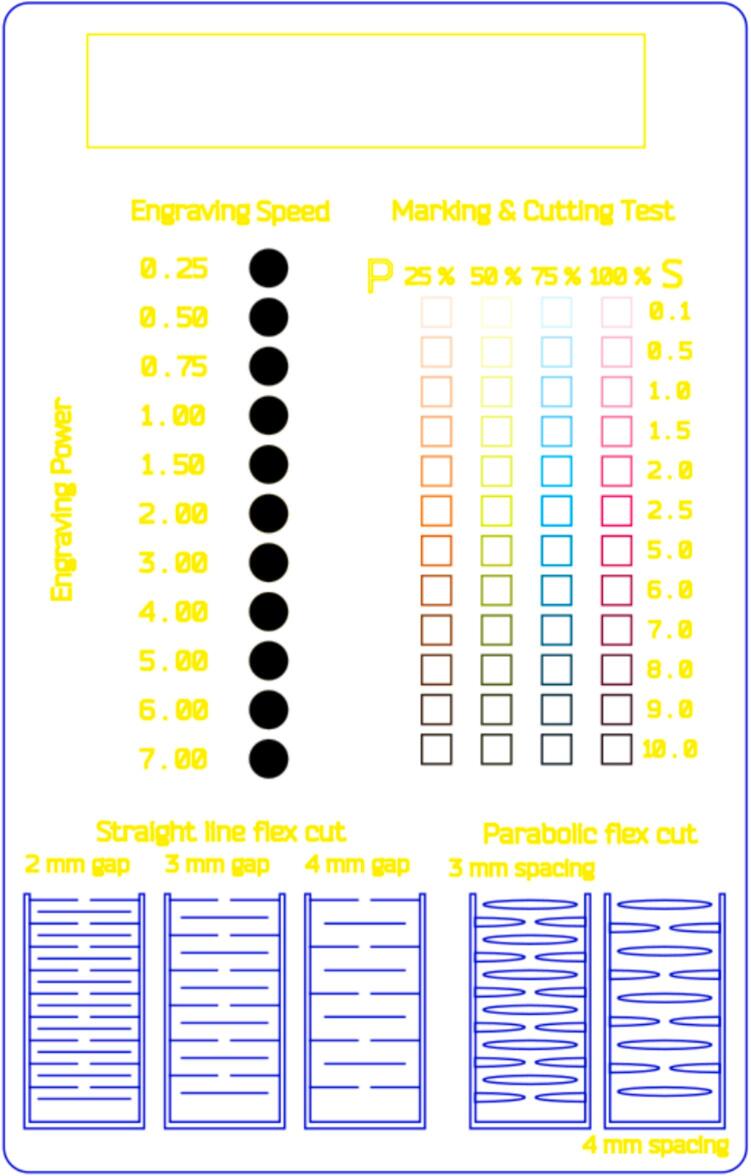 Figure 8
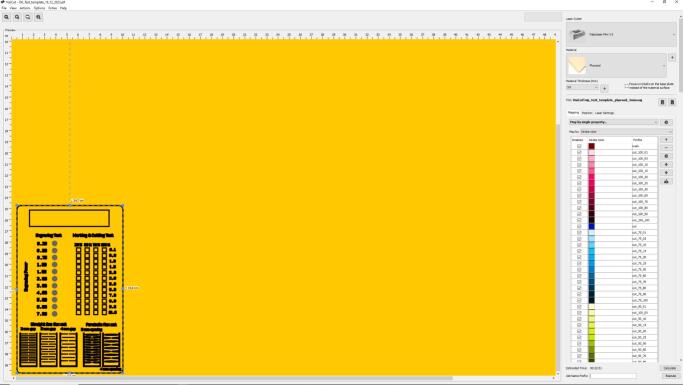 Figure 9
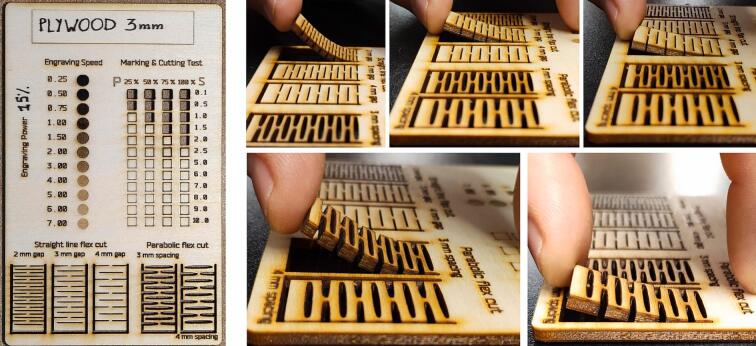 Figure 10
 Figure 11
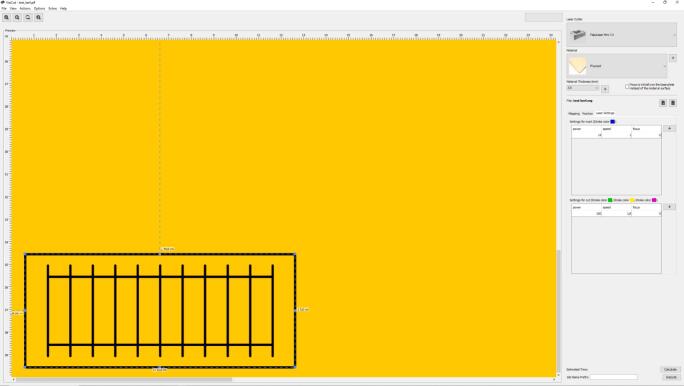 Figure 12
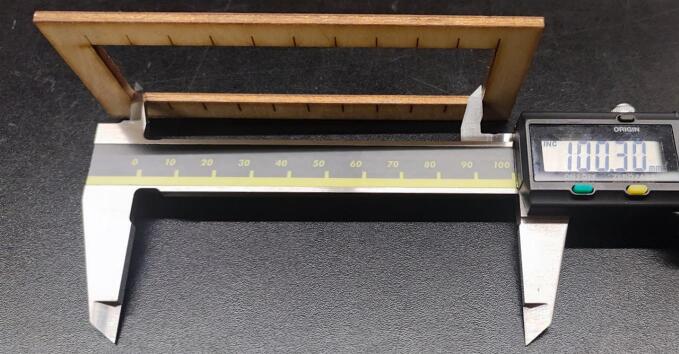 Figure 13
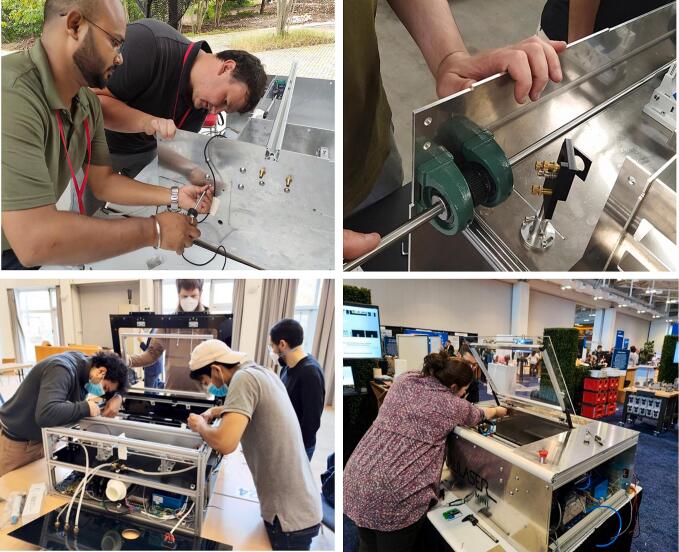 Figure 14
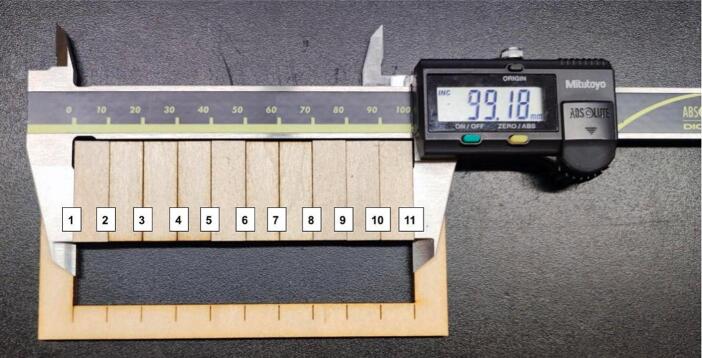 Figure 15
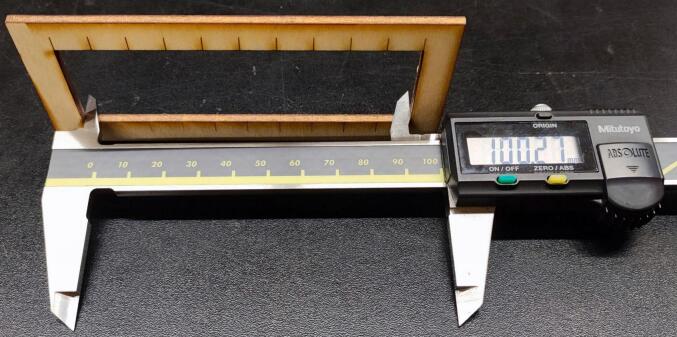 Figure 16
 Figure 17
 Figure 18
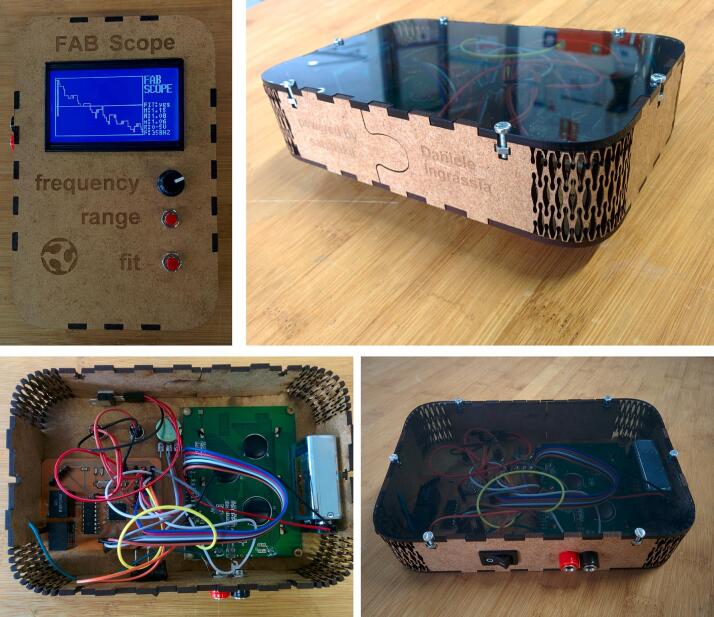 Figure 19
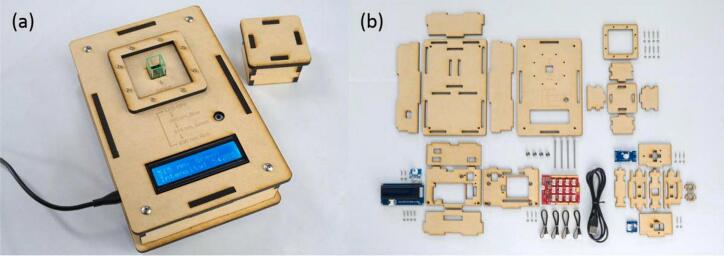 Figure 20
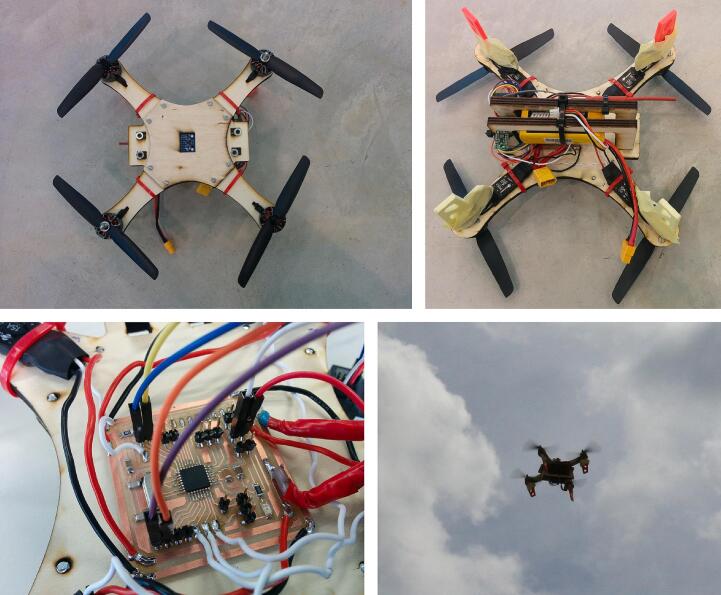 Figure 21
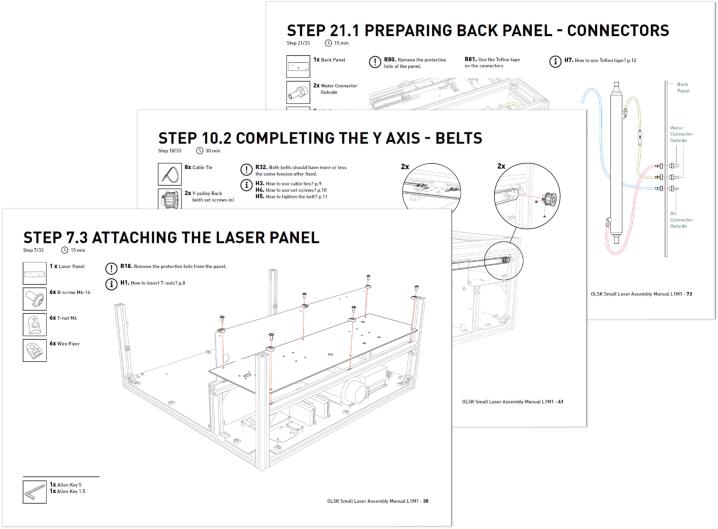 Figure 22
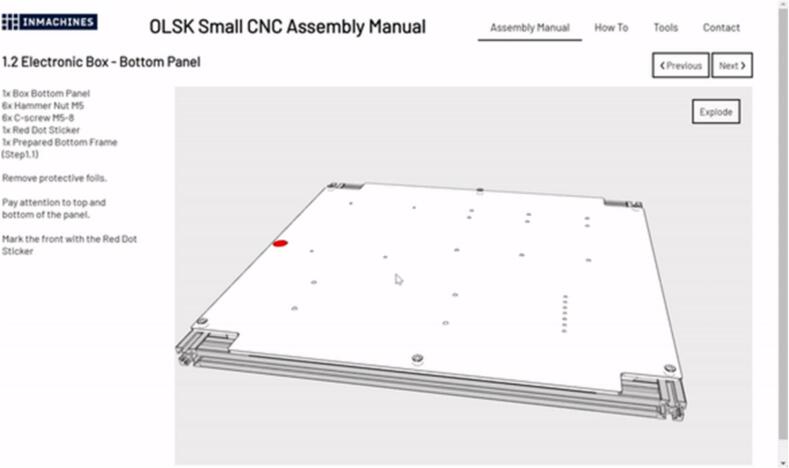 Figure 23
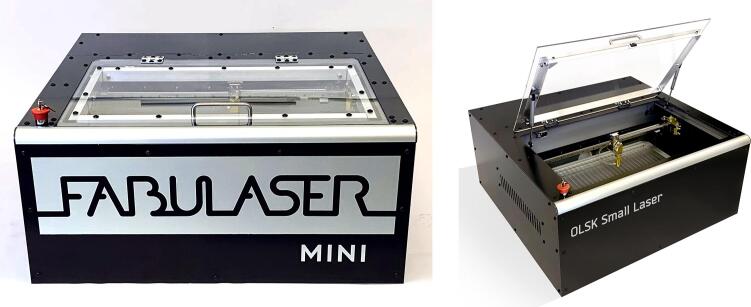 Figure 24
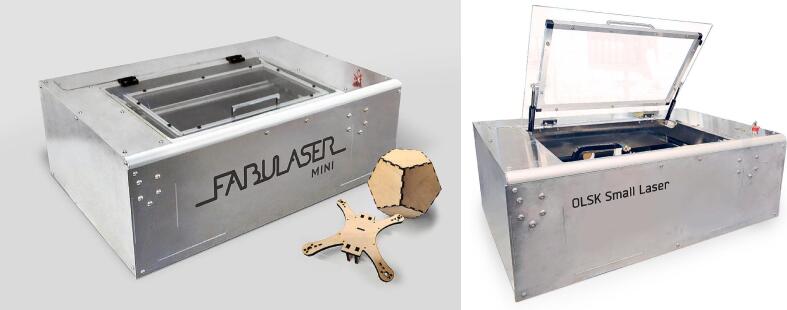 Figure 25
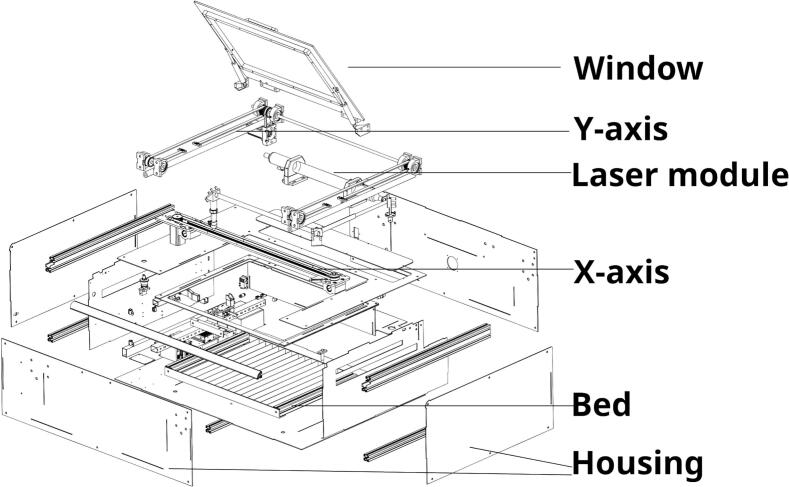 Figure 26
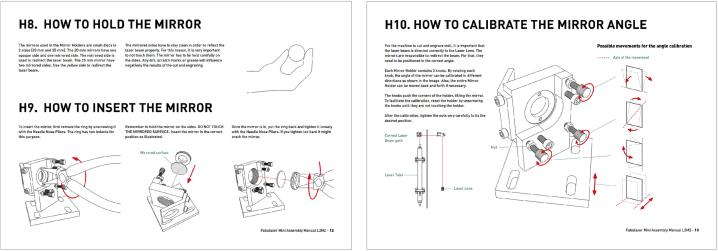 Figure 27
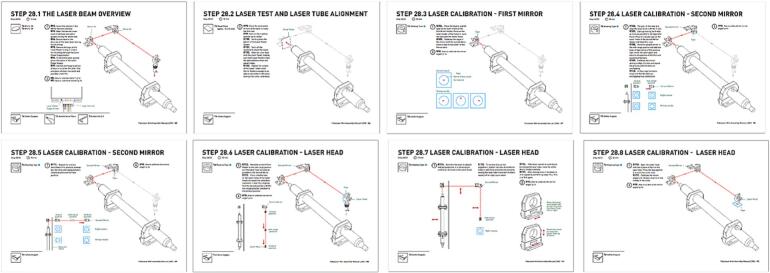 Figure 28
Peer Reviews
No public reviews on file for this paper yet. If you reviewed it on a platform where reviews are public (OpenReview, ICLR, NeurIPS, ICML), you can paste yours below so the community can read it here.
Videos
No videos yet. Explain this paper in a talk, walkthrough, or lecture? Add one.
Taxonomy
TopicsAugmented Reality Applications
Hardware in context
1
Laser cutting
1.1
Laser cutters are CNC (Computer Numerical Control) devices that perform subtractive manufacturing through laser cutting, a method where a focused laser beam with high energy intensity melts, vaporizes, or burns the workpiece material [1,2]. This technique is favored in digital fabrication for its operational simplicity and rapid prototyping capabilities, resulting in a significant growth in its market and an increased interest for open-source variants. The most prevalent laser sources include fiber lasers, diode lasers (Nd:YVO and Nd:YAG), and gas lasers (CO2), with the selection depending on the intended application. Laser cutters are compatible with a diverse range of materials, including cellulose-based substances like wood and cardboard, various polymers, textiles, and metals such as aluminum and steel, the latter requiring specialized laser technologies. See (Table 1).Table 1OLSK Small Laser V2 Specifications.Specifications tableHardware nameOpen Lab Starter Kit Small Laser V2Subject area
- ●Digital manufacturing technology
- ●Educational tools and Open Source alternatives to existing infrastructure Hardware type
- ●Laser cutter Closest commercial analogFLUX Beambox ProOpen source license
- ●Hardware design, CAD and PCB files, BOM, settings and other technical or design files are released under the following license: CERN Open Hardware License Version 2 Weakly Reciprocal − CERN-OHL-W
- ●Assembly manual, pictures, videos, presentations, description text and other type of media are released under the following license: Creative-Commons-Attribution-Share Alike 4.0 International − CC BY-SA 4.0 Cost of hardwareapproximately 3.000€Source file repositorydoi: 10.5281/zenodo.10412769
Open source hardware
1.2
Open Source Hardware (OSH), as defined by the Open Source Hardware Association (OSHWA), is “tangible artifacts − machines, devices, or other physical things − whose designs has been released to the public in such a way that anyone can make, modify, distribute, and use those things” [3].
Open Source Hardware offers many advantages over proprietary machinery: the designs are freely accessible and often emerge from user-driven co-development. The design and building of the hardware provide comprehensive insights into the machine’s capabilities and constraints. Production is local and can virtually be carried out everywhere (even if some modifications may be necessary in terms of parts and/or materials); The Open Source movement has cultivated a community that highly values the exchange of ideas [4].
There are various small commercial laser cutters such as the Flux BeamBox Pro, GlowForge, and Mr. Beam II DreamCut; which come in different form factors and do not offer the flexibility of a freely licensed hardware project. OLSK Small Laser V2 form factor strikes a balance suitable for both digital manufacturing enthusiasts and industrial applications.
The Open Lab Starter Kit
1.3
In the frame of Open Source Hardware ideals, the Open Lab Starter Kit (OLSK) was born with the goal of creating a set of digital fabrication machinery to start a fully functional digital fabrication laboratory.
The OLSK consists of 8 digital fabrication machines [5], as shown in Fig. 1:
- ●Large format laser cutter, “OLSK Large Laser”, cutting area of 1000 mm x 600 mm
- ●Small format laser cutter “OLSK Small Laser”, cutting area of 600 mm x 400 mm
- ●Large format CNC-milling machine “OLSK Large CNC”, working are of 2500 mm x 1250 mm x 300 mm
- ●Small format CNC-milling machine “OLSK Small CNC”, working area of 600 mm x 400 mm x 100 mm
- ●Large format 3D printer “OLSK Large 3D Printer”, printing area of 1000 mm x 1000 mm x 1000 mm
- ●Small format 3D Printer “OLSK Small 3D Printer”, printing are of 200 mm x 200 mm x 200 mm
- ●Vinyl cutter “OLSK Vinyl Cutter”, cutting width of 300 mm
- ●3D scanner “OLSK 3D Scanner”, maximum scanning area of 300 mm x 300 mm x 300 mm Fig. 1. Open Lab Starter Kit: current status. From top left to bottom right: Small Laser, Large Laser, Large CNC, Vinyl Cutter, Small 3D Printer, Large 3D Printer, Small CNC, 3D Scanner.
Most of the OLSK machines have been the object of several building workshops with the end users, as can be seen in Fig. 2; the goal of these workshops is to empower the operator by learning not only how to operate the machines, but also how they work, how to maintain them and how to repair them, if necessary.Fig. 2. Assembly Workshops.
With this aim in mind, a very important part of the Open Lab Starter Kit is the documentation, in the form assembly manual and repository.
Web based semi-automated assembly manual and documentation
1.4
As part of the documentation of the Open Source machines, the OLSK Small Laser V1 featured an assembly manual as a static pdf showing step-by-step instructions, with clear graphic design (shown in Fig. 3), which proved efficient through multiple machine-building workshops. However, it showed itself as difficult to update and replicate. As an improved version, the OLSK Small Laser V2 assembly manual is produced and offered in a completely new manner: an online interactive 3D viewer, generated semi-automatically using the CAD file. Through this webpage, that can be seen in Fig. 4, the user is able to navigate through the steps, explode the view to understand how to assemble the parts of each step and interact with the 3D model by zooming, panning and rotating it. The process to generate it is also much simpler than its previous version. By separating the parts into steps directly in the CAD file, and exporting as a web-friendly 3D file (glTF), the online assembly manual generates the steps with its respective list and count of parts. This also makes updates in the machine version easier, since it only needs the updating of the CAD file.Fig. 3. Snapshot of the OLSK Small Laser V1 manual.Fig. 4. Snapshot of the web based assembly manual.
Hardware description
2
OLSK Small Laser V2 is an Open Source Laser Cutter, based on the Fabulaser Mini Open Source Laser Cutter, which was first developed in 2020 at InMachines by Daniele Ingrassia, as shown in Fig. 5, Fig. 6; the goal was to create an affordable, desktop laser cutter for educational purposes; the design also aimed to embrace the concept of FabLabs 2.0, where digital fabrication machines are used to replicate or create digital fabrication machines. Fabulaser Mini quickly became a staple in Nord Rhine Westphalia schools, where it was replicated in several machine-building workshops [10]. See (Table 2).Fig. 5. Fabulaser Mini V2 and OLSK Small Laser V1.Fig. 6. Fabulaser Mini V3 and OLSK Small Laser V2.Table 2OLSK Small Laser V2 technical specifications.OLSK Small Laser V2 SpecsLaser sourceWater Cooled CO_2_ 40 WCutting area600 mm x 400 mmGuides25 mm linear shaft for Y axis and 15 mm linear rail for X axisAccuracy± 0.05 mmMax Speed1000 mm/sFrame and Housing30 mm x30 mm Aluminum profiles and interlocked 3 mm aluminum platesWindow6 mm Acrylic with reinforcement frame and gas springsBed0.8 mm Aluminum Lamellas, adjustable in height and levelingSensorsInductive Probes and Magnetic SwitchController32bit iMXRT1062 (Teensy 4.1) on custom PCB shieldFirmwaregrbl-HAL − iMXRT1062 driverCutting thicknessup to: 10 mm acrylic, 6 mm MDF, 8 mm poplar plywoodDimensions1161 mm x 812 mm x 390 mm (W x D x H)SoftwareVisicut and an OpenSource GCode sender (e.g. Universal GCode Platform)AccessoriesWater Chiller, Air pump, Air Filter, Radial Fan
Compared to the previous version (V1), the design of the OLSK Small Laser V2 focuses on the following aspects:
- ●Part count reduction, consisting of about 54 % less parts (lowering the count from 1193 parts to 549 parts, by comparing BOMs)
- ●Possibility to manufacture the parts either in Fab Labs (e.g. using a large format CNC milling machine) or industrially (e.g. by using a fiber laser cutter)
- ●Possibility to use different metals to produce the housing, giving higher reproducibility possibilities depending on the local availability
- ●Increased ease of calibration, having fixed position for the second mirror holder.
- ●Integration of frame and housing into an unique rigid structure made of interlocked aluminum plates
- ●Scalability of working area size without changing mechanics, proved to be incrementable to at least up to 1000 mm x 600 mm (up to 66 % increase in X and 50 % increase in Y, see OLSK Large Laser V1)
- ●High speed motion up to 1000 mm/s, a 150 % increase compared to the 400 mm/s of the V1
- ●Increased safety by:
- ○using aluminum instead of aluminum composite for the housing
- ○having the electrics on the right side instead of under the laser tube, reducing the risk of the coolant leaking onto the electrics
- ○using inductive probes as limit switches
- ○separating the cable ducts for AC and DC cables
Great attention is given to implementing safety features, including several sensors which prevent the laser to be shot when the machine window is open, similarly to commercial laser cutters. This aspect is further discussed in Section 7. Validation and Characterization. Accuracy of the sensors can be found in the technical datasheets of the components.
OLSK Small Laser V2 has been used to cut cardboard, plywood up to a thickness of 8 mm, acrylic up to a thickness of 10 mm and MDF up to a thickness of 6 mm. The settings for these materials can be found in the repository as vcsettings file.
In the frame of the Open Source concept, this desktop laser cutter presents:
- ●Use of Standardized and Interchangeable Components: this desktop laser cutter is constructed employing components readily available in the market and designed for interchangeability. Such an approach streamlines manufacturing processes, reduces costs, and ensures broader access to essential parts, thereby promoting scalability and affordability.
- ●Reproducibility: the laser cutter can be produced having available a standard Fab Lab inventory or industrially with common metal working tools, such as a fiber laser cutter. Furthermore the housing can be produced of different metals depending on local availability (e.g. aluminum or steel).
- ●Integration of Open Source Firmware: the laser cutter operates on an Open Source firmware architecture, emphasizing transparency, and accessibility in its operational framework. This modularity allows for code examination, modification, and collaborative refinement, fostering an environment conducive to continuous improvement and customization
- ●Adoption of Open Source Software Suite: employing Open Source software tools such as Visicut and Universal G-code Sender (UGS) for G-code generation and machine control highlights the commitment to transparency and accessibility. These tools provide a robust platform for precise command generation and seamless control of the laser cutter, enhancing user experience and operational precision.
By leveraging standardized components, Open Source Firmware, and software tools, this laser cutter exemplifies a commitment to democratizing access to digital fabrication tools. This approach aligns with the core tenets of the Open Source movement, aiming to foster inclusivity, collaboration, and continuous advancement within the digital fabrication domain.
Design files summary
3
See (Table 3).Table 3. Repositories list: the repositories contain all the files needed to replicate and assemble the OLSK Small Laser V2.Design file nameFile typeOpen source license****Location of the fileCAD OLSK Small Laser V2step, f3dCERN Open Hardware Licence Version 2 Weakly Reciprocaldoi: 10.5281/zenodo.10214225Firmware OLSK Small Laser V2zipCreative Commons Attribution 4.0 Internationalhttps://doi.org/10.5281/zenodo.10216168Media OLSK Small Laser V2png, jpgCreative Commons Attribution 4.0 Internationaldoi: 10.5281/zenodo.10216299Settings OLSK Small Laser V2vcsettingsCERN Open Hardware Licence Version 2 Weakly Reciprocaldoi: 10.5281/zenodo.10216488Additional Documentation OLSK Small Laser V2pdf, mdCreative Commons Attribution 4.0 Internationaldoi: 10.5281/zenodo.10277455Electronics OLSK Small Laser V2pdf, md, svg, png, jpgCreative Commons Attribution 4.0 International,CERN Open Hardware Licence Version 2 Weakly Reciprocaldoi: 10.5281/zenodo.10411270Test Files OLSK Small Laser V2Svg, plf, dxfCreative Commons Attribution 4.0 Internationaldoi: 10.5281/zenodo.10409835
Bill of materials summary
4
See (Table 4).Table 4. Bill of Materials of OLSK Small Laser V2: Costs don’t include shipping expenses. Some electronics components for the board are not reported in the Bill of materials table.NameQ.tyCost per UnitTotal CostLink****External AccessoriesPower Cord (computer style) at least 2 m17,89 €7,89 €https://www.amazon.de/-/en/deleyCON-Protective-Coupling-Computer-Projector-black/dp/B07Y1TJPJT/ref=sr_1_5?crid=17RRG4YAYUORE&keywords=powerd%2Bchord%2B2%2Bm&qid=1693573579&sprefix=powerd%2Bchord%2B2%2Bm%2Caps%2C186&sr=8–5&th=1Foot switch112,59 €12,59 €https://www.amazon.de/-/en/Brennenstuhl-Comfort-Switch-Adaptor-1508220/dp/B01JIKHVF4/ref=sr_1_6?keywords=footswitch&qid=1693574948&refinements=p_85:20943776031&rnid=20943775031&rps=1&sr=8–6&th=1Air Filter Airmex AM03 or similar1525,00 €525,00 €https://www.airmex-nord.com/lötrauch/am-03/Water Chiller CW-30001138,87 €138,87 €https://www.ebay.de/itm/353776425732Air pump Hailea ACO-318144,90 €44,90 €https://www.ebay.de/itm/393963501960?hash=item5bba0df988:g:dH4AAOSw ∼ 1tiG ∼ Qs&amdata=enc%3AAQAIAAAA4LalGGlD%2FPDZswicWJIfNhDA2bZ3GcDeRCYN6yt8BgdPsviD8ZwdLZonM7qgk1ro8XsIqVVt4utwoSnM8CJ8deg1M5agKoK3XSnzyN9xLYa%2FgQgQxmeMXE5CoBLZCXgk%2FxCFwwXa636H%2BrTzLDmtaPOmaTyJVXTkcUkGbXQB3CLCKdZXQcrnvhMNsQvxbL72EFtF6Ox39a%2FEaIurbnVXNwTZEaIPR16LWatg3QxWLgdyju9i10VRx%2BG%2FuwIhm90Dlxi3UNV98GEBm1OUPCZeh%2BAn8z0ckOpNYO3uL%2FzF7o0e%7Ctkp%3ABFBMzNiYj8piRadial Fan 150 mm 150 W Neverest RV-B186,37 €86,37 €https://www.amazon.de/Neverest-Rohrventilator-Ventilator-Leistungsstark-Radiall%C3%BCfter/dp/B07YG4DNLV/ref=asc_df_B07YG4DNLV/?tag=googshopde-21&linkCode=df0&hvadid=427689318616&hvpos=&hvnetw=g&hvrand=16873189388314541869&hvpone=&hvptwo=&hvqmt=&hvdev=c&hvdvcmdl=&hvlocint=&hvlocphy=9043534&hvtargid=pla-907659847108&psc=1&th=1&psc=1&tag=&ref=&adgrpid=97610610937&hvpone=&hvptwo=&hvadid=427689318616&hvpos=&hvnetw=g&hvrand=16873189388314541869&hvqmt=&hvdev=c&hvdvcmdl=&hvlocint=&hvlocphy=9043534&hvtargid=pla-907659847108Water Pipe Outside inside diameter 9 mm 2 m length218,25 €18,25 €https://www.ebay.de/itm/323585440131?var=513719600332Water Pipe Inside Silicon 1 m 7x10mm22,70 €2,70 €https://www.ebay.de/itm/263190368164?var=566060152729Air pipe 4x6mm 5 m112,98 €12,98 €https://www.amazon.de/gp/product/B099671H7K/ref=ppx_yo_dt_b_asin_title_o02_s03?ie=UTF8&th=1Air pipe adapter 6–10 mm with pipe 10 mm11,79 €1,79 €https://www.ebay.de/itm/175726486472?hash=item28ea1d63c8:g:1X8AAOSwAUlkV-r9&amdata=enc:AQAIAAAA8FNsm7bIPKO6K0mSMM0PwzeqpRsKoAEnusguVKxUMeNsnjHLMQDJhmjJzvOsa6FYDhLGCc5%2BJj1ooXyQFcFbuwyrb3lojJo7YbIa5wppz43xgYGEPchA5WKlC%2Bh179P%2FdyLrj9aGhoWam0sJXI6lZ%2BWSzumsc4Nik8afgAdbsr2o1dlAA8kEhaRnvrmIWUifB79SVIO%2F4rfwEZQ8C1WdksS%2BFUHpF7M%2B3w8LOU2wkM9jqqHvkYWvzy4%2F%2BhwbS8SmlsSBb5Z2qHuoRiTuIM5RipyDlQBdwa0fe3K5nazNymqQgavjkX2xGW2clNXXCt44RA%3D%3D|tkp:BFBMwJmGkMpiSafety Sticker set125,15 €25,15 €https://www.amazon.de/gp/product/B09NP6YCJL/ref=ppx_yo_dt_b_asin_title_o09_s01?ie=UTF8&th=1https://www.amazon.de/gp/product/B07HCBKK2R/ref=ppx_yo_dt_b_asin_title_o09_s02?ie=UTF8&psc=1https://www.amazon.de/gp/product/B09NP5HWWF/ref=ppx_yo_dt_b_asin_title_o00_s00?ie=UTF8&psc=1https://www.ebay.de/itm/313584414991https://www.ebay.de/itm/164935298284https://www.ebay.de/itm/164935204648USB Cable outside 2 m or more16,27 €6,27 €https://www.amazon.de/-/en/StarTech-com-USB-Male-Connectors-Cable/dp/B006VYYRM6/ref=sr_1_2?crid=2TI17A4HX6XZ8&keywords=USB + cable + 2725&qid=1693576361&sprefix=usb + cable + 2725 %2Caps%2C96&sr=8–2Exhaust hose 80 mm 1.5 m226,90 €26,90 €https://www.ebay.de/itm/225730582239?var=524841485315Hose Clamps 80 mm44,00 €16,00 €https://www.ebay.de/itm/Schlauchschellen-Edelstahl-V2A-mit-Schneckengewinde-DIN-3017-W2-von-8 mm-210 mm/332686901917?_trkparms=ispr%3D1&hash=item4d75af429d:m:mz6IHA-rdBEK4b2fcgCT8fQ&enc=AQAEAAACcIQvEcHUrT7nmUC3yY5qbPyaBN1nJEDYW8MyypsJPgXKjzb4uel3XQiGEzY4CITgmtHiT0EfYmGFCvMrif18F%2BAx%2Fl%2FNSXWbjUQ9qTgekiDWkJx%2BuQgyIbDbO1pX6NiyjmRl0HF6WbmA6nTznzH4SWE8JVcMHzacV%2BXw%2FNLrhjcyjPh0SkfHOWzH1finbcu3G6tV37gexErMA76rgXFau46ZTaKIQDwqoqsNTkcQnQHDXTlSMj0L%2BYpGR9mWsy2aMafWC0ANdU%2BCoM4Nwo2o6bmJntNitnYNUd7%2BMsW%2FsxJ7ucuWgPh4XRKKW%2BluaxqxvtmdmkiJ%2BoGNqTE1vuWKb3nYI8MU7BS5P68Q7tvhNDptfPFCsyg7%2BxtOEHwm0UzfFp8cK6gR8m6CM8vcDNVvHz%2FPeG7MS2eTMdfieu0g9Fvze4v2NvwXGhhx3U8Wl2KZ3p00l8TMGFPen78oU1crKjM%2BWEvIvk6P%2F34aUzF%2Biq4KH1Nfwl%2FnLB%2Fa1EVsyngJ9OUW6xw9oKvgSiKnzDoHPJlMuuJBIPi0xJKK10siz9jNbyqAcL3Ag8DBAR9wK5kYI5ty2HtjLbYSEMKKbcn2Nhe%2BPvHEpUjCthPQFP89%2FJgPcmoPi1BV5rrVQl%2BP3z%2BjNpAZOY1tj1Pb4uwkfZ36LDZo39W6DQaM9rG0EP1wzmkuF1weOJrlJzKfyrrvwoStK7SPUOirsyh3ecY%2FikogwfhS0zWkTgntQrW%2BAHd7xUG679z5wTZbjn4yffLRK1vpz%2Fsm8E59vDlOc6LPxo0FafvfwXoxYAtcb12UymguR5l4nV9HVImU%2Fa5VR%2Fg3SOO9Dg%3D%3D&checksum=332686901917c7c11047856541cc85e3e361752e6538Tesa Double Side Tape 50 mm 5 m16,89 €6,89 €https://www.amazon.de/-/en/Extra-Strong-Double-Carpet-Flooring/dp/B000QB4EIM/ref=sr_1_3?crid=2ILB4AJ8Y5L4B&keywords=Tesa%2BDouble%2BSide%2BTape%2B50mm%2B5m&qid=1693577037&sprefix=tesa%2Bdouble%2Bside%2Btape%2B50mm%2B5m%2Caps%2C98&sr=8–3&th=1Fuse 6.3A 5x20mm23,99 €3,99 €https://www.amazon.de/-/en/Glass-5x20-522–10-P%C3%A4ckchen-0–25-1–25/dp/B01AWB3Z7Q/ref=sr_1_6?crid=1J3D8ELXHGQXF&keywords=Fuse%2B6.3A%2B5x20mm&qid=1693577134&sprefix=fuse%2B6.3a%2B5x20mm%2Caps%2C77&sr=8–6&th=1Filter Adapter 3D Printed129,99 €29,99 €https://www.prusa3d.com/product/prusament-pla-pristine-white-1 kg/Radial Fan Adapter 3D Printed2Focus Tool2Cut from “Laser Window Acrylic 750x600 6 mm” left-oversRubber Rings 20 mm21,95 €3,90 €https://www.ebay.de/itm/185767312676?hash=item2b40983d24:g:IZQAAOSwerZdzVit&amdata=enc:AQAIAAAA4CXMnpOvhkR%2F3ASFc%2BQbmQDkWj9FJ9gHk%2FEoudgl453pz0LwtcqVEgnZORbNd9IpRMf7Vc6WjpQweYY89eaFuZLDXC78EOPDgUm1USZjw%2FEMS8d%2Ft0fhrj9Xe%2B89mvKb4KRquEBbG7eVcf%2F0tsjxFFohUuKHMq0Imc01tgLMqMHPkJ08ulYjk%2FJS03pVpkcKlul%2FEQ62JSRd6PSvS6Yz47bBXVEj2MvLm6%2FPXwlOSolUvAtVdTikUXXABX0NFMGhiI1zLL4uN5W1RPxwTdh3yRq99A2N%2BjBbjT5r23oqUXe3|tkp:Bk9SR5be7pHKYgOptical Paper18,90 €8,90 €https://www.amazon.de/Lens-Aid-Lens-Paper-Cleaning-Tear-Resistant/dp/B08FDLJ93Q/ref=sr_1_{1s}spa?keywords=lens + cleaning + paper&qid=1693578456&sprefix=lens + cleaning + pa%2Caps%2C86&sr=8–1-spons&sp_csd=d2lkZ2V0TmFtZT1zcF9hdGY&psc=1Wago Connectors Set128,48 €28,48 €https://www.amazon.de/-/en/Wago-clamps-pieces-assortment-consists/dp/B0846QDN1Y/ref=sr_1_17?crid=2SMVHU9N0BTMZ&keywords=wago + connector&qid=1693578690&refinements=p_85:20943776031&rnid=20943775031&rps=1&sprefix=wago + connte%2Caps%2C97&sr=8–17Cable Ties min. 150 mm 100 pieces14,69 €4,69 €https://www.amazon.de/-/en/mumbi-Cable-UV-Resistant-Protection-Professional/dp/B0BT4X7SM8/ref=sr_1_5?crid=35PLJBJ5EYI1S&keywords=cable + ties + 150 mm + x + 2.5&qid=1693578774&sprefix=cable + ties + 150 mm + x + 2.5 %2Caps%2C75&sr=8–5X AxisBall Bearing 6801411,60 €11,60 €https://www.ebay.de/itm/261661289497?hash=item3cec3a6c19:g:T40AAOSw2XFUZRiZ&amdata=enc:AQAIAAAA4BWdh%2FHABLUHJxBlqjHun007u0u3QzbWSeEw%2FUdLRjo2GJkBYozjSGJfAwWsjD5489uiqOcF%2BEObRzFDNVAr%2FC3n5af6Mq2grbhwawWt4wKRYL9QH6nBhDwaSVla1pzm3haOEYKe5nGOelDqsrIetVcoLbQWBOupO7bUXDmIO%2F4W1O%2BeVE7%2B51BWgEHP0e9xhy1QOjmgNk99KR3ZCnjhML6AXqi3Lp9KfemnaSRSZnyKNunsZgWiuUKyBRCu7U21G1QCAtFrfz7w0gs3rXbkCH5XNPNkHi0wAhIg7RpsqJhW|tkp:BFBM9vz4kspiStepper Motor 24HS39-4204D with Cable 4x0.5 mm 150 cm ground shield146,35 €46,35 €https://www.omc-stepperonline.com/de/search?search=24HS39-4204D&description=true9,00 €0,00 €https://www.ebay.de/itm/122857362393?hash=item1c9ade93d9:g:8qwAAOSw9gRaMAwX&amdata=enc%3AAQAIAAAA0L5FmiooBwUx9l0tSh%2Bnng14D5%2BDe5vE2CNBy48dGPFdJHTUxtnEw%2BNh0y%2Frvsk5fs3zZdZJdclHoH09bVA7L0%2FCF2BB1pNs13rMoQpzyOCXjLSVmuuhWmzPHLF%2FEiXnMMZ9jrn6scu03pjsp%2BuN94EX1qV1121ecgMFLbMC9C4IXJYjTbFjHlrFjphzi5Ec5PYBXYjMn4o%2FV9I%2BsF2UNM432wuQwSJgOKbH9s%2FnIZKk2bYhnzMqzjMEDp3lSvWACCG3LTv6UAk%2FJ8sTFubP7OU%3D%7Ctkp%3ABk9SR_T2npXKYgX Plate Aluminum 8 mm1102,45 €102,45 €https://shop.ibl-raimund.de/Alu/Platten/Maschinenbau-AlMg3/Aluminiumplatte-EN-AW-AlMg3-5754-Staerke-8-mm.htmlX Belt HTD 5 M 10 2075 mm161,97 €61,97 €https://www.zahnriemen24.de/a/40041-zahnriemen-meterware-5 m-pu?breite=10&offenv=2&polyamidgewebe=1&laenge=2075&quantity=1Y Linear Bearing SCE25UU Left112,21 €12,21 €https://www.dold-mechatronik.de/Linearlager-25 mm-SCE25UUY Linear Bearing SCE25UU Right112,21 €12,21 €https://www.dold-mechatronik.de/Linearlager-25 mm-SCE25UUX Linear Guide HGR15 T 850 mm148,40 €48,40 €https://www.cnc-store.eu/en/guida-hiwin-hgr15-t-c-fori-ciechi.html?search=00000605X Left Pulley HTD 5 M 28 T 9 mm19,85 €9,85 €https://www.zahnriemen24.de/a/40140-zahnscheiben-5 m?zaehnezahl=28&riemenbreite=9&bohrung=1&vorbohrungspannsatz=1&quantity=1X Right Pulley HTD 5 M 28 T 9 mm19,85 €9,85 €https://www.zahnriemen24.de/a/40140-zahnscheiben-5 m?zaehnezahl=28&riemenbreite=9&bohrung=1&vorbohrungspannsatz=1&quantity=1X Shaft 12 mm 35 mm11,60 €1,60 €https://www.dold-mechatronik.de/Praezisionswelle-12 mm-h6-geschliffen-und-gehaertet-100 mmY AxisY Shaft 25 mm 800 mm Tapped M12230,60 €61,20 €https://www.dold-mechatronik.de/Praezisionswelle-25 mm-h6-geschliffen-gehaertet-800 mm-mit-Gewindebohrungen-M12x30Y Belt HTD 5 M 15 mm 2000 mm cut to 1525 mm231,65 €63,30 €https://www.zahnriemen24.de/a/40008-zahnriemen-5 m?breite=15&laenge=2000&quantity=1Stepper Motor 24HS39-4204D with Cable 4x0.5 mm 100 cm ground shield1See “Stepper Motor 24HS39-4204D with Cable 4x0.5 mm 150 cm ground shield”Shaft 12 mm 150 mm12,40 €2,40 €https://www.dold-mechatronik.de/Praezisionswelle-12 mm-h6-geschliffen-und-gehaertet-150 mmShaft 12 mm 100 mm11,60 €1,60 €https://www.dold-mechatronik.de/Praezisionswelle-12 mm-h6-geschliffen-und-gehaertet-100 mmShaft 12 mm 1000 mm116,00 €16,00 €https://www.dold-mechatronik.de/Praezisionswelle-12 mm-h6-geschliffen-und-gehaertet-1000 mmY Motor Holder 3D Printed With Inserts M819,99 €9,99 €https://www.amazon.de/-/en/threaded-RX-M8x12-7-Threaded-Press-fit-ultrasound/dp/B085X28168/ref=sr_1_1?crid=2OR4EDMQW04R0&keywords=inserts%2Bm8%2B20%2Bruthex&qid=1693581386&sprefix=inserts%2Bm8%2B20%2Bruthex%2Caps%2C248&sr=8–1&th=1See “Filter Adapter 3D Printed”Y Belt Attacher Aluminum 6 mm4See “Head Holder Aluminum 6 mm”Y Pulley HTD 5 M 26 T 9 mm19,30 €9,30 €https://www.zahnriemen24.de/a/40140-zahnscheiben-5 m?zaehnezahl=26&riemenbreite=9&bohrung=1&vorbohrungspannsatz=1&quantity=1Y Pulley HTD 5 M 16 T 9 mm15,35 €5,35 €https://www.zahnriemen24.de/a/40140-zahnscheiben-5 m?zaehnezahl=16&riemenbreite=9&bohrung=1&vorbohrungspannsatz=1&quantity=1Y Pulley HTD 5 M 26 T 15 mm411,20 €44,80 €https://www.zahnriemen24.de/a/40140-zahnscheiben-5 m?zaehnezahl=26&riemenbreite=15&bohrung=1&vorbohrungspannsatz=1&quantity=1Y Motor Belt HTD 5 M 9 mm 305 T18,10 €8,10 €https://www.zahnriemen24.de/a/40008-zahnriemen-5 m?breite=9&laenge=305&quantity=1Pillow Block 12 mm UCPA20189,90 €79,20 €https://www.ebay.de/itm/331354351426?var=540546770082HousingFront Panel Aluminum 4 mm172,62 €72,62 €https://shop.ibl-raimund.de/Alu/Platten/Maschinenbau-AlMg3/Aluminiumblech-EN-AW-AlMg3-5754-Staerke-4-mm-oxid.htmlBack Panel Aluminum 4 mm172,62 €72,62 €https://shop.ibl-raimund.de/Alu/Platten/Maschinenbau-AlMg3/Aluminiumblech-EN-AW-AlMg3-5754-Staerke-4-mm-oxid.htmlRight Panel Aluminum 3 mm1400,21 €400,21 €https://shop.ibl-raimund.de/Alu/Platten/Maschinenbau-AlMg3/Aluminiumblech-EN-AW-AlMg3-5754-Staerke-3-mm.htmlSeparator Panel Aluminum 3 mm1Laser Panel Aluminum 3 mm1Cover Panel Aluminum 3 mm1Window Spacer Left Aluminum 3 mm1Window Spacer Back Aluminum 3 mm1Window Spacer Right Aluminum 3 mm1Sub Window Front Aluminum 3 mm1Sub Window Right Aluminum 3 mm1Sub Window Left Aluminum 3 mm1Sub Window Back Aluminum 3 mm1Inner Panel Left Aluminum 3 mm1Inner Panel Right Aluminum 3 mm1Left Panel Aluminum 3 mm1Top Panel Aluminum 3 mm1Bottom Panel Aluminum 3 mm1Front Support 3D Printed1See “Filter Adapter 3D Printed”Top Aluminum Profile 30x60 Nut 8 800 mm215,42 €30,84 €https://www.dold-mechatronik.de/Aluminiumprofil-30x60L-B-Typ-Nut-8–149 kg-m-Zuschnitt-50–6000 mmBottom Aluminum Profile 30x30 Nut 8 800 mm38,97 €26,91 €https://www.dold-mechatronik.de/Aluminiumprofil-30x30L-B-Typ-Nut-8–084 kg-m-Zuschnitt-50–6000 mmFillet Aluminum Profile 30x30 Nut 8 1145 mm112,27 €12,27 €https://www.dold-mechatronik.de/Designprofil-Aluminiumprofil-30x30L-Radius-25-B-Typ-Nut-8–078 kg-m-Zuschnitt-50–6000 mmFront Bracket 30x20x3 200 mm12,99 €2,99 €https://www.ebay.de/itm/221833745629?var=520715417225Exhaust Adapter 3D Printed1See “Filter Adapter 3D Printed”Water Connector 9–9 mm Screw 11.7 mm26,49 €12,98 €https://www.amazon.de/gp/product/B08L6V4RFH/ref=ppx_yo_dt_b_asin_title_o02_s04?ie=UTF8&th=1Air Connector Press Fit 6–6 mm1See “Air pipe 4x6mm 5 m”BedAluminum Profile 40x40 Nut 8 500 mm210,25 €20,50 €https://www.dold-mechatronik.de/Aluminiumprofil-40x40L-I-Typ-Nut-8-leicht-176 kg-m-Zuschnitt-50–6000 mmBed Bracket 40x40x3 700 mm25,23 €10,46 €https://www.ebay.de/itm/321496185505?var=510380657506Bed Lamella Aluminum 35x40x0.8 500 mm165,94 €95,04 €https://designbleche-shop.de/de/2000 mm-aluminim-winkel-silber-natur-eloxiert-246–259.htmlWindowWindow Front Profile Aluminum 20x20 599 mm13,29 €3,29 €https://www.ebay.de/itm/222004924597?var=520876544706Window Left Profile Aluminum 20x20 380 mm12,99 €2,99 €https://www.ebay.de/itm/222004924597?var=520876544706Window Right Profile Aluminum 20x20 380 mm12,99 €2,99 €https://www.ebay.de/itm/222004924597?var=520876544706Window Back Profile Aluminum 20x20 599 mm13,29 €3,29 €https://www.ebay.de/itm/222004924597?var=520876544706Laser Window Acrylic 750x600 6 mm149,15 €49,15 €https://www.ebay.de/itm/265727576896?hash=item3dde990b40:g:VW4AAOSw4BZf3kcyHinge GN 237-ZD-60–60-A-SW221,51 €43,02 €https://www.amazon.de/gp/product/B01M4O6HQ8/ref=ppx_yo_dt_b_asin_title_o02_s05?ie=UTF8&th=1Window Connector 20x20 3D Printed2See “Filter Adapter 3D Printed”Piston Support Right 3D Printed1See “Filter Adapter 3D Printed”Piston Support Left 3D Printed1See “Filter Adapter 3D Printed”Piston 100 N Length 250 Travel 80 mm20,00 €Window Handler 192 mm12,81 €2,81 €https://www.ebay.de/itm/352012618682?var=621522181952Window Angle Press Fit 20x2040,00 €Electrics / ElectronicsUSB Cable Inside12,29 €2,29 €https://www.ebay.de/itm/175584238791Resistor 1 K36,54 €6,54 €https://www.amazon.de/-/en/gp/product/B07KX37J53/ref=ppx_yo_dt_b_search_asin_title?ie=UTF8&psc=1Cable Duct 25x40 700 mm29,42 €9,42 €https://www.ebay.de/itm/175057818155Stepper Motor Driver DM556T219,99 €39,98 €https://www.amazon.de/gp/product/B093LF6LPG/ref=ppx_yo_dt_b_asin_title_o01_s00?ie=UTF8&psc=1Motor Power Supply RSP-500-48A195,57 €95,57 €https://www.omc-stepperonline.com/rsp-500–48-mean-well-504w-48vdc-10-5a-115-230vac-single-output-with-pfc-function-rsp-500–48Inductive Probe LJ12A3-4-Z/AY with cable 3x0.25 mm 320 cm + 140 cm ground shield25,99 €11,98 €https://www.ebay.de/itm/1232504305454,99 €0,00 €https://www.ebay.de/itm/183566517594?var=690941097742Window Sensor PS-3150 with cable 2x0.25 160 cm ground shield14,77 €4,77 €https://www.ebay.de/itm/174939181346Window Magnet PS-315011,10 €2,20 €https://www.ebay.de/itm/283736151360?hash=item420ffe1540:g:srwAAOSwjzleFeTWLogic Power Supply LRS-100–24122,89 €22,89 €https://www.ebay.de/itm/162929175682Laser Power Supply MYJG50W145,99 €45,99 €https://www.ebay.de/itm/403959124666?var=673838757648Window Sensor Holder 3D Printed1See “Filter Adapter 3D Printed”Cable Chain inner size 25x18 outer size 35x23 1000 mm115,00 €15,00 €https://www.ebay.de/itm/383608628106?var=652004675165Power Plug 48x28x27mm M4111,19 €11,19 €https://www.amazon.de/-/en/gp/product/B0BLJY9C2V/ref=ppx_yo_dt_b_search_asin_title?ie=UTF8&psc=1Cable Chain inner size 15x15 outer size 24x20 2000 mm129,98 €29,98 €https://www.ebay.de/itm/383608628106?var=652004675178X Chain Spacer 3D Printed1See “Filter Adapter 3D Printed”Y Endstop Holder 3D Printed1See “Filter Adapter 3D Printed”X Endstop Holder Pom 6 mm13,51 €3,51 €https://www.ebay.de/itm/333273781462?hash=item4d98aa54d6:g:1kMAAOSwLcBia62z&amdata=enc%3AAQAIAAAA4Os4HXXIS%2FrygkMMw3jrnkJ%2BIkb4XBSmDsOAZuYY7YzBJ4I3cU7CyDuz0IAdFuiES5muqpFOKeW2QfvM3SFeuDKzRt6zFw%2Ftbzmt18oTgvcN3jvEy3b2keOCtve0QH0bSUNXUPyePOwzUnN%2FlaoN5C%2FQWeNjgADnvBIPEIqq1ml9DGF8uz3ytq8xBqH%2BuqQ1YcGh39ZeyIao%2Fui%2BQz8A1a5YvqWmHofH%2B2Gakfr1orSB2UOW7bKL5m%2FDhRAsN8h%2Bz7h9M7B%2Fx4fnFu%2BOi1eHjUZ83TtDw7%2FGt1W0UISAzpT4%7Ctkp%3ABk9SR-zioqf-YgY Cable Organizer 3D Printed1See “Filter Adapter 3D Printed”Chiller Connector 3 Pole with 20 cm 2x0.25 mm cable no shield116,37 €16,37 €https://www.ebay.de/itm/334693663378?hash=item4ded4c0292:g:ciwAAOSwB4NWwImU&amdata=enc:AQAIAAAA0MneTKIiDNeIgh9tBKWYm8lTAHNxY0VMiciMwFy%2BeaSvuKE90Vq1CeIkeOiTwf%2BsQieRyw0S5kqN79oxvOWnRSIonwJ%2B4BHAkIKGdu2prdeatc8vx9s8qIIymWwpNqQtoNiAmNDZTmk2ivQIWPmOHUxETXEXYQxr3NGRMzwSZOAQSSNqnFK0OsR6cLEvfKgbDKTAxs0VlheF%2BBVTQHUOJs5ak8tsMbcj%2FXQnYKRgHweUAGJLYX1V7AypHQaSN20MRs3XlUxcXc%2BOV2gDifZjJ8Y%3D|tkp:Bk9SR-LPxKn-YgEmergency Button With Key AS22-B14215,99 €5,99 €https://www.ebay.de/itm/281817794707?var=585592937356M12x1.5 Cable gland v120,00 €Controller PCB (with Teensy 4.1 PJRC Development Board 600 MHz ARM Cortex-7 and ATtiny85-20PU ATMEL-AVR-RISC-µC 20 MHz 8 KB FLASH 2,7–5,5V DIP8)114,20 €14,20 €https://www.amazon.de/-/en/sourcing-Copper-Circuit-Laminate-Projects/dp/B09NJLP7T8/ref=sr_1_5?crid=OZVHYKMEITNO&keywords=platinen + copper&qid=1700659657&sprefix=platinen + copper%2Caps%2C100&sr=8–52,89 €2,89 €https://www.ebay.de/itm/335013554289?hash=item4e005d2871:g:1qQAAOSw4eNk8yWB&amdata=enc:AQAIAAABAIYevN60KZHPpwvkdZqefOZvub7Q%2FPSSpA63PV48yoQcVTqxeabYgisCq9MJT1jUcwsTkcm0EsR1d5AMgfsyyprZTNyHwxi6xJ3BA1MX1Yhci9rchJXeNC1VL%2FjCTUn4mKymXADdTFel5REM9qF1xcVSXIi8ebVPHDJwL959NtoNNm0xWap1BgK8IBMbwtfxNLx7EgU3uDB02rU5QyoW677YAvo2fA%2Bgvd7rQd48XwNkdh7RyPi9ukYmG5ReajekV0Zc%2FXkvfLUPeFz%2F%2Bw2FdkijizMf03XPlVxgMoki1BwPoOaJAWCTBw2ZY5sun4QP8ZagdHuiU9PyIxYx3EkNGiM%3D|tkp:BFBMzOun8_5i55,49 €55,49 €sps:xlink.href::https://www.ebay.de/itm/285549593143?hash=item427c150237:g:∼ycAAOSwA ∼ dlWs5U||xlink.type::simplePipe Holder M6 10 mm26,99 €13,98 €https://www.amazon.de/gp/product/B07VCJWP99/ref=ppx_yo_dt_b_asin_title_o09_s00?ie=UTF8&psc=1Wire Fixer6See “Filter Adapter 3D Printed”Driver Power Cable 2x1mm 60 cm ground shield21,38 €4,14 €https://www.ebay.de/itm/354345656132?var=623746616471Controller Power Cable 2x1mm 70 cm ground shield1Driver Logic Cable 4x0.5 mm 40 cm ground shield21,60 €3,20 €https://www.ebay.de/itm/354345656132?var=623746616471Laser Logic Cable 3x0.25 90 cm ground shield11,17 €1,17 €https://www.ebay.de/itm/354345656132?var=623746616471Chiller Cable 2 cores min. outer diameter 6.5 mm 2 m with 2 x chiller connectors1See “Chiller Connector 3 Pole with 20 cm 2x0.25 mm cable no shield (3 cores used)”Mains Cable AC 3x1.5 mm 25 cm111,00 €11,00 €https://www.ebay.de/itm/272663902835?hash=item3f7c08fa73:g:aJ8AAOSwt ∼ 5kcG3R&amdata=enc%3AAQAIAAABIFMIK1Z%2F%2Bq%2F%2Bxpf0BrNosj5UWHHlhZtsF1M96vmwwApZvgRCgSkveJ6wnpsTNhFnk2xVIHa4eTqQB%2BqZTRIZXEKgnx%2FGqjWEqjO%2FWIOhXz2OtkGPmwUak3h%2FO9xzJYWpsbZrkwipB0GFk5PIq7igfP%2FlVB12U3NddqLBBZYWSr%2FGQsGC9nPYc8fzKnHiqQ3U8nS7PaQLNC4cm8zIjtxt6lQqz76jzODleBlaO%2F%2BAU4%2FqzBqUyvNsYwNeIUeZ8bZE9dpPUI%2BZBKO945aLr9lQbEGkX0MhB0CRc8pK7bVUJCO7ST96L0QBiiO3ogylA8vhYBLv%2BZIJFlMubsDbz7jki8HOAY1TM3cEKdU9l5a2V%2BzSw28P3RJIOjaImutw7P4Exw%3D%3D%7Ctkp%3ABFBMmJWBqP5ihttps://www.ebay.de/itm/353772841189?var=623138129547AC Jumper 1x1.5 mm 8 cm1Earth Cable AC 1x1.5 mm 15 cm1AC Power Cable 3x1.5 mm 20 cm312,85 €12,85 €AC Extension Cable 3x1.5 mm 25 cm1Emergency Button Cable 2x1.5 mm 110 cm1Led Strip 24 V Warm White 40 cm with cable 2x0.75 70 cm + 2x0.75 230 cm222,99 €22,99 €https://www.amazon.de/gp/product/B08XLSW8C5/ref=ppx_yo_dt_b_asin_title_o01_s01?ie=UTF8&th=1LaserLaser connector (screw terminal mammut) 2 pos23,79 €7,58 €https://www.amazon.de/-/en/Connex-COXB370390-Terminal-Blocks-Pack/dp/B09446BM2V/ref=sr_1_36?keywords=terminal%2Bblock%2Bconnector&qid=1700582954&sr=8–36&th=1Laser Mirror 25 mm332,90 €98,70 €https://www.amazon.de/gp/product/B07MJLKBPM/ref=ppx_yo_dt_b_asin_title_o02_s04?ie=UTF8&th=1Laser Lens 20 mm 50.8 mm125,50 €25,50 €https://www.amazon.de/gp/product/B01EMZD262/ref=ppx_yo_dt_b_asin_title_o02_s04?ie=UTF8&th=1First Mirror Holder 25 mm127,20 €27,20 €https://www.aliexpress.com/item/1005005815933873.html?spm=a2g0o.productlist.seoads.9.32c52bd51Bx8kx&p4p_pvid=202311280845333398487926063440001537061_5&s=pLaser Tube Holder 45–80 mm224,19 €24,19 €https://www.ebay.de/itm/404517308384?hash=item5e2f1c47e0:g:taMAAOSw5ndlE7t2&amdata=enc%3AAQAIAAAA4GIhb5cXwLbbd8wkLSkGLdvDv7b3TU%2BJFtv%2FxC8Y%2BwjE27XfcVy1jnEcD0CFyzxHlV2pc0EgmGXZMSk2xdCTyOt5amj3LclVRHlPpXq4oIthy%2BfevqrM%2FLG0DZEeZTTC6XB5EDP2GycoLlOhEwypGlFuAOLJzAlX%2B7EJs8ZhWtIce6RbbPfJBGjFMvNWGWPzMYsWWLLhyfh0qbR0C2bUFuSKMfUeqyvMthZRI%2Fz7Slb7mlyw%2BEvhFqfVPKZwqoFiyQGc6N%2FHq%2Fvwaz%2F8tok2nnbcA39BCXpxLp9W8ryZnIYc%7Ctkp%3ABFBM_reVq_5iLaser Tube CO2 40 W 50x720mm166,99 €66,99 €https://www.ebay.de/itm/394206663693?var=662721051699Second Mirror Holder 25 mm128,87 €28,87 €https://www.aliexpress.com/item/1005005816007565.html?spm=a2g0o.store_pc_allProduct.8148356.1.28ae364dNihHnH&pdp_npi=4 %40dis%21EUR%21 %E2%82 %AC%2028 %2C87%21 %E2%82 %AC%2017 %2C32%21 %21 %21221.05 %21132.63 %21 %4021038edc17011901313181139e8a36%2112000034449688823 %21sh%21DE%210 %21Laser Mirror Spacer 3D Printed1See “Filter Adapter 3D Printed”Laser Head Mirror 25 Lens 20125,26 €25,26 €https://www.amazon.de/-/en/gp/product/B09R28KYRQ/ref=ppx_yo_dt_b_search_asin_title?ie=UTF8&th=1HeadHead Holder Aluminum 6 mm124,83 €24,83 €https://shop.ibl-raimund.de/index.php?cl=details&cnid=b18cba9430985474665e0bf701706904&anid=9a3c30ecccb7beda26491722425ea08a&listtype=list&&sid=7q42cd25eckae6iuhbavtaeoc2X Carriage QHH15CA1T1200Z0C126,23 €26,23 €https://www.cnc-store.eu/en/bearing-block-hgh15cazac.html?search=00000487Belt Attacher Aluminum 6 mm1See “Head Holder Aluminum 6 mm”FastenersISO 7380 M10 12 mm1614,84 €14,84 €https://www.ebay.de/itm/371775081777?var=640748904385ISO 7380 M8 10 mm389,03 €9,03 €https://www.ebay.de/itm/126065852743?hash=item1d5a1c4147:g:JS8AAOSwtQhk6JY∼ISO 7380 M5 25 mm44,33 €4,33 €https://www.ebay.de/itm/126065852743?hash=item1d5a1c4147:g:JS8AAOSwtQhk6JY∼ISO 7380 M4 10 mm374,90 €4,90 €https://www.ebay.de/itm/162259230026?var=461236651055ISO 7380 M12 20 mm411,32 €11,32 €https://malimo24.de/ISO-7380-Linsenkopfschrauben-Edelstahl-A2-M12x20-mm-25-StueckISO 7380 M8 20 mm246,38 €6,38 €https://www.ebay.de/itm/126065852743?hash=item1d5a1c4147:g:JS8AAOSwtQhk6JY∼DIN 912 M5 12 mm225,33 €5,33 €https://www.ebay.de/itm/125958291643?hash=item1d53b300bb:g:TPsAAOSwFg1kirODDIN 912 M6 16 mm84,97 €4,97 €https://www.ebay.de/itm/125958291643?hash=item1d53b300bb:g:TPsAAOSwFg1kirOD|DIN 912 M5 16 mm84,71 €4,71 €https://www.ebay.de/itm/125958291643?hash=item1d53b300bb:g:TPsAAOSwFg1kirODDIN 912 M4 16 mm44,73 €4,73 €https://www.ebay.de/itm/125958291643?hash=item1d53b300bb:g:TPsAAOSwFg1kirODDIN 912 M3 8 mm64,66 €4,66 €https://www.ebay.de/itm/125958291643?hash=item1d53b300bb:g:TPsAAOSwFg1kirODDIN985 M8346,63 €6,63 €https://www.ebay.de/itm/124269120502?hash=item1cef044bf6:g:IMgAAOSwEaZfMp4∼DIN 985 M584,36 €4,36 €https://www.ebay.de/itm/124269120502?hash=item1cef044bf6:g:IMgAAOSwEaZfMp4∼Plastic DIN 7985 M3 8 mm611,29 €11,29 €https://www.amazon.de/-/en/gp/product/B09MZ2JZY8/ref=ppx_yo_dt_b_search_asin_title?ie=UTF8&psc=1Nut 8 M8163,73 €3,73 €https://www.motedis.com/en/T-nut-guided-I-type-slot-8-M8Nut 6 M530,96 €0,96 €https://www.motedis.com/en/T-nut-with-spring-ball-with-guidance-I-Type-slot-6-M5Nut 6 M420,74 €0,74 €https://www.motedis.com/en/T-nut-with-spring-ball-with-guidance-I-Type-slot-6-M4DIN 125 M823,58 €3,58 €https://www.ebay.de/itm/124088182306?hash=item1ce43b6622:g:HTEAAOSwNkZfM44-Washer M440,371,48 €https://www.ebay.de/itm/124088182306?hash=item1ce43b6622:g:HTEAAOSwNkZfM44-ISO 7380 M8 55 mm210,55 €10,55 €https://www.ebay.de/itm/371775081777?var=640748904428DIN 985 M6125,28 €5,28 €https://www.ebay.de/itm/124269120502?hash=item1cef044bf6:g:IMgAAOSwEaZfMp4∼ISO 7380 M6 35 mm95,00 €5,00 €https://www.ebay.de/itm/126065852743?hash=item1d5a1c4147:g:JS8AAOSwtQhk6JY∼DIN 912 M3 12 mm44,55 €4,55 €https://www.ebay.de/itm/125958291643?hash=item1d53b300bb:g:TPsAAOSwFg1kirODDIN 985 M343,21 €3,21 €https://www.ebay.de/itm/124269120502?hash=item1cef044bf6:g:IMgAAOSwEaZfMp4∼DIN 7991 M8 25 mm44,50 €4,50 €https://www.ebay.de/itm/125958341983?hash=item1d53b3c55f:g:IC8AAOSwHWtlSJ-kDIN 9021 M8 Washer40,62 €0,62 €https://www.motedis.com/en/Washer-DIN-9021-for-M3-M4-M5-M6-M8-M10-and-M12DIN 912 M4 35 mm54,76 €4,76 €https://www.ebay.de/itm/125958291643?hash=item1d53b300bb:g:TPsAAOSwFg1kirODISO 7380 M8 30 mm65,29 €5,29 €https://www.ebay.de/itm/126065852743?hash=item1d5a1c4147:g:JS8AAOSwtQhk6JY∼Standoff M8 15–8 Male-Female212,20 €12,20 €https://www.ebay.de/itm/313859084521?var=612592197547DIN 912 M4 12 mm94,60 €4,60 €https://www.ebay.de/itm/125958291643?hash=item1d53b300bb:g:TPsAAOSwFg1kirODDIN 912 M4 10 mm84,72 €4,72 €https://www.ebay.de/itm/125958291643?hash=item1d53b300bb:g:TPsAAOSwFg1kirODDIN 912 M8 130 mm46,79 €6,79 €https://www.ebay.de/itm/126040022548?hash=item1d58921e14:g:uD0AAOSwhSpky1g0DIN 912 M3 6 mm54,73 €4,73 €https://www.ebay.de/itm/125958291643?hash=item1d53b300bb:g:TPsAAOSwFg1kirODDIN 7991 M8 50 mm44,80 €4,80 €https://www.ebay.de/itm/125958341983?hash=item1d53b3c55f:g:IC8AAOSwHWtlSJ-kDIN 912 M5 30 mm45,09 €5,09 €https://www.ebay.de/itm/125958291643?hash=item1d53b300bb:g:TPsAAOSwFg1kirODISO 7380 M6 16 mm24,31 €4,31 €https://www.ebay.de/itm/126065852743?hash=item1d5a1c4147:g:JS8AAOSwtQhk6JY∼ISO 7380 M8 16 mm24,42 €4,42 €https://www.ebay.de/itm/126065852743?hash=item1d5a1c4147:g:JS8AAOSwtQhk6JY∼Standoff Male Female M3 20 mm4See “Plastic DIN 7985 M3 8 mm”DIN 933 M6 16 mm14,71 €4,71 €https://www.ebay.de/itm/125956745082?hash=item1d539b677a:g:FGwAAOSwSohkdvvKDIN 933 M6 20 mm14,84 €4,84 €https://www.ebay.de/itm/125956745082?hash=item1d539b677a:g:FGwAAOSwSohkdvvKNOTE: links should be used as an example where to buy the parts, and may not be active in the future (depending on the stock availability).
Build instructions
5
The OLSK Small Laser V2 is an elaborate machine. Fig. 7, above illustrates a simplified exploded view of the different components in the design, excluding the electronic components. The machine design is inspired by previous iterations (i.e. Fabulaser Mini and OLSK Small Laser V1). Due to the complexity and number of parts and sub-assemblies, the assembly manual for OLSK Small Laser V2 is still under development; the assembly steps are therefore here presented as a workbook (Table 5), which divides the assembly in logical steps, and is the base of the web-based assembly manual described earlier. For the Electrical and electronics part, the Wiring Schematic can be followed (Fig. 10).Fig. 7. Simplified exploded view of OLSK Small Laser V2: A global view of the machine’s mechanical parts, further elaborated in the more detailed Assembly Workbook. Exploded view is based entirely on the STEP design file in “CAD OLSK Small Laser V2”.Table 5OLSK Small Laser V2 Workbook.StepStep TitleParts listTools listRemarksQtyPart nameQtyTool name****1Bottom Panel1Bottom Panel Aluminum 3 mm1Allen Key 5.0Do not tighten the screws yet for further alignment.6ISO 7380 M8 10 mm1Allen Key 4.0On the right profile, insert Nuts 6 M5 and attach it to the Bottom Panel Aluminum 3 mm, with the Cable Duct 25x40 700 mm on top.3ISO 7380 M5 12 mm1RulerPosition the Cable Duct 25x40 700 mm starting about 45 mm from the front of the machine.3Top Aluminum Profile 30x60 Nut 8 800 mm1Cable Duct 25x40 700 mm8Nut 8 M84Nut 6 M52Attach Electronics2Stepper Motor Driver DM556T1Allen Key 2.5All Stepper Motor Driver DM556T should have the terminals pointing outwards.1Laser Power Supply MYJG50W1Controller PCB4Plastic DIN 7985 M3 8 mm4Standoff Male Female M3 20 mm8ISO 7380 M4 10 mm3.1Inner Right Panel1Inner Panel Right Aluminum 3 mm1Allen Key 3.0Attach the parts before inserting the panel in the Bottom Panel Aluminum 3 mm.1Logic Power Supply LRS-100–24The Cable Glands should be turned to the inside1Motor Power Supply RSP-500-48A3DIN 912 M3 6 mm10ISO 7380 M4 10 mm2M12x1.5 Cable gland6Wire Fixers3.2Y-motor1Cable Duct 25x40 700 mm1Allen Key 3.0Fix the Y Pulley HTD 5 M 16 T 9 mm on the motor shaft aligning it to the edge, with the setscrews towards the outer side.5DIN 912 M4 10 mm1Wrench 5.5Tighten the set screws of the Y Pulley HTD 5 M 16 T 9 mm to the flat part of the motor shaft.4DIN 985 M5Insert the belt before fixing the motor on Y Motor Holder 3D Printed With Inserts M8.1Y Motor Belt HTD 5 M 9 mm 305 TFix the Cable Duct 25x40 700 mm after attaching the motor. They should not be touching each other.1Y Pulley HTD 5 M 16 T 9 mmThe cables of the motor should be pointing inside or down. Really tighten the setscrews of the Y Pulley HTD 5 M 16 T 9 mm. With loctite if possible1Stepper Motor 24HS39-4204D with Cable 4x0.5 mm 100 cm ground shield1Y Motor Holder 3D Printed With Inserts M82ISO 7380 M8 16 mm4DIN 912 M5 30 mm4Inner Left Panel and Middle Panel1Inner Panel Left Aluminum 3 mm1Allen Key 5.0The side hole of the Separator Panel Aluminum 3 mm needs to point to the left of the machine (from the front view).1Separator Panel Aluminum 3 mm2Window Connector 20x20 3D Printed4ISO 7380 M8 30 mm4DIN 985 M85Laser Panel1Laser Panel Aluminum 3 mm1Allen Key 3.0The base of the First Mirror Holder 25 mm should be fixed upside-down on the bottom of the Laser Panel Aluminum 3 mm.1First Mirror Holder 25 mm1Allen Key 4.0Use Loctite to fix the rod of the First Mirror Holder 25 mm2Laser Tube Holder 45–80 mm8DIN 912 M5 16 mm2ISO 7380 M4 10 mm6Pistons2Piston 100 N Length 250 Travel 80 mm1Wrench 13The Piston 100 N Length 250 Travel 80 mm rod should point up.2Piston Support Right and Left 3D Printed1Allen Key 5.0Insert the DIN 125 M8 between the screw and the piston.8DIN 985 M82DIN 125 M84ISO 7380 M8 20 mm2ISO 7380 M8 55 mm7Sensor Holders1Window Sensor PS-3150 with cable 2x0.25 160 cm ground shield1Allen Key 2.51Window Sensor Holder 3D Printed1Wrench 5.54DIN 912 M3 12 mm2DIN 912 M3 8 mm4DIN 985 M31Y Endstop Holder 3D Printed1Inductive Probe LJ12A3-4-Z/AY with cable 3x0.25 mm 140 cm ground shield8Back Panel1Back Panel Aluminum 4 mm1Allen Key 3.0To fit the Back Panel Aluminum 4 mm, move the machine slightly out of the table. Use a rubber hammer if necessary.2Water Connector 9–9 mm Screw 11.7 mm1Allen Key 5.0Fix the Air Connector Press Fit 6–6 mm in the left hole and the Chiller Connector 3 Pole with 20 cm 2x0.25 mm cable no shield in the right hole.1Air Connector Press Fit 6–6 mm1Wrench 13The threads of the Water Connector 9–9 mm Screw 11.7 mm should be inside1Chiller Connector 3 Pole with 20 cm 2x0.25 mm cable no shield1Rubber Hammer1Power Plug 48x28x27mm M41Wrench 191Fuse 6.3A 5x20mm6ISO 7380 M4 10 mm1Exhaust Adapter 3D Printed5ISO 7380 M8 10 mm9.1Bed Frame2Bed Bracket 40x40x3 700 mm1Allen Key 5.02Aluminum Profile 40x40 Nut 8 500 mm4ISO 7380 M8 20 mm9.2Bed Legs4DIN 912 M8 130 mm1Wrench 134DIN 985 M89.3Bed Lamella15Bed Lamella Aluminum 35x40x0.8 500 mm1Paper Cutter or ScissorsThe Bed Lamella Aluminum 35x40x0.8 500 mm should be placed with the larger side down.1Tesa Double Side Tape 50 mm 5 mFor the Bed Lamella Aluminum 35x40x0.8 500 mm, place it pointing backwards if needed.9.4Inserting the Bed4DIN 9021 M8 Washer10Front Panel1Front Panel Aluminum 4 mm1Allen Key 5.0After fixing the Front Panel Aluminum 4 mm, tighten all the Bottom Panel Aluminum 3 mm screws.6Nut 8 M8Insert the Nut 8 M8 in the outer side of the profiles, 3 units in each.3ISO 7380 M8 10 mm2Pipe Holder M6 10 mm2ISO 7380 M6 16 mm2DIN 985 M611Y-axis Guide2Y Shaft 25 mm 800 mm Tapped M121Allen Key 6.0Insert theY Linear Bearing SCE25UU in the guide before fixing it.1Y Linear Bearing SCE25UU Left1Wrench 10Work with 2 people.1Y Linear Bearing SCE25UU RightInsert the DIN 933 M6 12 mm in the Y Linear Bearing SCE25UU Right.4ISO 7380 M12 20 mm1DIN 933 M6 12 mm12.1Y-axis Motion Back 14Pillow Block 12 mm UCPA201Allen Key 6.0The Pillow Block 12 mm UCPA20 need to be fixed with the setscrews pointing left (right side of the machine looking from the front).8ISO 7380 M10 12 mm12.2Y-axis Motion Back 21Shaft 12 mm 1000 mm1LubricantFor inserting the Shaft 12 mm 1000 mm, the bearings of the Pillow Block 12 mm UCPA20 can tilt. Use some force and lubricant.2Y Pulley HTD 5 M 26 T 15 mm1Rubber HammerPulleys need to be inserted while inserting the shaft, with setscrews pointing left (right side of the machine looking from the front).4Setscrew (check if inserted in pulleys)Y Pulley HTD 5 M 26 T 15 mm1Y Pulley HTD 5 M 26 T 9 mmStart inserting the shaft from the left side of the machine.12.3Y-axis Motion Front4Pillow Block 12 mm UCPA201Allen Key 6.02Y Pulley HTD 5 M 26 T 15 mm2Setscrew (check if inserted in pulleys)1Shaft 12 mm 100 mmLeft1Shaft 12 mm 150 mmRight8ISO 7380 M10 12 mm13.1Wiring DC1Controller Power Cable 2x1mm 70 cm ground shield1Screwdriver slotted smallConnect the Window Sensor PS-3150 with cable 2x0.25 160 cm ground shield, Chiller Connector 3 Pole with 20 cm 2x0.25 mm cable no shield and Inductive Probe LJ12A3-4-Z/AY with cable 3x0.25 mm 140 cm ground shield2Driver Power Cable 2x1mm 60 cm ground shield1Screwdriver Phillips1Laser Logic Cable 3x0.25 90 cm ground shield2Driver Logic Cable 4x0.5 mm 40 cm ground shield1Resistor 1 K2AC Jumper 1x1.5 mm 8 cm2Wago Connector 2 slots1Wago Connector 5 slots13.2Wiring AC5Wago Connector 3 slots1Screwdriver Phillips1Wago Connector 2 slots1Wago Connector 5 slots1Emergency Button Cable 2x1.5 mm 110 cm1AC Power Cable 3x1.5 mm 20 cmLaser Power Supply Cable1AC Power Cable 3x1.5 mm 20 cmLogic Power Supply Cable1AC Power Cable 3x1.5 mm 20 cmMotor Power Supply Cable1AC Extension Cable 3x1.5 mm 25 cm1Earth Cable AC 1x1.5 mm 15 cm14.1Preparing the X-axis 11X Plate Aluminum 8 mm1Allen Key 4.0Push the X Linear Guide HGR15 T 850 mm to the outside to align and tighten the screws all at the same time.1X Linear Guide HGR15 T 850 mm13DIN 912 M5 12 mm14.2Preparing the X-axis 22DIN 912 M3 8 mm1Allen Key 2.5Hammer the X Shaft 12 mm 35 mm inside the X Plate Aluminum 8 mm.1X Shaft 12 mm 35 mm1Allen Key 5.0Fix the X Endstop Holder POM 6 mm in the correct position.1X Left Pulley HTD 5 M 28 T 9 mm1HammerDo not tighten the Y Belt Attacher Aluminum 6 mm attachers yet.2Setscrew (check if inserted in pulleys)1Lubricant4Y Belt Attacher Aluminum 6 mm8DIN 912 M6 16 mm1X Endstop Holder POM 6 mm1Inductive Probe LJ12A3-4-Z/AY with cable 3x0.25 mm 320 cm14.3Preparing the X-axis 31Second Mirror Holder 25 mm1Allen Key 4.0Insert the X Carriage QHH15CA1T1200Z0C carefully while removing the plastic one.1Laser Mirror Spacer 3D Printed2DIN 912 M4 16 mm1X Carriage QHH15CA1T1200Z0C15Attaching the X-axis1Cable Ties min. 150 mm 100 pieces1Allen Key 5.0Pass the X-axis through the bottom slot of the Inner Panel Left Aluminum 3 mm.8ISO 7380 M8 20 mmTighten the cable of the Inductive Probe LJ12A3-4-Z/AY with cable 3x0.25 mm 320 cm on the body of the sensor16Attaching the X-motor1Stepper Motor 24HS39-4204D with Cable 4x0.5 mm 150 cm ground shield1Allen Key 3.0The cable of the motor should point outwards4ISO 7380 M5 25 mm1Wrench 84DIN 985 M51X Right Pulley HTD 5 M 28 T 9 mm2Setscrew (check if inserted in pulleys)17Install LEDs2Led Strip 24 V Warm White 40 cm with cable 2x0.75 70 cm + 2x0.75 230 cm1Allen Key 3.0The cables of the Led Strip 24 V Warm White 40 cm should point to the holes in the Inner side panels.2Cable Ties min. 150 mm 100 piecesPass the left Led Strip 24 V Warm White 40 cm cable through the holes on the Middle and Laser Panel18Top Profiles2Top Aluminum Profile 30x60 Nut 8 800 mm1Allen Key 6.0Insert the Nut 8 M8 in the outer side of the profiles, 3 units in each.6ISO 7380 M8 10 mm19Y-belts2Y Belt HTD 5 M 15 mm 2000 mm1Large PliersTo tighten the Y Belt HTD 5 M 15 mm 2000 mm, loosen the front Pillow Block 12 mm UCPA201 first. Then fix one end of the belt with the Y Belt Attacher Aluminum 6 mm gripping the belt teeth. Pass the belt around the Y Pulley HTD 5 M 26 T 15 mm and fix the other end of the belt. Then tighten the Pillow Block 12 mm UCPA20120Install Laser Head1Head Holder Aluminum 6 mm1Allen Key 2.5The side hole of Laser Head Mirror 25 Lens 20 should point to the second mirror1Laser Head Mirror 25 Lens 204DIN 912 M4 12 mm4DIN 912 M4 10 mm21Install X-chain1Air pipe 4x6mm 5 mPass the Air pipe 4x6mm 5 m through the Cable Chain inner size 15x15 outer size 24x20 2000 mm before fixing it1Cable Chain inner size 15x15 outer size 24x20 2000 mmFix the Cable Chain inner size 15x15 outer size 24x20 2000 mm in the right position. If needed, invert the ending piece.3DIN 912 M4 35 mmFix the chain to the X-axis with cable ties, together with the Inductive Probe LJ12A3-4-Z/AY with cable 3x0.25 mm 320 cm. Position it under the X-axis.1X Chain Spacer 3D Printed3Cable Ties min. 150 mm 100 pieces1Y Cable Organizer 3D Printed3DIN 912 M4 12 mm2DIN 912 M3 8 mm22Align X-axis2Template2Template or two identical objectsAlign the X-axis using the templates as reference to set an equal distance from the Front Panel Aluminum 4 mm. Then tighten all the pulley of the Y-axis.23Insert X-belt1X Belt HTD 5 M 10 2075 mm1Allen Key 3.0After inserting theX Belt HTD 5 M 10 2075 mm around the X Right and Left Pulleys HTD 5 M 28 T 9 mm, tighten it by unscrewing the DIN 933 M6 12 in the Y Linear Bearing SCE25UU Right.1Belt Attacher Aluminum 6 mm2DIN 912 M4 16 mm2Washer M424Installing the Y-chain1Cable Chain inner size 25x18 outer size 35x23 1000 mm1Allen Key 3.0Make sure the Cable Chain inner size is 25x18 mm & outer size 35x23 mm with length being 1000 mm..6DIN 912 M5 12 mmInsert theAir pipe 4x6mm 5 m, the Probe LJ12A3-4-Z/AY with cable 3x0.25 mm 320 cm cable and the Stepper Motor 24HS39-4204D with Cable 4x0.5 mm 150 cm ground shield cables in the Cable Chain inner size 25x18 outer size 35x23 1000 mm. The segments can be opened with a flat screwdriver.25Water Pipes1Water Pipe Inside Silicon 1 m 7x10mm1Water Pipe Inside Silicon 1 m 7x10mm2Water Pipe Outside inside diameter 9 mm 2 m length2Cable Ties min. 150 mm 100 pieces26Laser Tube1Laser Tube CO2 40 W 50x720mm1CutterRemove the top part of theLaser Tube Holder 45–80 mm to insert the Laser Tube CO2 40 W 50x720mm.2Cable Ties min. 150 mm 100 piecesConnect the Water Pipe Inside Silicon 1 m 7x10mm with the Laser Tube CO2 40 W 50x720mm. Fix the connections with Cable Ties.27.1Wiring DC 22Laser connector (screw terminal mammut) 2 pos1Screwdriver slotted smallConnect the motors,Probe LJ12A3-4-Z/AY with cable 3x0.25 mm 320 cm and Led Strip 24 V Warm White 40 cm with cable 2x0.75 70 cm + 2x0.75 230 cm1Laser (−) CableConnect the Laser (+) and Laser (−) Cable and cover the terminals with a shrinking tube. Make sure the laser attachment is well fixed.27.2Cable ManagementCable Tie28.1Sub and Spacer Sides Panels1Sub Window Right Aluminum 3 mm1Sub Window Left Aluminum 3 mm1Window Spacer Right Aluminum 3 mm1Window Spacer Left Aluminum 3 mm28.2Top Panel1Top Panel Aluminum 3 mm1Screwdriver PhillipsInsert the Nut 8 M8 before placing the Top Panel Aluminum 3 mm.6ISO 7380 M8 10 mmConnect theEmergency Button Cable 2x1.5 mm 110 cm to the Emergency Button With Key AS22-B142.6Nut 8 M81Emergency Button With Key AS22-B14228.3Sub and Spacer Back Panels1Sub Window Back Aluminum 3 mm1Allen Key 5.0Fit the Sub Window Back Aluminum 3 mm and the Window Spacer Back Aluminum 3 mm under the Top Panel Aluminum 3 mm with the holes aligned.1Window Spacer Back Aluminum 3 mm1Wrench 1328.4Subpanel Front1Sub Window Front Aluminum 3 mm1Allen Key 5.06ISO 7380 M8 20 mm1Wrench 136DIN 985 M829.1Prepare the Fillet Profile1Fillet Aluminum Profile 30x30 Nut 8 1145 mm1Wrench 13Fix the Front Support 3D Printed and theFront Bracket 30x20x3 200 mm to the Fillet Aluminum Profile 30x30 Nut 8 1145 mm before fixing it to the Front Panel Aluminum 4 mm.1Front Support 3D Printed2DIN 912 M4 14 mm2Washer M42Nut 6 M429.2Attach Fillet Profile2ISO 7380 M8 20 mmDo not tighten the ISO 7380 M8 20 mm yet for further alignment.1Front Bracket 30x20x3 200 mm1Allen Key 5.02Nut 8 M84ISO 7380 M8 10 mm2DIN 985 M830.1Prepare Window 11Laser Window Acrylic 750x600 6 mm1Allen Key 4.0Laser Window Acrylic 750x600 6 mm holes are not symmetric! The profiles holes should be matched before inserting the corner connectors1Window Front Profile Aluminum 20x20 599 mm1Wrench 101Window Back Profile Aluminum 20x20 599 mm11Window Left Profile Aluminum 20x20 380 mm1Allen Key 3.01Window Right Profile Aluminum 20x20 380 mm4Window Angle Press Fit 20x2030.2Prepare the Window 29ISO 7380 M6 35 mm1Allen Key 2.59DIN 985 M62DIN 912 M4 35 mm1Window Handler 192 mm1Window Magnet PS-31502DIN 912 M3 6 mm2Hinge GN 237-ZD-60–60-A-SW4DIN 7991 M8 25 mm4DIN 985 M831Install Window1Prepared Window1Allen Key 5.0Insert theDIN 125 M8 between the piston and the DIN 9854DIN 7991 M8 50 mm1Allen Key 6.0Do not touch the surface of the mirrors.2Standoff M8 15–8 Male-Female1Wrench 132ISO 7380 M8 30 mm2DIN 125 M86DIN 985 M832Insert Mirrors3Laser Mirror 25 mm33Prepare for Calibration1Air pump Hailea ACO-3181Digital Level meterSemi-tighten the screws of the Laser Tube Holder 45–80 mm and First Mirror Holder 25 mm.1Water Chiller CW-30001CaliperTest the water.15L Distilled WaterAlign the Laser Tube Holder 45–80 mm with the caliper2Water Pipe Outside inside diameter 9 mm 2 m lengthMake sure the Laser Tube CO2 40 W 50x720mm is parallel to the frame and horizontally leveled.2Clamps (included in Water Chiller CW-3000)Pre-align visually First Mirror Holder 25 mm, Second Mirror Holder 25 mm and Laser Tube CO2 40 W 50x720mm.1Chiller Cable 2 cores min. outer diameter 6.5 mm 2 m with 2 x chiller connectors1Air pipe 4x6mm 5 m1Air pipe adapter 6–10 mm with pipe 10 mm34Laser Calibration1Power Cord (computer style) at least 2 mAlways use 2 layers tape on the mirror, and one layer to align1Masking tape35Insert Lens1Laser Lens 20 mm 50.8 mmPlace it with the flat surface down.2Rubber Rings 20 mmDo not touch the surface of the lens.1Hot Glue36Fix Top Back Panel1Cover Panel Aluminum 3 mm1Allen Key 2.56ISO 7380 M4 10 mm37Insert Side Panels1Left Panel Aluminum 3 mm1Allen Key 5.0Tighten the screws of theFront Bracket 30x20x3 200 mm and theFront Support 3D Printed.1Right Panel Aluminum 3 mmTo fix the Right and Left Panels Aluminum 3 mm, insert them in the slot of the Front Panel Aluminum 4 mm first.14ISO 7380 M8 10 mm1USB Cable Inside2Plastic DIN 7985 M3 8 mm38Install Air Filter / Radial Fan1Air Filter Airmex AM03 or similar / Radial Fan 150 mm 150 W Neverest RV-B1 or 2Exhaust hose 80 mm 1.5 m2 or 3Hose Clamps 80 mm1Foot Switch
The table below is the current workbook, and reports the main steps for the assembly of OLSK Small Laser V2.
Step 34 (Calibration) is the most delicate and sensitive assembly step. It may require great trial and error and the experience is a key factor for speeding this step. See (Fig. 8, Fig. 9).Fig. 8. Information to calibrate.Fig. 9. Steps to calibrate.
In the manual of Fabulaser Mini V2 (pages 12 and 13; pages 85 to 92) [13] are contained the following information:
- ●How to hold the mirror − page 12
- ●How to insert the mirror − page 12
- ●How to calibrate the mirror angle − page 13
- ●The laser beam overview − page 85
- ●Laser test and laser tube alignment − page 86
- ●Laser calibration − first mirror − page 87
- ●Laser calibration − second mirror − pages 88 and 89
- ●Laser calibration − head −pages 90, 91 and 92
Calibration is potentially dangerous due to the shooting of the laser without the safety feature activated. For this reason, it must be carried on carefully and with all the precautions, as reported in the assembly manual of Fabulaser Mini V2 (page 4):
- ●The laser calibration should be carried out with a minimum of 2 people: one checking the laser path and the other operating the computer
- ●Only UGS software should be running on the computer; if UGS is running too slow, another computer should be used
- ●To avoid distractions, phones should not be used and should be in silence mode
- ●Make sure to do the calibration in a room without anything flammable that could potentially set on fire
- ●The room where the calibration is carried out should not have other people inside
- ●Calibration should be performed far away from the windows, or with the windows’ blinds closed
- ●Other people should be informed about the calibration, to avoid that somebody enters the room suddenly without notice
- ●All mechanical parts should be checked to have been correctly installed. All the moving parts should be checked that can move freely
- ●All the wiring should be checked to have been correctly connected and to have been tested beforehand with the electricity power socket (220 V)
- ●Water connections should be checked to have been firmly done so that the water is flowing (to the proper direction)
- ●Water Chiller should be checked to be switched on.
- ●Transparent plastic safety goggles should always be worn
- ●Long clothes should always be worn
- ●The operators should be ready to push the emergency button if the laser stays on, or if the beam is going in the wrong direction
- ●All the Mirror Holders, the Laser Head and the Mirrors should be checked to ensure that they are installed before starting the calibration
- ●The laser tube should be checked to ensure that it is installed pointing to the correct direction; the end with a hole, through which the laser will come out, and should be pointing to the First Mirror
- ●The laser tube should be checked to ensure that is not damaged, cracked, or leaking water from any point
- ●The laser path should be checked to ensure that it is hitting the mirror(s); if not sure, something to block the laser beam from hitting anything should be used on the first test. It is recommended to use a flat wood plank.
- ●The operator should never stand in the direction of the laser beam.
- ●Only the necessary housing parts should be removed. The rest should be kept attached as a protection
- ●The machine window should always be closed to activate the window switches
- ●Tape should not be sticked to the mirror, but only to the holders
- ●Masking tape which is thick enough should be used. A single test should be performed to make sure it does not set on fire. If it is too thin, it is possible to use two overlapping pieces of tape
- ●A fire extinguisher or a bucket of water should be kept close to the machine
The Wiring Schematics in Fig. 10 shows the connections between the components of the electric/electronics components.Fig. 10. Wiring Schematics.
The wiring schematic diagram illustrates the core components of the OLSK Small Laser V2. The Laser tube is where the laser beam is generated and it is connected to the Laser Power Supply, which provides the voltage and current to excite the gas inside the tube, creating a beam. The Laser power supply energizes the laser tube and there are control signal connections running from it to the main PCB. The Motor Power Supply provides power to the stepper motors that move the laser assembly along the X and Y axes, allowing the laser beam to be precisely positioned for cutting or engraving workpieces. The Motor Drivers are connected to the Logic Power Supply and the Motor Power Supply, they receive control signals from the logic board, and help move the laser head to the desired position. The Logic Power Supply provides power to the logic circuits, which include the necessary electronics for the operation of the laser cutter. The PCB, enables the laser cutter and the computer to communicate, where data is interpreted to control the movement of the laser head. The Endstops (X and Y) are inductive probes that the moving part of the machine might activate, to let the control system know when a limit has been reached (preventing unwanted crashes, common in old proprietary laser cutter models). Similarly, the Window Sensor also monitors the opening and closing of the machine. The Chiller sensor uses water to keep the laser tube cool. The chiller sensor monitors the temperature and ensures that the laser tube does not overheat. LED strips are used for the illumination inside the machine, so that the user can see the workpiece and the laser head's path. Additionally, wire duct screws allow for the management and tidiness of the machine and the electronic chamber depicts the separation of the Electronics from where the laser cutting or engraving operations happen.
The laser cutter is driven by the Laser Controller PCB V1.7 (Fig. 11).Fig. 11. Controller PCB and its components.
The Controller PCB is composed of:
- ●A shield on which all the components are placed
- ●ATTiny 85-20PU/ATTiny 85-20PU
- ●Teensy 4.1
- ●Connectors
- ○Inductive Probes
- ○Motor Drivers
- ○USB
- ○Laser
- ○Inductive Probes Power Supply
The function of the Laser Controller PCB is to enable the communication between the laser cutter and the computer, and to drive motors and laser source to perform laser cutting and engraving jobs.
A microcontroller is an embedded system similar to a simple computer with everything integrated, which works with systems, such as sensors and actuators, in real time. The used microcontroller is the iMXRT1062 integrated in the Teensy 4.1, which is composed of a chip with Cortex ARM M7 architecture and has inside everything needed to execute the machine code (RAM memory, EPROM, Flash memory, USB…). Since it has a BGA package, the chip is hard to embed, therefore the Teensy 4.1. The Teensy is integrated in the laser cutter thanks to a customized shield (Laser Controller PCB), connected to the Teensy via pins. The Teensy is a generic board with minimum I/O, while for the OLSK Small Laser needs other connectors different from the pin headers and signal transformations. The shield provides:
- ●Connections for the motor drivers signal conversion and connections for the inductive probes (limit switches) which work at 24 V
- ●Connections for the laser power supply, where the signal is logically converted from 3.3 V to 5 V
- ●Power connections for 24 V
The ATtiny is a very simple controller which manages the connection with the laser power supply. When the controller is powered, the teensy needs time to initialize. During the initialization, the Teensy outputs are not stable, therefore the laser may be wrongly activated during the starting phase of the Teensy. To prevent this the ATtiny has a timer that makes the connection from the output of teensy to the laser power supply activated with 6 s delay from the turning on of the controller. The PCB supports ethernet via the Teensy, but in the firmware the ethernet connection is not very stable yet, so the USB connection is to be preferred. Teensy works at 3.3 V, provided by an integrated stepdown voltage regulator from 5 V given by the USB connection.
Flashing the Teensy 4.1 and the ATtiny 45
Instructions on how to flash the Teensy 4.1 and the ATtiny 45 may be found in “Electronics OLSK Small Laser V2”.
Operation instructions
6
Operation Instructions may be found in “Additional Documentation OLSK Small Laser V2”.
It is very important to take all the necessary precautions:
- ●The laser cutter should never be left unattended while working
- ●If needed, the job can be paused (the job can be resumed) or stopped (the job cannot be resumed)
- ●In case of an emergency (like fire), the emergency button should be pushed immediately: the machine will stop working promptly. The job cannot be resumed
The OLSK Small Laser V2 uses a laser beam and therefore all the precautions must be taken: no skin and eye exposure to the laser beam and attention towards possible fires.
The OLSK Small Laser V2 uses high voltage current and therefore, any access to the electrical and electronic parts and the laser tube must be performed with the machine turned off and unplugged.
Validation and characterization
7
OLSK Small Laser V2 has been used to cut cardboard, plywood, acrylic and MDF (Fig. 12).Fig. 12. Laser cut work pieces.
The OLSK Small Laser system incorporates a comprehensive suite of safety features designed to ensure secure operation. These features include:
- ●Magnetic Window Sensors: These sensors prevent laser activation when the access window is not securely closed, thereby mitigating the risk of accidental exposure to the laser
- ●Electrical System Grounding: In order to reduce the risk of electrical shock and help protect the electronic components from power surges
- ●High Voltage/Low Voltage Separation: The system's design separates high-voltage and low-voltage circuits (AC and DC), minimizing the potential for electrical interference
- ●Non-Flammable Construction: The extensive use of aluminum in the construction of the laser system reduces the risk of fire
- ●Isolated Electronics Chamber: The electronics are housed in a separate chamber to provide easy access and protect other parts from failures
- ●Emergency Stop Mechanism: An emergency button equipped with a key provides a rapid means to cease all laser operations in the event of an emergency
- ●Inductive Probes as End-Stops: Inductive probes detect the physical limits of axis movement, ensuring that motion ceases before the mechanical boundaries are breached, thus preventing damage to the machinery
- ●Water Chiller Sensor: The inclusion of a water chiller sensor allows for continuous monitoring of the cooling system's performance, which is essential for maintaining the laser's operational integrity and preventing overheating
To validate the reliability of the OLSK Small Laser, the parameters for marking, cutting and engraving were tested for poplar plywood (about 3 mm thickness, as shown in (Fig. 13).Fig. 13. Thickness of the tested plywood.
For the measurements, the Mitutoyo Digimatic Caliper (model CD-15APX) was used.
The maximum speed for the OLSK Small Laser V2 is 1000 mm/s, which corresponds to a speed value of 100 (%).
A template, shown in Fig. 14, was designed in Inkscape.Fig. 14. Test Template: SVG file; design based on Mike Murray’s template [14].
The Gcode was prepared using Visicut, as can be seen in Fig. 15.Fig. 15. Test Template: Visicut file.
Engraving
7.1
Using an engraving power of 15 %, the speed was varied between 0.25 % (2.5 mm/s) and 100 % (1000 mm/s). The dithering algorithm used was Floyd-Steinberg. See (Fig. 16).Fig. 16. Laser cut test on the left. Living hinges test on the right.
Marking and cutting
7.2
A combination of 4 different power values (25 %, 50 %, 75 % and 100 %) and speed values (ranging from 0.1 % to 10 %) were tested.
Living hinges
7.3
5 different patterns were tested for living hinges
- ●Straight line
- ○2 mm gap
- ○3 mm gap
- ○4 mm gap
- ●Parabolic
- ○3 mm spacing
- ○4 mm spacing
The kerf was tested for plywood 3 mm thick.
A simple design, composed of 10 rectangles, was drawn as shown in Fig. 17.Fig. 17. Kerf Test: SVG file.
The GCode was prepared in Visicut, using the following parameters. See (Fig. 18.
- ●Green lines, yellow lines and pink lines − cutting
- ○Speed: 1.8 %
- ○Power: 100 %
- ●Blue lines − marking
- ○Speed: 0.5 %
- ○Power: 14 % Fig. 18. Kerf Test: Visicut file.
Marking was performed first, followed by the cutting of the green lines, the cutting of the yellow lines and eventually the cutting of the pink lines. The cut parts were measured, as shown in Fig. 19, Fig. 20, Fig. 21, Fig. 22.Fig. 19. Measurement of the outer rectangle: test 1.Fig. 20. Measurement of the inner rectangles: test 1.Fig. 21. Measurement of the outer rectangle: test 2.Fig. 22. Measurement of the inner rectangles: test 2.
The kerf was calculated with the formula:
Two tests were performed:
- ●Test 1: maximum speed 10000 mm/min
The outside cut measured 100.30 mm, the sum of the inside rectangles measured 99.18 mm.
Where A = 100.29 mm, B = 99.18 and C = 11 (number of cuts).
The calculation resulted in kerf = 0.10 mm.
- ●Test 2: maximum speed 60000 mm/min
The outside cut measured 100.27 mm, the sum of the inside rectangles measured 99.16 mm.
Where A = 100.27 mm, B = 99.16 and C = 11 (number of cuts).
The calculation resulted in kerf = 0.10 mm.
The OLSK Small Laser V2 showed a consistent kerf at two different maximum speeds.
Relevant use cases
7.4
The OLSK Small Laser V2 is used mainly for the production of components and tools of the other machines of the Open Lab Starter Kit or for the replication of the OSLK Small laser V2 itself.
For example, OLSK Small Laser V2 has been used to produce:
- •Masks for the precise drilling of holes in OLSK machines components (for example, for the component “Front Bracket 30x20x3 200 mm”)
- •Focus tools
- •X Endstop Holder POM 6 mm
The decision of using OLSK Small Laser V2 resides in the ideal of self-replicating machines and in the intent to prove this concept. Furthermore, given its reliability, the company InMachines decided to use OLSK Small Laser V2 as its main laser cutter (together with LaserDuo for the production of bigger pieces, such as the window of OLSK Small Laser V2).
Laser cutters in general have been used in the production of several projects that the authors report as examples of what could be produced with OLSK Small Laser V2. See (Fig. 23, Fig. 24, Fig. 25, Fig. 26).Fig. 23. Laser cut face shield: by Christian Spieß, TROK-MEDIA.Source: https://fablab.hochschule-rhein-waal.de/Fig. 24. FabScope:Source: https://github.com/satshas/FabScope.Fig. 25. Colorimeter Kuutano [12]. a) Assembled colorimeter. b) The Colotimeter Kuutano Kit.Fig. 26. Satshacopter:Source: https://github.com/satshacopter/satshacopter-250X.
These projects include:
- ●Face masks during the COVID pandemic to cut out the polycarbonate face shields
During the COVID 19 pandemic, several makers felt involved in finding solutions to produce protective gears against the spreading of the virus. The Rhine Waal University of Applied Sciences also participated in the effort, with the release of a completely laser cuttable face shield [11].
- ●FabScope:
FabScope is a publicly available oscilloscope. The case is entirely produced using laser cutting.
The side is laser cut with a living hinge; the pattern made the MDF panel flexible.
- ●Colorimeter Kuutamo
Colorimeter Kuutamo is an Open Source colorimeter produced entirely using the laser cutting technique.
- ●Satshacopter:
Satshacopter is a publicly available quadcopter. The frame is entirely made of laser cut plywood.
Future developments
7.5
OLSK Small Laser V2 is a prototype and presents its limitations, such as:
- ●Lower usability compared to commercial machines
- ●Not being a stand-alone machine (requiring a computer to be operated)
- ●Needing 2 different programs to run an job
- ●Need of a chiller
- ●Still hard laser calibration
- ●Bigger size and higher weight in comparison of similar commercial laser cutters
The OLSK Small Laser V2, as mentioned above, is not the last iteration of this machine.
In order to produce an Open Source laser cutter with comparable usability to the latest developed commercial machines, these features are planned to be implemented:
- ●Stand-alone laser cutter: in the OLSK Small Laser V3 will be integrated an Open Source software to manage the machine; the software (OLOS − Open Lab Operating System) is currently under development and will run on a single board computer; UGS and Visicut will not be longer needed
- ●Camera: a camera to observe the cutting area will be mounted
- ●Touch screen: a large touch screen will increase usability
- ●CO_2_ Rf metal laser source: this laser source shows numerous advantages compared to CO_2_ glass pipe laser source:
- ○It is air cooled and doesn’t require the water chiller
- ○It uses a lower voltage, making itself safer than CO_2_ glass pipe laser source
- ○It has a built-in coaxial laser pointer, which makes the calibration safer and easier
- ●Servo motors instead of stepper motors: a closed loop control is implemented, the servo motors are more reliable and faster; they are smoother in motion and produce less noise
- ●Tool changer: OLSK Small Laser V3 will implement a tool changer to change laser source and to have a machine that is configurable. Sensors, autofocus and other features and functionalities are also considered for tool changer
- ●Reduced use of aluminum profiles: t-slotted aluminum profiles are not easily available everywhere and therefore a reduced amount in the next version is aimed
- ●Z-axis implemented: the Z-axis will be moved up and down for the focus of the laser
- ●Possibly CE certified
Conclusion
8
The OLSK Small Laser V2 has shown to be a reliable machine, which can be produced both industrially and in a Fab Lab or Maker Space. Great attention was given to the safety features, implementing a redundant system of sensors and switches.
Nevertheless, many improvements will be realized in the third design and prototyping iteration (OLSK Small Laser V3), to render this Open Source laser cutter safer, more user friendly and less voluminous.
CRediT authorship contribution statement
Daniele Ingrassia: Writing – review & editing, Writing – original draft, Validation, Supervision, Project administration, Methodology, Conceptualization. Gaia Di Martino: Writing – review & editing, Writing – original draft. J.C. Mariscal-Melgar: Writing – review & editing, Writing – original draft. Mohammed Omer: Writing – review & editing, Writing – original draft. Liane Sayuri Honda: Writing – original draft, Conceptualization. Luisa Lange: Writing – review & editing, Supervision. Marc Kohlen: Methodology, Conceptualization. Manuel Moritz: Writing – review & editing, Supervision. Tobias Redlich: Supervision, Project administration.
Declaration of competing interest
The authors declare that they have no known competing financial interests or personal relationships that could have appeared to influence the work reported in this paper.
The author is an Editorial Board Member/Editor-in-Chief/Associate Editor/Guest Editor for [HardwareX] and was not involved in the editorial review or the decision to publish this article.
The reference list from the paper itself. Each links out to its DOI / PubMed record.
- 1Karpuschewski B.Byrne G.Denkena B.Oliveira J.Vereschaka A.Machining Processes Grote K.H.Hefazi H.Springer Handbook of Mechanical Engineering. Springer Handbooks 2021 Springer Cham 10.1007/978-3-030-47035-7_12 · doi ↗
- 2J. Powell, The Basic Principles. In: CO 2 Laser Cutting. Springer, London (1998), doi: https://doi.org//10.1007/978-1-4471-1279-2_1.
- 3Definition (English). https://oshwa.org/resources/open-source-hardware-definition/. Accessed 02 June. 2025.
- 4Baden T.Chagas A.M.Gage G.J.Marzullo T.C.Prieto-Godino L.L.Euler T.Open labware: 3-D printing your own lab equipment P Lo S Biol.1352015 e 100217510.1371/journal.pbio.1002175 PMC 436862725794301 · doi ↗ · pubmed ↗
- 5In Machines Ingrassia. https://www.inmachines.net/open-lab-starter-kit. Accessed 10 Jan. 2024.
- 6“Fab City – Dezentrale digitale Produktion für die urbane Wertschöpfung.” dtec.bw, https://dtecbw.de/home/forschung/hsu/projekt-fabcity. Accessed 10 Jan. 2024.
- 7Open Lab Hamburg. . Accessed 10 Jan. 2024.
- 8Open Lab Hamburg. https://openlab.hamburg/en/openlabs/starterkit. Accessed 10 Jan. 2024.