Development of the European Laparoscopic Intermediate Urological Skills LUSs2 Curriculum: A Delphi Consensus from the European School of Urology
Diego M. Carrion, Loic Baekelandt, Moises Rodriguez Socarras, Willem M. Brinkman, Tiago Ribeiro de Oliveira, Giovannalberto Pini, Anna H. de Vries, Cristina E. Bujoreanu, Tomasso Silvestri, Andreas Skolarikos, Bogdan Petrut, Domenico Veneziano, Francesco Greco

TL;DR
This paper introduces a new standardized training curriculum for intermediate laparoscopic urological skills developed through expert consensus.
Contribution
The novel contribution is the creation of the first intermediate laparoscopic urology curriculum using a Delphi consensus method.
Findings
The Delphi process achieved consensus on 85% of statements regarding laparoscopic procedures.
The curriculum covers key areas like renal hilum dissection and pyeloplasty.
The LUSs2 curriculum aims to standardize training and improve surgical proficiency.
Abstract
The European laparoscopic intermediate urological skills curriculum LUSs2 is the first development of an intermediate laparoscopic curriculum in urology. The combined approach, uniting a cognitive task analysis and Delphi consensus, facilitated the creation of a robust and finely tuned surgical training curriculum with the collaborative spirit that dives into medical education led by experts. While programmes such as the European Basic Laparoscopic Urological Skills have made strides in foundational training, a significant gap exists for intermediate and advanced laparoscopy education. Our objective is to develop and validate the European laparoscopic intermediate urological skills (LUSs2) curriculum, which will establish uniformity in the training of urological laparoscopic procedures and facilitate proficiency among practitioners. The study combines a literature review, cognitive…
Genes, proteins, chemicals, diseases, species, mutations and cell lines named across the full text — each resolved to its canonical identifier and authoritative record.
Click any figure to enlarge with its caption.
 Figure 1
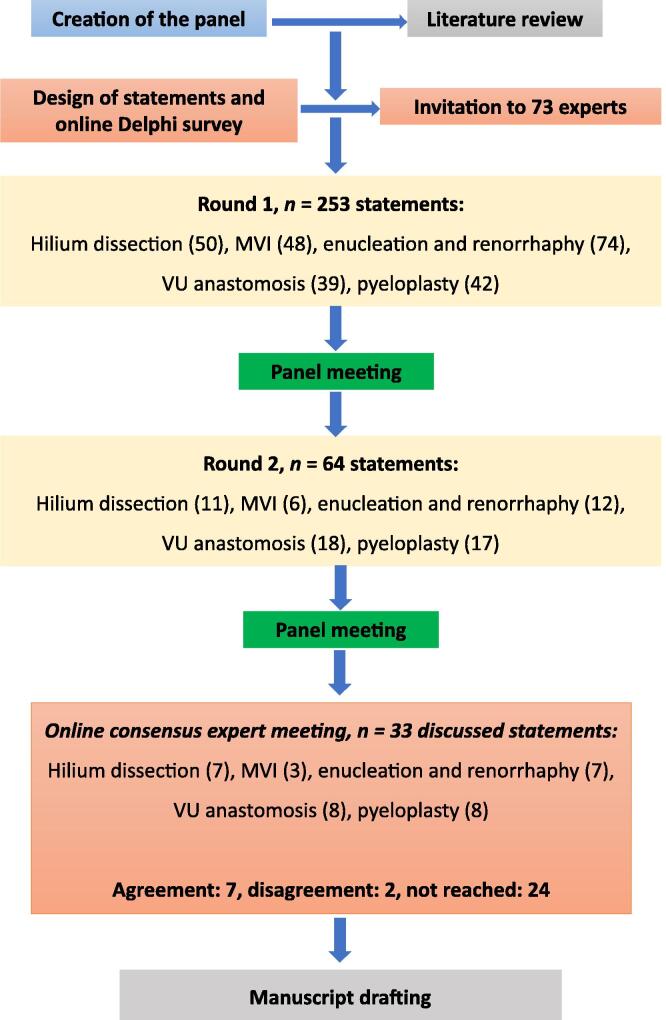 Figure 2
Peer Reviews
No public reviews on file for this paper yet. If you reviewed it on a platform where reviews are public (OpenReview, ICLR, NeurIPS, ICML), you can paste yours below so the community can read it here.
Videos
No videos yet. Explain this paper in a talk, walkthrough, or lecture? Add one.
Taxonomy
TopicsSurgical Simulation and Training · Cardiac, Anesthesia and Surgical Outcomes · Innovations in Medical Education
Introduction
1
Laparoscopic urological training and curricula
1.1
Proficiency in minimally invasive surgery, particularly in laparoscopy, is crucial for attaining surgical excellence and ensuring the best patient outcomes in urology [1]. The field’s constant evolution, marked by new technologies and surgical techniques, necessitates adaptive training methodologies. The European School of Urology’s (ESU’s) introduction of the European Basic Laparoscopic Urological Skills programme in 2011 was a significant step in this direction, but the lack of established and internationally validated curricula for intermediate and advanced laparoscopic skills is evident [2].
Benefits of standardised surgical training
1.2
The traditional Halsted model of “see one, do one, teach one” is increasingly being replaced by preoperative training models, including online materials, workshops, and training models [1]. Simulation-based training, common in high-risk professions, is particularly beneficial for rehearsing complex surgeries, allowing for skill refinement before the actual operations. This approach aligns with technological advancements and addresses the urgent need for standardised training methodologies in laparoscopic urology.
Lack of curricula and standardised training
1.3
Despite laparoscopy’s recognised role in urology, disparities in training, particularly in laparoscopic exposure, are evident [3], [4]. These disparities are more pronounced in certain regions, highlighting geographical inconsistencies in training standards [3], [4], [5]. The absence of advanced curricula underscores the need for a more structured approach to training in complex laparoscopic procedures.
Importance of consensus for surgical training
1.4
Establishing a consensus on training protocols, particularly with simulation models, is crucial [1]. A cognitive task analysis (CTA), developed initially in the military, offers a methodology for deconstructing the cognitive processes in each critical phase of a procedure [6]. Evidence suggests that a CTA-based instructional approach is superior in cultivating procedural knowledge and technical skills to conventional methods [7], [8], [9]. This study aims to develop and validate an intermediate laparoscopic urological skills curriculum to establish uniformity and facilitate proficiency in commonly performed urological laparoscopic procedures.
Methods
2
Literature review
2.1
A comprehensive nonsystematic literature review was performed according to the Preferred Reporting Items for Systematic Reviews and Meta-analyses (PRISMA) guidelines searching in PubMed/Medline, Embase, and Cochrane Library (CENTRAL and CDSR), using the combination of following keywords: “laparoscopy urology training”, “laparoscopy urology standardization”, “laparoscopy urology complications”, “renal hilum dissection”, “major vessel injury”, “renal tumour enucleation”, “laparoscopy vesicourethral anastomosis technique”, and “pyeloplasty”. The findings of the reviews provided the basis for the statements developed for voting in the Delphi survey and consensus meeting.
CTA development
2.2
A steering group of urologists involved in educational and surgical simulation activities (P.Z., T.R.O., G.P., J.G.R., H.d.V., C.B., W.B., T.S., M.R.S., and D.M.C.) within the European Association of Urology (EAU) and the ESU embarked on a series of collaborative meetings to meticulously craft a laparoscopic intermediate urological skills (LUSs2) curriculum using an in-depth CTA methodology. This curriculum involved intricate dissection of five distinct CTAs, meticulously outlining the sequential stages and essential equipment for specific tasks integral to the key laparoscopic urological surgical procedures. The specific tasks encompassed renal hilum dissection, major vessel injuries (MVIs), enucleation and renorrhaphy, vesicourethral (VU) anastomosis, and pyeloplasty.
These CTAs were initially drafted by renowned experts (renal hilum dissection: A.S., B.P., and D.V.; MVI: D.V., A.S., and F.G.; enucleation and renorrhaphy: D.V., A.S., and G.P.; VU anastomosis: R.R.T.-B., R.S.-S., and M.A.-M.; and pyeloplasty: A.S., M.A.-M., and P.Z.), with the final objective to be replicated within a hands-on training framework in simulators for training and evaluation. All steering group members meticulously reviewed and adapted all CTAs before their formal approval.
Two-round Delphi survey
2.3
Upon the competition and endorsement of the LUSs2 curriculum, our focus shifted to validation, prompting us to engage an array of international experts using the Delphi methodology. All CTAs were transformed into Delphi statements, facilitated by the online software Welphi (Welphi.com; Decision Eyes, Lisbon, Portugal). This process involved the creation of five different questionnaires, each aligned with a specific CTA, accompanied by a space for comments in each statement.
We employed a Likert scale spanning the spectrum from 1 to 9. A score of 1 represented “strongly disagree”, while 9 indicated “strongly agree”. We classified scores of 7, 8, and 9 as indicating agreement; 1, 2, and 3 as indicating nonagreement; and 4, 5, and 6 as denoting uncertainties.
The steering group agreed to define consensus as statements achieving ≥70% agreement (scores 7–9) and <10% disagreement (scores 1–3). Conversely, nonconsensus was defined when statements had ≥70% disagreement (scores 1–3) and <10% agreement (scores 7–9). The decision to use a 70% threshold was based on previous studies and research on consensus methods [10], [11], [12].
Experienced urologists in laparoscopic surgery from various sections of the EAU and different countries were invited via e-mail to participate in the Delphi consensus. To ensure the integrity of the process, participants’ identities and responses were protected, ensuring anonymity throughout the entire procedure. An experienced urologist in laparoscopic surgery was defined as a urologist with experience in the field of urological laparoscopy with significant hands-on experience with >5 yr of experience and >100 laparoscopic procedures per year, or >10 yr of experience with >50 laparoscopic procedures per year.
The first round was conducted from April 25 to May 25, 2023. The steering group analysed the results and comments, revising and resending the statements that did not reach an agreement. A second round was planned for these statements, involving a thorough review of comments and refinement to facilitate potential consensus.
The second round took place from June 26 to July 31, 2023. During this round, experts were informed of the consensus reached in the first round and the revised statements, including those with comments or edits as decided by the steering group.
Consensus meeting
2.4
Following the two rounds of the Delphi survey, statements that did not achieve consensus were presented for a vote to the expert panel during an online consensus meeting on November 22, 2023. The invited experts participated, where statements were subjected to a simple vote to determine “agreement” or “disagreement” based on the previously established >70% threshold.
Results
3
Literature review
3.1
The following question was reviewed: What is the current status of laparoscopy in urology in terms of training, standardisation, complications, and specific techniques such as renal hilum dissection, main vessel injuries, renal tumour enucleation, laparoscopic VU anastomosis, and pyeloplasty?
The selection process is outlined in the PRISMA diagram shown in Figure 1. The initial search reached 2330 records. Based on the title and abstract, 48 studies were screened, 39 were analysed in full text, and at the end of the process, 32 studies with reports were included in the qualitative analysis [13], [14], [15], [16], [17], [18], [19], [20], [21], [22], [23], [24], [25], [26], [27], [28], [29], [30], [31], [32], [33], [34], [35], [36], [37], [38], [39], [40], [41], [42], [43], [44]. Among these, 24 randomised controlled trials were identified [14], [15], [16], [17], [19], [22], [23], [24], [26], [27], [28], [29], [30], [31], [32], [33], [34], [37], [38], [39], [41], [42], [43], [44], and the included articles were used as a basis for the drafting of the statements. Twelve studies on laparoscopy urology training [13], [14], [15], [16], [17], [18], [19], [20], [21], [22], [23], [24], nine on laparoscopy urology standardisation [25], [26], [27], [28], [29], [30], [31], [32], [33], three on laparoscopy urology complications [34], [35], [36], three on renal tumour enucleation [37], [38], [44], and five on pyeloplasty [39], [40], [41], [42], [43] were identified. Articles used to define the consensus rules were not considered for analysis.Fig. 1. Preferred Reporting Items for Systematic Reviews and Meta-analyses (PRISMA) flowchart.
The literature also discusses various training methods for residents and novices, such as box trainers and simulators. Studies suggest that practice through structured training can lead to skill retention and potentially improve proficiency. However, the optimal method and the extent to which such training translates into clinical practice remain subjects of on-going research and debate.
It is evident that while the steep learning curve and effort required to achieve proficiency in laparoscopic surgery are recognised, the approaches to training vary significantly, and there is a persistent call for standardisation and improvement in training programmes.
Development of CTAs and Delphi statements
3.2
The steering group identified five complex laparoscopic tasks described in five different CTAs (Supplementary material). The essential key cognitive steps and decision-making processes of all CTAs were formulated into clear and concise Delphi statements so that the experts could evaluate and provide feedback on these. The statements were organised in a structured manner that reflected the sequence of cognitive processes involved in each task.
Two-round Delphi survey results
3.3
Figure 2 shows the Delphi consensus flowchart for the survey. Table 1 presents the characteristics of the respondents. On average, 61 experts from 17 countries participated in the Delphi consensus, including Belgium, the Netherlands, Italy, Portugal, Germany, Spain, Greece, Turkey, and the UK. The overall response rate was 84%. A detailed breakdown of the participant numbers in each Delphi round can be found in Supplementary Table 1.Fig. 2. Delphi consensus study flowchart. MVI = major vessel injury; VU = vesicourethral.Table 1. Characteristics of the participantsCharacteristics of the participantsAge (yr), mean ±47.15 ± 8.18Region/country, n (%) Italy16 (25.81) Spain12 (19.35) The Netherlands10 (16.13) Portugal4 (6.45) Romania3 (4.84) Greece3 (4.84) UK3 (4.84) Germany2 (3.23) France2 (3.23) Belgium1 (1.61) Canada1 (1.61) Georgia1 (1.61) Switzerland1 (1.61) Turkey1 (1.61) UAE1 (1.61) USA1 (1.61)Years of practice, n (%) 1–56 (9.68) 6–1011 (17.74) 11–1516 (25.81) 16–2014 (22.58) >2015 (24.19)
In total, 205, 28, and two statements reached consensus in round 1, round 2, and the consensus meeting, respectively. Overall, 235 out of 275 (85%) statements reached an agreement, and 0.7% disagreed.
Part I: hilum dissection
3.3.1
In this section, 38 of 50 (78%) statements reached agreement in the first round and four more in the second round, six statements were edited, and in the end, seven statements were discussed at the consensus meeting. The summary of statements regarding renal hilum dissection is shown in Table 2. There was an agreement regarding the usefulness of equipment such as atraumatic graspers, Maryland dissecting forceps, bulldog clamps, Hem-O-Lok clips, and suction-irrigation devices. There was also agreement that dissection can be considered complete when each vessel is sufficiently freed to safely place three Hem-O-Lok clips, a bulldog clamp, or tourniquets (in case of partial nephrectomy under warm ischaemia) with or without preservation of the adrenal gland, depending on the procedure. In the retroperitoneal approach, the Gaur balloon could be useful to create the operative field; the renal artery is the first to be identified, the psoas is the constant anatomical landmark, and the identification of the vena cava/aorta will help in easier finding of the hilum. There was no consensus on the imperative need to have instruments such as Satinsky clamp, Crawford clamp, EndoGia stapler, clips, or blood vessel sealing devices available.Table 2. Summary of the statements regarding hilum dissection that were discussed and voted in round 1, round 2, and consensus meetingRound 1Round 2Consensus meetingStatements round 1Disagree %Uncertain %Agree %StatusStatements round 2Disagree %Uncertain %Agree %StatusDisagree %Agree %Status1–34–67–91–34–67–9Hilum dissection equipment**Hilum dissection equipment1. A 5-mm atraumatic grasping forceps81676Agreement2. A 5-mm straight (Maryland) dissecting forceps132564Not reached2. pair of A 5-mm straight (Maryland) dissecting forceps51780Agreement3. A 5- or 10-mm right-angle dissecting forceps101577Agreement4. A 5-mm bipolar dissecting forceps51778Agreement5. A 5-mm blood vessel sealing device182261Not reached5. A blood vessel sealing device161669Not reached4159Not reached6. Monopolar or bipolar laparoscopic scissors161669Not reached6. Laparoscopic scissors91180Agreement7. A 5-mm endoclip applier and 5-mm clips322642Not reached7. A 5-mm endoclip applier and 5-mm clips are needed if radical nephrectomy has to be performed402535Not reached6529Not reached8. A 10-mm endoclip applier and 10-mm clips202060Not reached8. A 10-mm endoclip applier and 10-mm clips are needed if radical nephrectomy has to be performed141076Not reached2959Not reached9. Vessel loops (two different colours) for artery and vein occlusion if partial nephrectomy172360Not reached9. Vessel loops for artery and/or vein occlusion are recommended if partial nephrectomy has to be performed101773Agreement10. Two long (10 cm) and two short (6 cm) pieces of a silicone 10F catheter to use as tourniquets if partial nephrectomy313732Not reached10. Two long (10 cm) and two short (6 cm) pieces of a silicone 10F catheter to use as tourniquets if partial nephrectomy has to be performed314325Not reached2959Not reached11. Suction—irrigation device8587Agreement12. A bulldog clamp applier if partial nephrectomy with clamping6392Agreement13. Bulldog 5 mm straight and curved clamps if partial nephrectomy and clamping are required72767Not reached13. Bulldog 5-mm straight and curved clamps if partial nephrectomy and clamping are required41087Agreement14. Bulldog 10 mm straight and curved clamps if partial nephrectomy with clamping61382Agreement15. Satinsky laparoscopic clamp283438Not reached15. Satinsky laparoscopic clamp254233Not reached4147Not reached16. Crawford laparoscopic curved clamp294130Not reached16. To have a Crawford laparoscopic curved clamp275221Not reached5929Not reached17. Hem-O-Lok clips XL (in case of radical nephrectomy)6788Agreement18. EndoGia stapler with a 45–60 mm vascular cassette in case of radical nephrectomy342243Not reached18. EndoGia stapler with a 45–60 mm vascular cassette in case of radical nephrectomy422237Not reached5335Not reachedHilum dissection approach**Hilum dissection approach1. Always check images on CT or MRI first. Identify anatomy, best possible approach to the hilum, number of arteries/veins, and possible abnormalities/variations00100Agreement2. Laparoscopic hilum dissection can be done with transperitoneal approach00100Agreement3. Laparoscopic hilum dissection can be done by retroperitoneal approach0596Agreement4. In the transperitoneal approach, the optimal way to perform dissection of structures is by an ascending route61582Agreement5. Descendant or direct dissection is an alternative to the ascendant approach71085AgreementHilum dissection transperitoneal approach round 1**Hilum dissection transperitoneal approach round 21. Rise up the lower kidney pole with the nondominant hand along with the ureter and gonadal vein (left side), to expose the psoas muscle and allow easier dissection of the fatty tissue01090Agreement2. Apply vertical dissection to the fatty tissue overlying the psoas muscle71480Agreement3. While dissecting the fatty tissue, the nondominant hand is progressively repositioned, moving cranially0794Agreement4. The ureter and gonadal vein should be lifted up to allow easier and faster identification of the pedicle61185Agreement5. Cut the connective tissue, even without cauterisation112564Not reached6. Use cauterisation when cutting adhesions, after a wide dissection21386Agreement7. To ensure controlling the hilum before it bifurcates proximally to the kidney, it can be useful to move medially and search for the cava/aorta21089Agreement8. During vertical dissection of the perihilar fat, the renal vein is the first to show up in the majority of cases0299Agreement9. When the renal vein is first seen, its surface has to be considered as the new cleavage plane to be followed in order to take apart the fatty tissue and achieve a full vascular exposure0693Agreement10. A Maryland dissector can help in case of adhesions or a tight/absent cleavage plane over the vessels52570Agreement11. Once the medial face of the renal vein is exposed fully, the posterior face can be freed with an angled dissector or (in case it is not available) the Maryland dissector. Any curved instrument might be useful21485Agreement12. The renal artery is usually located posteriorly and cranially to the renal vein4889Agreement13. Check for aberrant arteries or arterial branches when you find the main renal artery, or when you work closely to the kidney and not on the level of the cava or aorta0696Agreement14. In order to facilitate the exposure of the renal artery, remember to perform effective lifting of the kidney with the nondominant hand0793Agreement15. Special care has to be taken during the dissection of the renal artery as the surrounding fat may contain small vessels that could be damaged by excessive tension2297Agreement16. In order to complete the dissection of the renal artery (posterior face), place an angled dissector between this and the vein, and open it slowly on its back41483Agreement17. The renal artery can eventually be marked by placing a vessel loop (when needed or when performing a partial nephrectomy)71085Agreement18. The dissection can be considered completed when each vessel is freed enough to safely place 3 clips, a bulldog clamp, or tourniquets (in case of a partial nephrectomy under warm ischaemia)0497Agreement19. Depending on the procedure (adrenal sparing or not), the vein might be clipped and cut above the adrenal branch (adrenal sparing) or below the adrenal branch when performing a radical nephrectomy4592AgreementHilum dissection retroperitoneal approach variations**Hilum dissection retroperitoneal approach variations1. Expand the Gaur balloon in the retroperitoneal space to create the operating field01189Agreement2. The lower kidney pole will be identified covered with the peri- and pararenal fat01486Agreement3. Lift up the lower kidney pole along with the ureter to gain access to the hilum21386Agreement4. Identification of the vena cava/aorta will help in an easier find of the hilum21781Agreement5. In the retroperitoneal approach, the renal artery is identified first, as the pedicle is dissected from the posterior side0794Agreement6. The renal artery is posterior, and the renal vein is anterior and usually caudal (inferior) to the renal artery4592Agreement7. Before beginning dissection on the renal artery or vein, the horizontal positions of the major vessels (aorta on the left side, vena cava on the right: both parallel to the psoas) and vertical pulsations of the fat-covered renal artery laterally are looked for, and almost always visualised21187Agreement8. One must remember that during renal retroperitoneoscopy, the psoas is the constant anatomic landmark.0595AgreementCT = computed tomography; MRI = magnetic resonance imaging.
Part II: MVI
3.3.2
Of the 48 statements, 44 (91%) reached agreement in the first round, 1 was edited for round 2, and two more statements were added; three statements reached agreement in round 2, and finally, three that did not reach agreement were discussed at the consensus meeting (Table 3).Table 3. Summary of the statements about the assessment, handling, and repair of venous or arterial lesions (MVI) voted in round 1, round 2, and consensus meetingRound 1Round 2Consensus meetingStatements round 1Disagree %Uncertain %Agree %StatusStatements round 2Disagree %Uncertain %Agree %StatusDisagree %Agree %Status1–34–67–91–34–67–9MVI equipment**MVI equipment1. Having a laparoscopic Satinsky clamp prepared is recommended61778Agreement2. Having a laparoscopic Crawford clamp prepared is recommended132859Not reached2. Having a laparoscopic Crawford clamp prepared is recommended111575Not reached1189Agreement3. Having laparoscopic clips with an applier prepared is recommended51086Agreement4. Having Hem-O-Lok clips (sizes M-L, L, and XL) prepared is recommended7986Agreement5. 4-0 or 5-0 Prolene sutures should be ready0398Agreement6. Pre-prepared 4-0 or 5-0 Prolene sutures with a knot at the tail and a Hem-O-Lok or Lapra-Ty clip should be ready (rescue stitch)6887Agreement7. Two needle holders should be prepared71578Agreement8. A closed suction drain should be left at the end of a surgery that required laparoscopic MVI repair102665Not reached8.1. A closed suction drain should be left at the end of a surgery that required MVI repair221861Not reached3961Not reached8.2. A drain should be left at the end of a surgery that required MVI repair8885Agreement8.2. A passive drain should be left at the end of a surgery that required MVI repair81578Agreement9. Bipolar energy devices should be prepared in case of MVI repair91775Agreement10. Ultrasound energy devices should be prepared in case of MVI repair193843Not reached10. Ultrasound energy devices should be prepared in case of MVI repair173449Not reached6139Not reachedMVI repair approach**MVI repair approach1. While experiencing a major vein injury, a quick decision should be made between ligating the vessel immediately or continuing dissection to allow better exposure51184Agreement2. While experiencing a major artery injury, a quick estimation of the injury to the circumference should be done4790AgreementMVI repair: handling and repair of venous injuries**MVI repair: handling and repair of venous injuries1. One of the first steps to control a major vein injury is compression with a gauze or clamp with an atraumatic grasper0397Agreement2. One of the first steps to control a major vein injury is to increase the pneumoperitoneum pressure to gain more time (be aware that in case of large injuries to vena cava, it is not advisable to increase pressure, as this could lead to gas embolism)51284Agreement3. Avoid further damage and remove scissors81478Agreement4. Avoid further damage and avoid applying clips without proper exposure to the bleeding vessel0298Agreement5. Immediately communicate with your assistant and localise the injured vein together0398Agreement6. The assistant should be aware of having the optic lens clean and away from the bleeding points00100Agreement7. The assistant should be aware of applying the correct amount of pressure with the suction device0299Agreement8. Communicate with the anaesthesiologist about the injury to estimate the amount of blood loss0299Agreement9. Communicate with the scrub nurse to prepare an open surgery tray0497Agreement10. Communicate with the scrub nurse to prepare extra trocars, needle drivers, Prolene sutures00100Agreement11. Plan your next steps beforehand and make sure that the entire team understands your plan and will follow it00101Agreement12. Increase gas flow to a high level (40 l/min) and pressure up to 20 mmHg (especially if you need aggressive suctioning) to gain exposure and reduce venous leakage (be aware that in case of large injuries to vena cava, it is not advisable to increase pressure, as this could lead to gas embolism)21484Agreement13. Identify the injury and explore surrounding structures to allow complete visualisation of the region0099Agreement14. For small tears in the vena cava, local pressure plus haemostatic agent application should be enough21881Agreement15. In case of a small venotomy, after adequate exposure, perform a figure-8 stitch with a Hem-O-Lok or Lapra-Ty on one side of the knot (rescue stitch)51481Agreement16. In case of a small venotomy, after adequate exposure, perform a figure-8 stitch using a suture with freehand knot tying (rescue stitch)01783Agreement17. In case of a large injury, consider a temporal clamp of the vessel proximal and distal to the injury0298Agreement18. Useful instruments for vessel clamping in large venous injuries are Satinsky clamp (12 mm trocar), curved Crawford clamp (10 mm trocar), and bulldog clams (10–12 mm trocars)0695Agreement19. After clamping a vessel in large venous injuries, consider conversion to open surgery if you find a large defect hard to manage laparoscopically0497Agreement20.In case of large venous injuries, if you find it possible, repair the injury with interrupted 4-0 or 5-0 Prolene suture7491Agreement21. It is important to ask the anaesthesiologist to temporarily lower blood pressure to 60/70 mmHg (minimal pressure to guarantee regular renal and cerebral perfusion) to allow easier control of the injury, if possible21485AgreementMVI repair: handling and repair of arterial injuries**MVI repair: handling and repair of arterial injuries1. Arterial injuries need suturing, grafting, end-to-end anastomosis, or bypassing depending on the extent of the injury2990Agreement2. Arterial lacerations need suturing with 4-0 or 5-0 Prolene suture (simple or figure-8 stitch)0991Agreement3. For injuries that encompass >30% of the circumference of the artery, a repair with vein grafts or Gore-Tex patch graphs is needed23167Not reached3. For injuries that encompass >30% of the circumference of the artery, a repair with vein grafts or Gore-Tex patch graphs is needed21979Agreement4. For injuries that encompass >30% of the circumference of the artery, ask for immediate vascular surgery assistance4592Agreement5. Complete arterial transection requires end-to-end anastomosis01685Agreement6. More complicated arterial injuries require bypassing vascular surgery01685Agreement7. An arterial repair with vein grafts or Gore-Tex patch requires mobilisation of the artery and clamping above and below the level of the injury (with either laparoscopic bulldog clamps or vessel loop tourniquets)0892Agreement8. To perform an end-to-end anastomosis in complete arterial transection, mobilisation of the artery and clamping above and below the level of the injury (with either laparoscopic bulldog clamps or vessel loop tourniquets) is required0497Agreement9. Complex injuries that require bypassing vascular surgery require mobilisation of the artery and clamping above and below the level of the injury (with either laparoscopic bulldog clamps or vessel loop tourniquets)01090Agreement10. A heparin flush should be done before closing arterial defects01982Agreement11. In any of the steps mentioned, vascular surgeon consultation may be needed2695AgreementMVI repair: urgent conversion to open surgery**MVI repair: urgent conversion to open surgery1. In case of (laparoscopic) uncontrollable bleeding, a prompt decision to convert to open surgery should be made0299Agreement2. Iodine and sterile cover should already be anticipated on a possible conversion before starting a laparoscopic procedure51283Agreement3. The patient should preferably be moved to a supine position, and a midline incision should be made for adequate exposure of major vessels depending on the surgeon's preference61579Agreement4. In case of an injury with the patient in the lateral decubitus, patient should preferably be moved to the supine position to perform a subcostal (Chevron) incision for adequate exposure of major vessels depending on the surgeon's preference62371AgreementMVI = major vessel injury.
In case laparoscopic MVI repair is needed, it is recommended that a laparoscopic Satinsky clamp, laparoscopic Crawford clamp, Hem-O-Lok clips (sizes M-L, L, and XL), two needle holders, and bipolar energy devices be prepared.
The statement regarding a closed suction drain to be left at the end of the surgery did not reach agreement in any of the rounds or consensus meetings. For round 2, two more statements were added and approved: one about leaving a drain and the other about leaving a passive suction drain.
We consider these useful advice for laparoscopists. However, there was no consensus about the need for prepared ultrasound energy devices or leaving a suction drain at the end of MVI repair.
Part III: enucleation and renorrhaphy
3.3.3
Seventy-four statements were drafted initially for this section, 67 reached consensus in round 1 (90%), five were edited, and five were added for round 2. In round 2, five statements reached an agreement, and seven were discussed in the consensus meeting.
There was consensus on the usefulness and availability of equipment such as bipolar forceps, suction-irrigation devices, monopolar scissors, needle holders, and bulldog forceps or tourniquets. In addition, there is consensus that laparoscopic enucleation and renorrhaphy can be performed transperitoneally or retroperitoneally. The preferred route should be chosen according to the location of the renal lesion and the surgeon's experience. Zero ischaemia, warm ischaemia, selective/superselective clamping, and early arterial unclamping are viable options. Furthermore, monofilament suture is recommended for inner renorrhaphy, while no consensus was obtained for the type of suture for the outer renorrhaphy. Statements about the exposure technique, tumour excision, and renorrhaphy techniques are given in Table 4.Table 4. Summary of the statements about the equipment, exposure technique, tumour excision, and renorrhaphy techniques for enucleation and renorrhaphy voted in round 1, round 2, and consensus meetingRound 1Round 2Consensus meetingStatements round 1Disagree %Uncertain %Agree %StatusStatements round 2Disagree %Uncertain %Agree %StatusDisagree %Agree %Status1–34–67–91–34–67–9Enucleation and renorrhaphy equipment**Enucleation and renorrhaphy equipment1. A 2 × 10–12 mm trocar is needed31482Agreement2. A 2–3 × 5 mm trocar is needed91577Agreement3. A 1 × laparoscopic 5 mm bipolar grasper is needed22079Agreement4. A 1 × laparoscopic 5 mm aspiration-irrigation device is needed0099Agreement5. A pair of 1 × laparoscopic monopolar scissors is needed2793Agreement6. A 1 × laparoscopic 5 or 10 mm right-angle dissecting forceps is needed192456Not reached6. A 1 × laparoscopic 5 or 10 mm right-angle dissecting forceps is needed24967Not reached4258Not reached7. A 1 × laparoscopic 5 mm Maryland forceps is needed92466Not reached7.1. A 1 × laparoscopic 5 mm Maryland forceps is needed72271Agreement7.2. A 1 × laparoscopic fenestrated grasper is needed122168Not reached2179Agreement8. A 1 × laparoscopic 10-mm Satinsky or bulldog clamp applier is needed8685Agreement9. 2 × laparoscopic 5 mm needle holders are needed10881Agreement10. A 1 × laparoscopic probe for intraoperative ultrasound is needed53262Not reached10. A 1 × laparoscopic probe for intraoperative ultrasound is needed for the evaluation of the tumour and objectifying deepness during laparoscopic enucleation and renorrhaphy02773Agreement11. A 2 × bulldog clamp or tourniquet is needed41088Agreement12. a 30° optical lens camera on the optic trocar is suggested (it could be related to the transperitoneal or retroperitoneal approach)71282Agreement13. Optional: advanced sealing system can be helpful82170Agreement14. Barbed sutures are needed202060Not reached14.1. Barbed sutures are recommended for inner renorrhaphy161669Not reached5842Not reached14.2. Barbed sutures are recommended for outer/capsular renorrhaphy162755Not reached4753Not reached14.3. Polyglactin (Vicryl) is recommended for inner renorrhaphy162359Not reached6337Not reached14.4. Polyglactin (Vicryl) is recommended for outer/capsular renorrhaphy132759Not reached4753Not reached14.5. Monofilament is recommended for inner renorrhaphy71678Agreement15. CT-1, 36, 1/2C, Taperpoint, 0, polyglactin (or monofilament PDS) 20–25 cm is needed102268Not reached15. Monofilament is recommended for outer/capsular renorrhaphy302941Not reached2674Agreement16. CT-2, 26, 1/2C, Taperpoint, polyglactin (or monofilament PDS), 2/0, 20 cm is needed22772Agreement17. Nonabsorbable or absorbable clips and clip applier are needed for laparoscopic enucleation and renorrhaphy0595Agreement18. Haemostatic agents in some cases are needed for laparoscopic enucleation and renorrhaphy21189AgreementEnucleation and renorrhaphy planning and approach**Enucleation and renorrhaphy planning and approach1. Preoperative planning based on imaging is mandatory before laparoscopic enucleation and renorrhaphy to check dimension, shape, exophytic/endophytic proportions, distance from calyces, nearness to other structures, and other abnormalities00100Agreement2. Laparoscopic enucleation and renorrhaphy can be done via a transperitoneal approach0099Agreement3. Laparoscopic enucleation and renorrhaphy can be done via a retroperitoneal approach0991Agreement4. The preferred approach should be chosen in accordance with the location of the renal lesion and the experience of the surgeon00100Agreement5. Zero ischaemia is a viable option during laparoscopic enucleation and renorrhaphy4989Agreement6. Warm ischaemia is a viable option during laparoscopic enucleation and renorrhaphy0299Agreement7. Selective or superselective clamping (with or without fluorescence) is a viable option during laparoscopic enucleation and renorrhaphy0695Agreement8. Early arterial unclamping is a viable option during laparoscopic enucleation and renorrhaphy0793AgreementEnucleation and renorrhaphy: tumour exposition and excision**Enucleation and renorrhaphy: tumour exposition and excision1. Follow the same passage and technique of hilum dissection after thoroughly analysing the CT for arterial vasculature0596Agreement2. Secure artery/arteries with a vessel loop with Hem-O-Lok62272Agreement3. Open Gerota’s fascia near the location of the lesion5887Agreement4. Make a first incision on the perirenal fat, near the location of the lesion81478Agreement5. Follow the cleavage plane between capsule and fat until the border of the tumour/adipose tissue covering the tumour (if the tumour is exophytic)0397Agreement6. In case of endophytic masses, the borders of the tumour are identified with US intraoperative guidance after defatting0497Agreement7. Complete exposure and defatting of kidney surface except for fat overlying the tumour0693Agreement8. Mark the resection line all around the tumour edge according to the endoscopic/intraoperative US appearance of the tumour2792Agreement9. Mobilise the kidney as much as needed2495Agreement10. Time out: take a minute to check that everything is ready: bulldog clamps or Rummel tourniquet, needle drivers, sutures (type and length, ready prepared), endoclips (Hem-O-Lok or similar)0299Agreement11. In case of large masses, clamping can be applied after marking the resection line00100Agreement12. In case of small masses, clamping can be evaluated during enucleation according to the surgeon's experience and ability to control bleeding adequately, thus providing a clean working area3295Agreement13. Communicate with the anaesthesiologist for the ischaemia time; start and stop to be documented0099Agreement14. Throughout the procedure, the assistant will provide a clean field by using suction, rinsing/flushing saline when needed, and/or pressing down any bleeding points0496Agreement15. With nondominant hand gently lift the perirenal fat overlying the tumour, and with dominant hand make a sharp incision on the renal capsule 2/3 mm away from the border of the tumour0794Agreement16. Widen the first sharp incision up to overall 5 mm, to allow easier identification of the tissues01188Agreement17. Search for colour difference compared with the surrounding kidney parenchyma (whitish/yellowish), cleavable plane0992Agreement18. Pay attention to complex cysts to avoid any type of traction, and generally an enucleoresection should be preferred in these cases0396Agreement19. Produce countertraction between tumour (nondominant hand) and parenchyma (dominant hand) to identify and follow the correct cleavage plane, and to avoid inadvertent rupture of tumour pseudocapsule0298Agreement20. In case of enucleation, the surgeon will provide dissection as close as possible to the tumour pseudocapsule by a blunt and sharp technique2099Agreement21. Inadvertent cut or entry into the tumour should be recognised by the effluence of necrotic/oncotic material, and/or the more yellowish tissue emerging into the dissecting plane0794Agreement22. Cutting the pelvicalyceal system will be recognised by the effluence of urine in the operating field51975Approved23. In order to readjust the plane between the renal parenchyma and the tumour correctly, you should step back (with the camera and the instruments) a few millimetres from the wrong plane, identify the normal parenchyma, and dissect either superiorly or inferiorly to the correct plane0298Agreement24. Visible bleeding vessels and incidental opening of the collecting system are ligated with running capsular suture with different stitches (polyglactin, CT-2, 26, 1/2C, taper-point needle, PDS, or Prolene)41780Agreement25. Early arterial unclamping could be attempted at this time in order to decrease warm ischaemia time and help identify bleeding points21287AgreementEnucleation and renorrhaphy: renorrhaphy technique**Enucleation and renorrhaphy: renorrhaphy technique1. To close the defect: one layer in cortical small defects4692Agreement2. To close the defect: two layers in deeper defects (inner renorrhaphy for vessels)21584Agreement3. To close the defect: three layers in which the collecting system is closed separately92567Not reached3. To close the defect: three layers in some particular cases with complex lesions and deep defect of parenchyma in which the collecting system is closed separately41680Approved4. There are different renorrhaphy techniques0298Agreement5. In some cases, the renorrhaphy could be avoided with a sutureless technique. In this situation, coagulation and biological haemostatic agents are used132068Not reached5. In some particular conditions (small masses, poorly vascularised), the renorrhaphy could be avoided with a sutureless technique. In this situation, coagulation and biological haemostatic agents are used61085Approved6. A CT-1 ½ circle needle polyglactin/PDS suture (or barbed suture) is prepared on the back table by applying a Hem-O-Lok clip to the end with a prefixed knot at the free end of the suture, and the clip is applied just in front of the knot preventing slipping. The suture must be fixed exactly at the centre of the clip, and perpendicularly, this area exerts more firmly and distributes the force01288Agreement7. (At the end of the external renorrhaphy) As the renal parenchyma is reapproximated, internal renorrhaphy may loosen. At this point, traction on both tails (one at a time) of the internal renorrhaphy line will expose the knot of the suture and the clip applied on each site2792Agreement8. Another nonabsorbable clip is then applied above these (on its corner, we call it the “locking” nonabsorbable clip), in close proximity to the renal capsule, in order to reinforce the internal renorrhaphy01387AgreementEnucleation and renorrhaphy: running-sliding clip technique**Enucleation and renorrhaphy: running-sliding clip technique1. The recommended length of the suture is 18–20 cm, depending on the size of the defect01289Agreement2. Based on individual anatomy, two such sutures should be prefixed and ready for use0991Agreement3. The suture is passed through the renal capsule at the edge of the nephrothomy, from the renal parenchyma outside to the renal “bed” inside. The renal bed is sutured over and over to seal any bleeding vessels or any opening of the pelvicalyceal system. The suture is finally pulled out from the renal bed inside to the renal parenchyma outside at the opposite edge of the nephrothomy0298Agreement4. The suture line is locked by the appliance of a nonabsorbable clip at the exterior part of the suture in contact with the surface of the renal parenchyma2396AgreementEnucleation and renorrhaphy: interrupted mattress sliding technique**Enucleation and renorrhaphy: interrupted mattress sliding technique1. The recommended length of the suture is 10–12 cm32274Agreement2. Mattress sutures: The first suture is passed through the renal capsule at the edge of the nephrothomy, from the renal parenchyma outside to the renal “bed” inside. Next, a separate bite of the renal bed is taken, to seal any bleeding vessels or any opening of the pelvicalyceal system, and the suture is passed from inside out to the opposite site of the renal parenchyma. The thread of the suture is locked with a new Hem-O-Lok clip, but the suture is not tightened at this moment and left loose instead. Several such sutures are placed alongside the surface area needed to be reapproximated and remain loose32076Agreement3. When all the sutures have been placed, start tightening them one by one by pulling the suture and pressing the Hem-O-Lok clip at the thread of the suture, and also at the tail of the suture against the renal parenchyma so as to reapproximate the inner parenchyma and “lock” the sutures. Repeat the same procedure for all the sutures of the internal renorrhaphy51778AgreementEnucleation and renorrhaphy: external renorrhaphy running-sliding technique**Enucleation and renorrhaphy: external renorrhaphy running-sliding technique1. The recommended length of the suture is 18–20 cm4790Agreement2. The suture is then passed through the renal capsule perpendicularly and pulled to the desired tension2792Agreement3. A second Hem-O-Lok clip secures it snugly against the opposing renal capsule with the aid of a right-angle forceps21485Agreement4. In preparation for the next throw, a new Hem-O-Lok clip is applied 1.5 cm proximal to the second set of clips21287AgreementEnucleation and renorrhaphy: external renorrhaphy interrupted mattress sliding technique**Enucleation and renorrhaphy: external renorrhaphy interrupted mattress sliding technique1. The recommended length of the suture is 12–15 cm21683Agreement2. The suture is then passed through the renal capsule perpendicularly and pulled to the desired tension2890Agreement3. A second Hem-O-Lok clip secures it snugly against the opposing renal capsule with the aid of a right-angle forceps21682Agreement4. The suture is then cut, the needle is removed, and another separate prefixed suture is passed through the renal capsule in a 3–5 mm width distance from the entrance of the previous suture21980AgreementCT = computed tomography; USA = ultrasound.
Part IV: VU anastomosis
3.3.4
Thirty-nine statements were initially proposed; 24 reached agreements (61%) in round 1. Four statements were edited for round 2, and three new statements were added. Round 2 included 18 statements, of which ten reached agreement. The remaining eight statements were discussed in the consensus meeting, and none reached an agreement.
Regarding the required equipment, it was agreed that at least one needle holder is recommended for laparoscopic VU anastomosis and one 18-20F Foley catheter is needed for laparoscopic VU anastomosis. In addition, two unidirectional or one bidirectional barbed suture may be useful for laparoscopic VU anastomosis. It was agreed that knots should be done and kept outside the urethral lumen, and to inflate the balloon and test the integrity of the anastomosis by filling the bladder with 150 ml saline is useful at the end of the procedure. The VU anastomosis technique statements are available in Table 5. There was no consensus on the ideal needle for VU anastomosis.Table 5. Summary of the statements regarding vesicourethral anastomosis voted in round 1, round 2, and consensus meetingRound 1Round 2Consensus meetingStatements round 1Disagree %Uncertain %Agree %StatusStatements round 2Disagree %Uncertain %Agree %Do not perform the procedureStatusDisagree %Agree %Status1–34–67–91–34–67–9Vesicourethral anastomosis equipment**Vesicourethral anastomosis equipment1. One pair of monopolar scissors is needed161074Not reached1. One pair of monopolar scissors is recommended to cut the threads8587Agreement2. Two needle holders are needed131472Not reached2. At least one needle holder is recommended2693Agreement3. One 5 mm straight (Maryland) dissecting forceps is needed92170Not reached3. One 5 mm straight (Maryland) dissecting forceps is recommended72469Not reached5644Not reached4. One 18-20 Fr Foley catheter is needed0596Agreement4.2. One fenestrated grasper is needed243344Not reached5644Not reached5. Two twin 3-0 poliglecaprone-25 sutures on a CT-1 needle that are tied together on the two ends are needed92366Not reached5. Two twin 3-0 poliglecaprone-25 sutures that are tied together on the two ends are needed71478Agreement6. Alternatively, two polyglactin sutures on a CT-1 needle that are tied together on the two ends are needed112662Not reached6. Two polyglactin sutures on a CT-1 needle that are tied together on the two ends are needed101574Not reached6139Not reached7. Alternatively, two unidirectional or one bidirectional barbed suture is needed4394Agreement8. A suture with a 1/2 circle 26 mm needle is needed103060Not reached5050Not reached9. A suture with a 5/8 circle 26 mm needle is needed152559Not reached5050Not reachedVesicourethral anastomosis procedural step 1**Vesicourethral anastomosis procedural step 11. Prepare a 12–20 cm suture, depending on the width of the bladder neck01485Agreement2. If the bladder neck is wide: start reconstruction by closing the two corners with a figure of 8 suture in order to create a fish mouth, or with an anterior or posterior bladder closure51282Agreement3. Ask for a perineal push. The manoeuvre will expose urethral stump and urethral mucosa01584Agreement4. Place both needles outside in through the bladder neck and inside out through the urethra, the right needle from the 5:30 o’clock towards the 3:00 o’clock position and the left needle from the 6:30 o’clock towards the 9:00 o’clock position21682Agreement5. Pull the sutures with gentle traction on each thread (simultaneously or alternatively) in order to bring the bladder neck adjacent to the urethra without leaving a gap within the dorsal part of the anastomosis0892Agreement6. Avoid tearing the urethra by pulling the suture gently, upwards or laterally, and having the suture pass between the two jaws of the open needle holder placed adjacent to the urethra0595Agreement7. Place a 18-20 Fr Foley catheter into the bladder5886Agreement8. Pass the sutures outside in on the bladder neck and inside out on the urethra, running from the 6:30 and 5:30 o’clock positions towards the 10:00 and 2:00 o'clock positions, respectively01189Agreement9. Check the integrity of the ureteral orifice before start and avoid catching ureters in the bladder neck0497Agreement10. After each urethral stitch, the catheter needs to be mobilised gently in order to rule out inadvertent fixation2792Agreement11. Continue the sutures to the 12:00 o'clock position0397Agreement12. Place a new 18-20 Fr Foley catheter through the anastomosis21979Agreement13. Tie the sutures to each other so that the knot rests on the exterior of the bladder (unless a barbed suture is used, these do not require a knot to lock)4494Agreement14. Perform an anterior tennis-racket suture if there is a mismatch between the bladder and the urethra21089Agreement15. Inflate the balloon and test the integrity of the anastomosis by filling the bladder with 150 ml saline0990AgreementVesicourethral anastomosis procedural step 2**Vesicourethral anastomosis procedural step 21. Prepare a 15 cm absorbable suture52570Not reached1. Prepare a 15-cm absorbable suture1.820.277.78Agreement2. Pass the needle at the 9:00 o’clock position outside in on the bladder neck and at the 9:00 o’clock position inside out on the urethra and tie the suture into a knot with the suture tail72372Agreement3. Pass the needle at the 11:00 o’clock position outside in on the bladder neck and at the 7:00 o’clock position inside out on the urethra92468Not reached3. Pass the needle at the 11:00 o’clock position outside in on the bladder neck and at the 7:00 o’clock position inside out on the urethra015.381.412Agreement4. Pass the single suture continuously at the 1:00 o’clock position on the bladder neck, at the 5:00 o’clock position on the urethra, at the 1:00 o’clock position on the urethra, at the 7:00 o’clock position on the bladder neck, and at the 11:00 o‘clock position on the urethra102268Not reached4. Pass the single suture continuously at the 1:00 o’clock position on the bladder neck, at the 5:00 o’clock position on the urethra, at the 1:00 o’clock position on the urethra, at the 7:00 o’clock position on the bladder neck, and at the 11:00 o’clock position on the urethra1.919.178.712Agreement5. Place a 18-20 Fr Foley catheter into the bladder and tie the knot with the suture tail at the 9 o’clock position (unless a barbed suture is used, these do not require a knot to lock)81972Agreement6. Inflate the balloon and test the integrity of the anastomosis by filling the bladder with 150 ml saline41482AgreementVesicourethral anastomosis procedural step 3**Vesicourethral anastomosis procedural step 31. Prepare a 15 cm absorbable suture62766Not reached1. Prepare a 15 cm absorbable suture1.818.479.68Agreement2. Place the first suture inside out on the urethra and outside in on the bladder neck at the 5:00 o’clock position132958Not reached2. Place the first suture inside out on the urethra and outside in on the bladder neck at the 5:00 o’clock position5.520.373.98Agreement3. Tie the suture inside the urethral lumen192952Not reached3. Tie the suture inside the urethral lumen16.325.4587Not reached7222Not reached4. Place the second suture inside out on the urethra and outside in on the bladder neck at the 7:00 o’clock position123654Not reached4. Place the second suture inside out on the urethra and outside in on the bladder neck at the 7:00 o’clock position5.428.965.37Not reached3361Not reached5. Tie the suture inside the urethral lumen212752Not reached5. Tie the suture inside the urethral lumen19.918.161.77Not reached6728Not reached6. Place four sutures symmetrically at the 4:00, 8:00, 2:00, and 10:00 o’clock positions outside in on the urethra and inside out on the bladder neck62766Not reached6. Place four sutures symmetrically at the 4:00, 8:00, 2:00, and 10:00 o’clock positions outside in on the urethra and inside out on the bladder neck7.219.972.57Agreement7. Tie the sutures outside the urethral lumen82171Agreement8. Place the final 2 sutures outside in on the urethra and inside out on the bladder neck at the 11:00 and 1:00 o’clock positions92466Not reached8. Place the final 2 sutures outside in on the urethra and inside out on the bladder neck at the 11:00 and 1:00 o’clock positions7.21874.47Agreement9. Place a 18-20 Fr Foley catheter into the bladder61381Agreement10. Tie the final sutures outside the urethral lumen61678Agreement11. Inflate the balloon and test the integrity of the anastomosis by filling the bladder with 150 ml saline61876Agreement
Part V: pyeloplasty
3.3.5
Forty-two statements were drafted initially, 32 were approved in round 1 (76%), seven were edited, and ten were added for round 2; after round 2, six statements were approved, and ten were discussed in the consensus meeting (Table 6).Table 6. Summary of the statements regarding pyeloplasty voted in round 1, round 2, and consensus meetingRound 1Round 2Consensus meetingStatements round 1Disagree %Uncertain %Agree %StatusStatements round 2Disagree %Uncertain %Agree %StatusDisagree %Agree %Status1–34–67–91–34–67–9Pyeloplasty equipment**Pyeloplasty equipment1. A Gaur balloon dilator is needed if retroperitoneal access is planned52173Agreement2. Veress or Hasson techniques should be used for transperitoneal access as well as direct vision trocar9984Agreement3. Two 10 mm trocars are required261657Not reached3.1. Besides the optic trocar, another 2 trocars are needed (2 × 10 mm trocars)282151Not reached3.2. Besides the optic trocar, another 2 trocars are needed (1 × 5 mm and 1 × 10 mm trocars)71777Agreement3.3. Besides the optic trocar, another 2 × 10mm trocars and 2 × 5 mm trocars are needed502327Not reached4. Two 5 mm trocars are required (one trocar is mandatory, the other optional)21880Agreement5. A 30° laparoscopic camera is recommended121573Not reached5.1. A 30° laparoscopic camera is recommended101081Agreement5.2. A 0° laparoscopic camera is recommended313732Not reached6. One 5 mm atraumatic grasping forceps is required21186Agreement7. One Maryland grasper is required71380Agreement8. Two needle holders are required151668Not reached8. At least one needle holder is recommended.10289Agreement9. One pair of monopolar scissors is required4295Agreement10. One bipolar forceps is required2792Agreement11. One vessel sealing device can be used—optional201665Not reached11. One vessel sealing device can be used—optional11781Not reached694Agreement12. 4-0 polyglactin suture (on a 26 mm blunt or RB 1 needle) is required72864Not reached12.1. 4-0 polyglactin suture is recommended41879Agreement12.2. A 1/2 circle 26 mm needle is recommended82171Agreement12.3. A 5/8 circle 26 mm needle is recommended244137Not reached6139Not reached13. 4-0 monofilament suture is required41581Agreement14. One suction-irrigation device is required0793Agreement15. One suction drain is required141968Not reached15.1. A drain is recommended11682Not reached2872Agreement15.2. A passive drain is recommended112069Not reached2872Agreement15.3. A suction drain is recommended411741Not reached8911Disagreement16. A 4.8 or 6 French 24–28 cm double-J stent with a nitinol hydrophilic guidewire is required2098AgreementPyeloplasty procedural steps**Pyeloplasty procedural steps1. Cystoscopy and retrograde pyelography with double-J stent insertion is optional prior to laparoscopic pyeloplasty232353Not reached1. Cystoscopy and retrograde pyelography with stent insertion is optional prior to laparoscopic pyeloplasty181864Not reached2179Agreement2. Three (to five) laparoscopic trocars are placed after obtaining pneumoperitoneum respecting triangulation principle01090Agreement3. The periumbilical port (usually pararectal) is used for the insertion of the laparoscope in transperitoneal approach01090Agreement4. Retroperitoneal approach needs balloon dilatation to create the working space for pyeloplasty72666Not reached4. Balloon dilation to create the working space for pyeloplasty is recommended for the retroperitoneal approach22078Agreement5. A prestented ureter is easier to identify due to its rigidity, and presenting is recommended363034Not reached5. Stenting should be done before pyeloplasty432828Not reached8911Disagreement6. A good exposure of the UPJ is recommended with cephalic dissection of the proximal ureter towards the pelvis0696Agreement7. The ureter and the renal pelvis are identified and dissected from the surrounding tissues in order to (a) gain length for the anastomosis, (b) reduce its size, and (c) transpose it over crossing vessels00100Agreement8. 4-0 polyglactin or monofilament stay suture is placed in the anterior portion of the upper ureter101673AgreementDismembered pyeloplasty (Anderson-Hynes)Dismembered pyeloplasty (Anderson-Hynes)1. The ureter is spatulated on the lateral side: an incision is made in the ureter for 2–3 cm on craniocaudal (posterior posterolateral) border2890Agreement2. The diseased UPJ is excised and redundant tissue is excluded; a small flap can remain until the end of the procedure for traction2395Agreement3. The anastomosis should be tension free and knots should be outside the UPJ lumen2099Agreement4. Suture with 3 mm bites of tissue, 3 mm apart for nonischaemic watertight anastomosis01288Agreement5. When a two–running suture technique is used, start by creating the posterior wall of the anastomosis by running the first stitch outside in on the ureter and inside out on the pelvis4988Agreement6. After having the double-J stent placed properly, the anterior part of the anastomosis is performed with the second stitch using the same principles0298Agreement7. At the end of the suture line, the stitch should lie at the outside part of the pelvic wall and the two stitches (anterior and posterior) are sutured together6689Agreement8. Place one stay suture at the spatulated ureter and one stay suture at the anterior part of the renal pelvis52075Agreement9. The following steps are the same as for the running technique (posterior wall, double-J stent insertion, anterior wall), but with interrupted sutures21187Agreement10. The anastomosis is finished alongside the ureteral spatulation length. A three-point suture (renal pelvis out in, ureter in out in, renal pelvis in out) can be used at the end32373AgreementFoley Y-V plastyFoley Y-V plasty1. Outline a widely based triangle of a V-shaped flap and placement of stay suture on its border, with the base of the V-shaped flap on the medial aspect of the renal pelvis and the tip of the V shape flap at the UPJ72172Agreement2. Incision of the apex of the flap along the lateral border of the proximal ureter into the normally calibrated ureter52075Agreement3. Placement of a double-J stent3790Agreement4. Approximation of the apex of the flap to the inferior aspect of the ureterotomy incision31483Agreement5. Approximation of the posterior walls with interrupted or running suture71281Agreement6. Anastomosis of the anterior walls51283Agreement7. A double-J stent is passed through one of the trocars following the initially placed nitinol hydrophilic guidewire and advanced into the ureter and urinary bladder4888Agreement8. The correct placement of the double-J stent should be confirmed by fluoroscopy (laparoscopic surgery) or flexible cystoscopy, or by instilling a dye into the bladder251856Not reached8. The correct placement of the double-J stent should be confirmed by fluoroscopy (laparoscopic surgery) or flexible cystoscopy, or by instilling a dye into the bladder251560Not reached4159Not reachedUPJ = ureteropelvic junction.
About the equipment required, it was agreed that Maryland grasper, monopolar scissors, bipolar forceps, and a suction device are needed; at least one needle holder is recommended; and a balloon dilator is needed if retroperitoneal access is performed. Regarding the procedural steps, a good exposure of the ureteropelvic junction (UPJ) with cephalic dissection of the proximal ureter towards the pelvis is recommended, the diseased UPJ is removed, and redundant tissue is excluded. However, a small flap may remain until the end of the procedure for traction. The anastomosis should be tension free, and the knots should be outside the lumen of the UPJ. There was no consensus that the correct placement of the JJ stent should be confirmed by fluoroscopy, flexible cystoscopy, or instilling a dye into the bladder.
Consensus panel expert meeting
3.4
In the online consensus expert panel meeting, 33 statements were discussed to find “agreement” or “disagreement”. Nineteen experts participated in the meeting and voted; seven statements (21%) reached an agreement. Two statements, both in the pyeloplasty section, were in >70% disagreement: “a suction drain is recommended” and “stenting should be done before pyeloplasty”.
Discussion
4
This study is the first of its kind, focusing on developing an intermediate laparoscopic urological skills curriculum known as LUSs2. Our group utilised a unique approach based on CTAs to meticulously describe the necessary equipment, the step-by-step technique, and the resolution of potential complications that may arise in various urological procedures. This method breaks down complex surgical procedures into discrete cognitive components, revealing cognitive processes crucial for successful execution.
Once the curriculum was formulated and discussed among the group and invited collaborators, our focus shifted to ensuring its validity and effectiveness. We employed the highly rigorous Delphi consensus methodology, a systematic process involving a panel of esteemed European experts within the urological laparoscopy domain. Through no more than two rounds of discussion and an additional consensus meeting, the panel reached an agreement on nearly all curriculum statements. Those that were not agreed upon are a matter of the surgeon’s preference and do not impact this intermediate task's overall generalisability and degree of standardisation. This process allowed for a comprehensive evaluation of the curriculum’s content, structure, and relevance, while providing a platform for these experienced surgeons to contribute their expertise further and refine the curriculum.
The escalating complexity of surgeries and the integration of advanced technologies such as laparoscopy, endoscopy, and robotics underscore the urgent need for standardised training curricula. With limitations in trainee working hours, heightened expectations for operational results, and the imperative to reduce complications and hospital stays, the importance of effective training methods, including cadaveric, animal, and virtual simulations, is magnified. However, these methods are often costly and inaccessible, emphasising the necessity for a validated, standardised curriculum.
Data from a survey conducted by the European Society of Residents in Urology noted that only 44% of surveyed residents had a training centre for simulation in laparoscopy, and only 67% had participated in practical courses on laparoscopy [3]. Although these data could be influenced by the progressive availability of robotic surgery in some residency programmes, the lack of laparoscopic training facilities and courses is evident. The same study found a positive association between training course participation and confidence in performing surgeries [3]. Studies estimate that around 70% of vital steps can be missed when taught by experts in lectures [9]. This may result from automation when surgeons reach the expert level. This could significantly affect the teaching process as experts may lose their conscious awareness of certain parts of procedures. Moreover, being an expert surgeon or having mastered surgical techniques does not translate into being an expert teacher and having a vocation as an educator [45].
Given these challenges, we advocate for the initial integration of CTAs into all surgical learning programmes. Compared with other motor-based interventions, CTAs offer several benefits, including ease of administration, cost effectiveness, and significant training impact [9]. We recommend prioritising cognitive skills before psychomotor skills training, with CTAs and hands-on courses complementing operating room training.
While our study makes significant strides in developing and validating an intermediate laparoscopic urological skills curriculum, it has limitations, particularly our reliance on survey-based data. First, the response rate and the inherent selection of respondents can affect the generalisability of our findings. Additionally, the phrasing of statements and the range of response options can lead participants towards specific answers. Lastly, while surveys provide valuable insights into the perceptions and experiences of experts, these do not capture objective measures of competency improvement. Despite the limitations, the Delphi consensus process proved to be an effective validation mechanism, allowing for the synthesis of diverse expert opinions. Its anonymous nature prevented any dominant influence, ensuring a true consensus. The process was managed efficiently through e-mails, negating the need for physical meetings.
Future studies should incorporate objective, performance-based assessments to complement survey findings, providing a more rounded evaluation of the curriculum's impact on surgical proficiency. Looking forward, we are developing an examination and certification process for the LUSs2 curriculum. This initiative is a critical step towards formalising the competencies acquired through this innovative training framework, aligning with the broader goals of the EAU and the ESU to elevate the standards of urological surgical education and enhance patient care.
Conclusions
5
LUSs2 is the first development of a laparoscopic surgery curriculum in urology beyond the basic steps. The combined approach, uniting CTAs and Delphi consensus, not only facilitated the creation of a robust and finely tuned surgical training curriculum, but also enhanced the collaborative spirit that dives into medical education led by experts.
Author contributions: Patricia J. Zondervan and Diego M. Carrion had full access to all the data in the study and take responsibility for the integrity of the data and accuracy of the analysis.
Study concept and design: Zondervan, Rivas, Carrion, Veneziano, Somani.
Acquisition of data: Zondervan, de Oliveira, Rivas, de Vries, Bujoreanu, Brinkman, Silvestri, Carrion, Socarras.
Analysis and interpretation of data: Zondervan, Rivas, Carrion, Socarras, Baekelandt, Veneziano, Somani.
Drafting of the manuscript: Zondervan, Rivas, Carrion, Socarras, Baekelandt, Veneziano, Somani.
Critical revision of the manuscript for important intellectual content: Zondervan, de Oliveira, Pini, Rivas, de Vries, Bujoreanu, Brinkman, Silvestri, Carrion, Socarras, Baekelandt, Veneziano, Somani.
Statistical analysis: Zondervan, Rivas, Carrion, Socarras, Baekelandt, Veneziano, Somani.
Obtaining funding: Erasmus + grant.
Administrative, technical, or material support: Julie Landsman.
Supervision: Zondervan, Veneziano, Somani.
Other: Initial development of all CTAs: renal hilum dissection—Skolarikos, Petrut, Veneziano; major vessel injury—Veneziano, Skolarikos, Greco; enucleation and renorrhaphy—Veneziano, Skolarikos, Pini; VU anastomosis—Tourinho-Barbosa, Sanchez-Salas, Alvarez-Maestro; pyeloplasty—Skolarikos, Alvarez-Maestro, Zondervan.
Financial disclosures: Patricia J. Zondervan certifies that all conflicts of interest, including specific financial interests and relationships and affiliations relevant to the subject matter or materials discussed in the manuscript (eg, employment/affiliation, grants or funding, consultancies, honoraria, stock ownership or options, expert testimony, royalties, or patents filed, received, or pending), are the following: None.
Funding/Support and role of the sponsor: This study was supported within the SISE project by the Erasmus + grant, project number 2020-1-NL01-KA203-064721 (https://sise-urology.com/).
Acknowledgements: Delphi support: Julie Landsman.
The reference list from the paper itself. Each links out to its DOI / PubMed record.
- 1Ritchie A.Pacilli M.Nataraja R.M.Simulation-based education in urology—an update Ther Adv Urol 1520231756287223118992410.1177/17562872231189924 PMC 1041389637577030 · doi ↗ · pubmed ↗
- 2Brinkman W.M.Tjiam I.M.Schout B.M.A.Results of the European Basic Laparoscopic Urological Skills examination Eur Urol 6520144904962423125610.1016/j.eururo.2013.10.036 · doi ↗ · pubmed ↗
- 3Carrion D.M.Rodriguez-Socarrás M.E.Mantica G.Current status of urology surgical training in Europe: an ESRU-ESU-ESUT collaborative study World J Urol 3820202392463098209910.1007/s 00345-019-02763-1 · doi ↗ · pubmed ↗
- 4Checcucci E.Puliatti S.Pecoraro A.ESRU-ESU-YAU_UROTECH survey on urology residents surgical training: are we ready for simulation and a standardized program?Eur Urol Open Sci 61202418283838444010.1016/j.euros.2023.12.008PMC 10879935 · doi ↗ · pubmed ↗
- 5de Oliveira T.R.Cleynenbreugel B.V.Pereira S.Laparoscopic training in urology residency programs: a systematic review Curr Urol 1220191211263131631910.1159/000489437 PMC 6613320 · doi ↗ · pubmed ↗
- 6Militello L.G.Hutton R.J.Applied cognitive task analysis (ACTA): a practitioner’s toolkit for understanding cognitive task demands Ergonomics 41199816181641981957810.1080/001401398186108 · doi ↗ · pubmed ↗
- 7Ahmad K.Bhattacharyya R.Gupte C.Using cognitive task analysis to train orthopaedic surgeons—is it time to think differently?A systematic review. Ann Med Surg 59202013113710.1016/j.amsu.2020.09.031PMC 751122032994993 · doi ↗ · pubmed ↗
- 8Edwards T.C.Coombs A.W.Szyszka B.Logishetty K.Cobb J.P.Cognitive task analysis-based training in surgery: a meta-analysis BJS Open 52021 zrab 12210.1093/bjsopen/zrab 122PMC 866979334904648 · doi ↗ · pubmed ↗