Protocol for inoculating bottled mineral water with bacteria to receive artificial contaminated water samples
Hans-Peter Ziegler, Sabine Platzer, Doris Haas, Herbert Galler, Michael Schalli

TL;DR
This paper provides a detailed protocol for contaminating bottled mineral water with bacteria to create artificial samples for study.
Contribution
The novelty lies in the comprehensive method for inoculating and analyzing bacterial contamination in water samples.
Findings
Steps for preparing bacterial solutions and inoculating water samples are outlined.
Procedures for filtration, incubation, and colony counting are described.
Chemical properties affecting bacterial growth are analyzed.
Abstract
Here, we present a protocol for inoculating drinking water samples with a variety of pathogens or facultative pathogen bacteria. We describe steps for preparing bacterial solutions, inoculating mineral water bottles and other drinking water samples, filtration and incubation of the agar plates, and counting colony-forming unit per mL. We also detail procedures for determining selected chemical properties, such as anions and cations, which can also affect the bacterial growth. For complete details on the use and execution of this protocol, please refer to Schalli et al.1 •Detailed steps to artificially contaminate bottled mineral water•Steps to analyze the chemical properties of water•Steps for filtration and incubation of agar plates and validation of strains Detailed steps to artificially contaminate bottled mineral water Steps to analyze the chemical properties of water Steps for…
Genes, proteins, chemicals, diseases, species, mutations and cell lines named across the full text — each resolved to its canonical identifier and authoritative record.
Click any figure to enlarge with its caption.
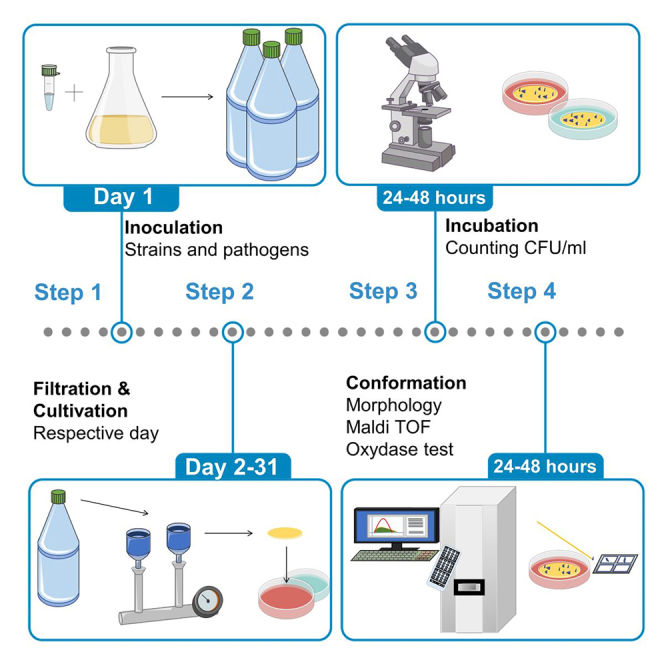 Figure 1
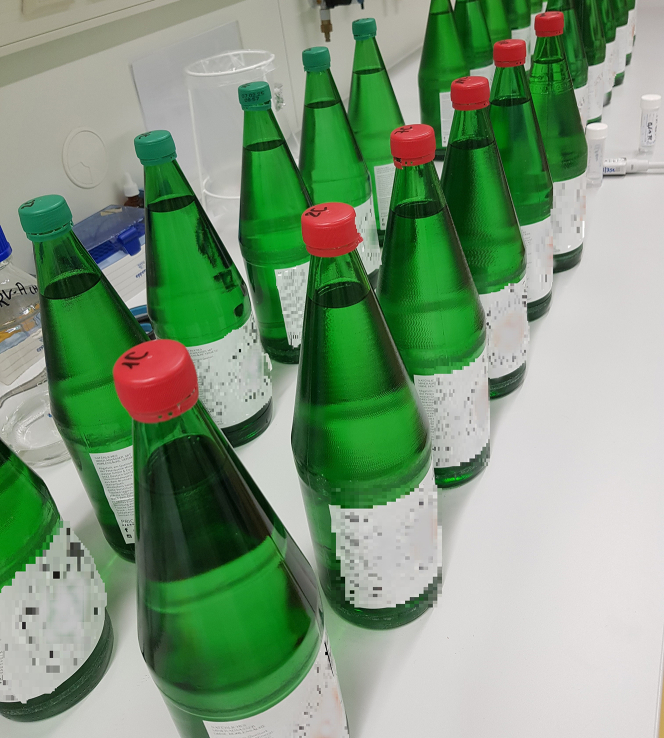 Figure 2
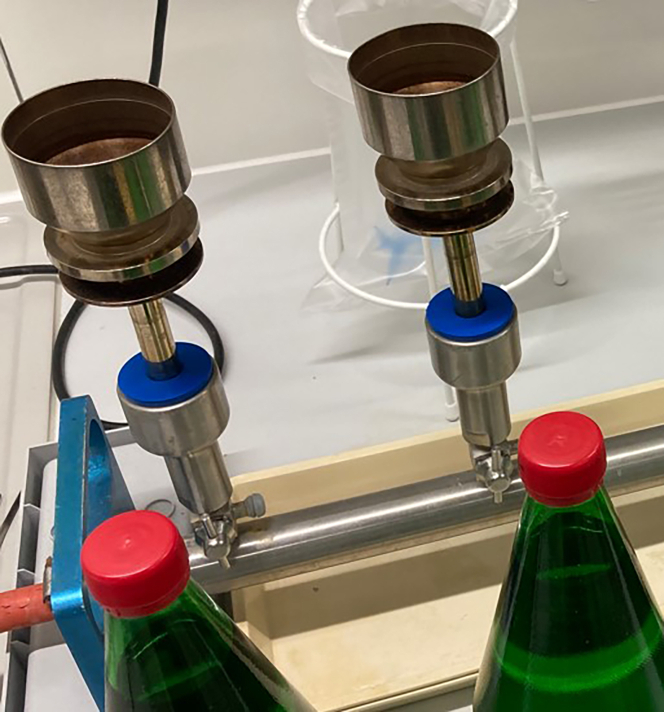 Figure 3
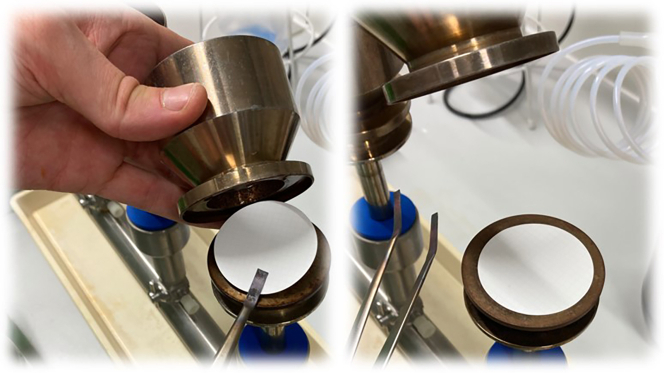 Figure 4
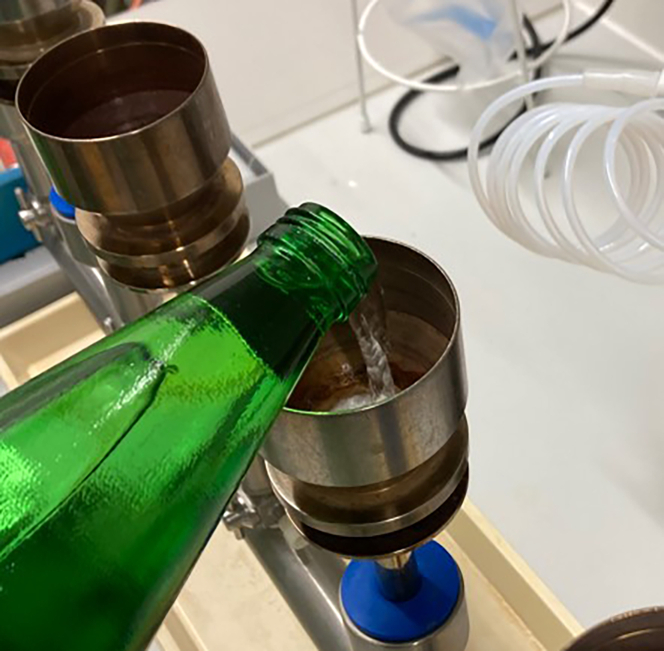 Figure 5
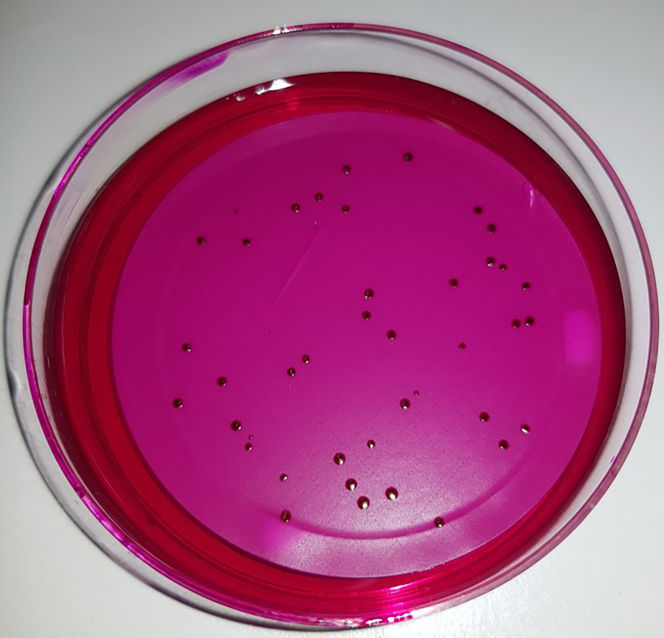 Figure 6
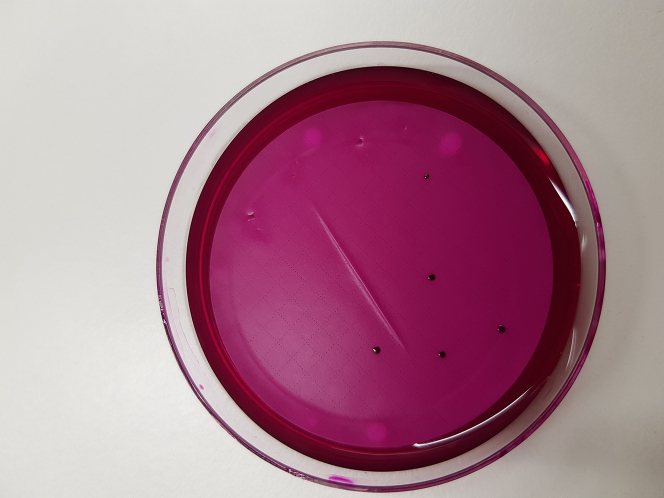 Figure 7
Peer Reviews
No public reviews on file for this paper yet. If you reviewed it on a platform where reviews are public (OpenReview, ICLR, NeurIPS, ICML), you can paste yours below so the community can read it here.
Videos
No videos yet. Explain this paper in a talk, walkthrough, or lecture? Add one.
Taxonomy
TopicsFecal contamination and water quality
Before you begin
The protocol below describes a method of inoculating drinking water samples with a variety of pathogens or facultative pathogen bacteria. We describe steps for preparing bacterial solutions, inoculating mineral water bottles and other drinking water samples, filtration and incubation of the agar plates, and counting CFU/mL. We also detail procedures for determining selected chemical properties, such as anions and cations, which can also affect the bacterial growth.
Institutional permissions
All experimental procedures require compliance to the safety guidelines of the institution or laboratory.
Preparation one: Contaminant solution and incubators
Timing: 30–60 min
- 1.First, prepare the contamination solution to inoculate the water samples.
- a.Autoclave a sterile glass bottle containing 1000 mL of distilled water at 121°C for 20 min for each strain.
- b.Dilute one ceramic bead in a bottle of distilled water (1000 mL):
- c.Gently mix the solution by inverting the bottle.
- d.After 10 min the contaminate solution is ready.
- e.To determine the CFU/mL in the contaminated starting solution, prepare a serial dilution and plate it on tryptic soy agar. Afterwards count your plates and note the CFU/mL you started with.
- 2.For the incubation step of the artificial contaminated water at the period of 31 days set the incubator to 25°C
- 3.The incubators should be set to 37°C to provide an optimal growth rate for counting the CFU/mL of the strains.
Note: This protocol requires bacterial strains to inoculate the water samples. The strains we used were obtained from commercial sources (E. coli DSM 1103 and P. aeruginosa DSM 50071, Leibnitz-Institute, DSMZ-German Collection of Microorganisms und Cell Cultures GmbH, Braunschweig, Germany), which were shipped in glass vials and contain freeze-dried material on ceramic beads. More important, we started the protocol using the beads covered in a cryopreservative solution with around 10^6^ CFU/mL. The CFU/mL of the beads covered in the cryopreservative solution can be found in the datasheet of the respective strains that are listed in the table REAGENT or RESOURCE.
Preparation two: Equipment for the filtration
Timing: 10–15 min
- 4.For this protocol, take a cylindrical funnel with a volume of 100 mL and filtrate an amount by 10 mL–100 mL of the artificial contaminated water samples.2^,^3
- 5.To verify Enterobacteriaceae filtrate the 100 mL of the artificial contaminated water and put the filter on Endo agar plates.
Note: For the filtration of the water samples through a porous membrane, filtration equipment is necessary. CRITICAL: The handling of the filtration equipment can adversely affect the efficiency of this technique. Furthermore, the right handling avoids cross contaminations to receive reliable results. Note: The membrane disc must have the correct pore size of 0.45 μm to ensure the right strains are filtered.3 Note: If you store the plates at 4°C in the fridge, be sure to preheat to 25°C before it's usage.
Preparation three: Eluent for ion chromatography and reagents for photometry
Timing: 45 min
- 6.To prepare the anion eluent add 42.4 g Na_2_CO_3_ and 4.2 g NaHCO_3_ to 500 mL deionized water to reach an eluent concentrate of 800 mM Na_2_CO_3_ and 100 mM NaHCO_3_.
- a.Freshly prepare the eluent using 20 mL of the solution prepared in 1. a. and dilute in 1980 mL deionized water.
Note: We use the stock solution to prepare the eluent for the ion chromatography ICS 1100.
- 7.Dissolve 260 g C_7_H_5_NaO_3_ and 260 g Na_3_C_6_H_5_O_7_ in 1600 mL deionized water.
- a.Once the chemicals are dissolved, add 1.94 g sodium nitroprusside and mix the reagent again to obtain reagent 1.
- 8.The reagent 2 contains 64 g sodium hydroxide in 1000 mL deionized water.
- a.Add 4 g sodium dichloride isocyanurate and mix the solution until all chemicals dissolve.
Note: The photometric determination of the ammonium values in the samples requires two reagents.4
- 9.Add 100 mL Orthophosphoric acid to 500 mL deionized water, to prepare the reagent to measure the nitrite.5
- a.Add 40 g sulfanilamide to the orthophosphoric acid solution and mix it well.
- b.Continue to get the reagent by adding 2 g naphthylethylenediamine dihydrochloride.
Note: We use the Griess test to measure the nitrite ions in the water samples.
Key resources table
REAGENT or RESOURCESOURCEIDENTIFIERChemicals, peptides, and recombinant proteinsSodium carbonateRothCat#A135.2Sodium hydrogen carbonateMerck GmbHCat#1.06329Argon 99.99%Fa. Air LiquideCat#231-147-0Sulfuric acid 96%Merck GmbHCat#1.00714Sodium peroxidisulfateMerck GmbHCat#1.06609Orthophosphoric acidMerck GmbHCat#1.00573Nitric acid conc.Merck GmbHCat#1.00441Sodium citrateMerck GmbHCat#1.6448Sodium nitroprussideMerck GmbHCat#1.06541Sodium salicylateMerck GmbHCat#1.06601Sodium hydroxideMerck GmbHCat#1.06498Sodium dichloride isocyanurateMerck GmbHCat#1.10888SulfanilamideMerck GmbHCat#1.11799Naphthylethylenediamine dihydrochlorideAppliCemCat#A2782Bacterial and virus strainsE. coliDSMDSM 1103P. aeruginosaDSMDSM 50071Biological samplesBottled mineral waterDeposited dataRaw dataSupporting information, https://doi.org/10.1016/j.heliyon.2023.e21634OtherTryptic soy agar (TSA)VWRCat#101114ZAEndo agarMerck GmbHCat#104044Cellulose ester filter, 47 mm diameter, 0.45 μm pore sizeMerck GmbHCat#EZHAWG474DrySlide oxidase 231746BDCat#231746MALDI-TOF VITEK MSbioMerieuxMemo-TitratorMetrohmTitrando 888LL Aquatrode PlusMetrohmCat#6.0253.100ConductometerMetrohm712TOC Multi N/CAnalytik Jena GmbHN6-581/MICP-OESThermo Fisher Scientific, Inc.ICAP7000 PlusDionex ICSThermo Fisher Scientific, Inc.ICS-1100Dionex IonPac AS14A IC columnsThermo Fisher Scientific, Inc.Cat#056904Dionex IonPac AG 14 P/N columnsThermo Fisher Scientific, Inc.Cat#56904SpectrophotometerHitachiU-2900150 mL beakerFA. NalgeneStainless steel funnel for vacuum filtrationMerck GmbHXF2014752Vacuum filtration manifoldMerck GmbHXX2504700Heraeus incubatorThermo Fisher Scientific, Inc.B 6200RuMed incubatorThermo Fisher Scientific, Inc.D/30-36/02-2001Autoclave SystecBartelt GesmbHVX-120
Materials and equipment
Stock solution for ion chromatographyReagentFinal concentrationAmountddH_2_ON/A500 mLNa_2_CO_3_400 mM42,4 gNaHCO_3_50 mM4,2 gTotalN/A500 mL Note: The eluent concentrate can be stored for 2 months at 25°C. Further chemicals that we used in this protocol, e.g., acidifying samples, are listed in the key resources table. UV/VIS solution (reagent 1)ReagentFinal concentrationAmountC_7_H_5_NaO_3_385 mM260 gNa_3_C_6_H_5_O_7_620 mM260 gNa_2_[Fe(CN)_5_NO] ∗ 2 H_2_O4 mM1.94 gddH_2_ON/A1600 mLTotalN/A1600 mL Note: If you keep reagent 1 in the fridge at 4°C, the solution can be stored for 2 weeks. Contrariwise, freshly prepare reagent 2 every day. Griess SolutionReagentFinal concentrationAmountddH_2_ON/A500 mLH_3_PO_4_1 M100 mLC_6_H_8_N_2_O_2_S387 mM40 gC_12_H_14_N_2_18 mM2 gTotalN/A600 mL Note: The reagent for Griess test is stable for 1 month, since it's stored in the fridge at 4°C. If you want to store the solution up to one year, keep the reagent at −25°C.
Step-by-step method details
Step one: Analyses on the chemical properties
Timing: 1–1.5 h
Follow this procedure to determine the chemical properties of mineral water (Table 1) without carbon dioxide and with additional CO_2_.
- 1.For analyzing the pH fill a 150 mL beaker with 100 mL of the respective water sample and run the program to measure the pH value at RT.6
- 2.To get the conductivity score use the same beaker filled with 100 mL of the water sample and do the measurements with the conductometer.7 Note: We use the Metrohm Tritator connected to the sample changer 730 to move the samples. For this reason, we measured the pH and conductivity values of the samples consecutively and the raw data was processed using the Tiamo software.
- 3.Add 50 μL sulfuric acid (2M) with additional 80 g/L sodium peroxidsulfate to the reaction tube and put the sample into the TOC analyzer.8 Troubleshooting 1. Note: You have to ensure that the argon gas flow is set between 130 and 150 mL/min.
- 4.To assay the dissolved metal ions, take 100 mL of the water samples, filter it through a 0.45 μm membrane and add 1 mL of HNO_3_ conc. to acidify the sample for the determination of Fe, Mn, Ca, Mg, Na and K.9
- a.Put the samples to the ICAP 7000 sampler module and start the program.
- b.Calculate the hardness by the values of Calcium and Magnesium. DIN 38409:1986:01 DEV H6. Note: We use the samples changer ASX-280 for the ICP-OES to analyze the water samples in serial, applying the Qtegra software version 2.8.2944.202 to calculate the results and values for each ion.
- 5.For mineral water samples, please prepare a 1 to 10 dilution and set it in the schedule. Put the vial to the sample holder and run the program. Note: Our ICS-1100 is connected to AS-DV sample changer to analyze the samples subsequently. Once the program is finished, Chromeleon Version 7.2.10.ES software evaluates the anion values. To determine the anions (Nitrate, chloride and sulfate) using the ion chromatography run the correct program on the Dionex ICS-1100.10 Before you start with the samples rinse the system with the eluent solution to receive a linear baseline. Troubleshooting 2.Note: We measured the ammonium and nitrite ions using a spectrophotometer.4
- 6.Take a reaction tube and fill in 5 mL of the water sample to measure the ammonium ions.
- a.Add 0.4 mL of the previously prepared reagent 1 to the water sample and mix it well.
- b.Additionally, add 0.4 mL of freshly prepared reagent 2 and mix the reaction tube. The pH of the samples should now reach 12.6.
- c.Measure the extinction at a wavelength of 665 nm to get the ammonium values.
- 7.To measure the value of the nitrite ions add one drop of the Griess reagent to the samples (5 mL).5
- a.Wait for 20 min until the reaction is finished.
- b.Set the wavelength to 540 nm and measure the extinction. Note: The calculation of the values was done after the procedure mentioned in ÖNORM ISO 7150-1:1987 12 01 (DIN 38406-5:1983 (DEV-E5))Table 1. The chemical properties of mineral water with and without CO_2_Chemical properties of bottled water without additional CO_2_Calcium (Ca^2+^)Magnesium (Mg^2+^)Sodium (Na^+^)Potassium (K^+^)Iron (Fe)Manganese (Mn)54.214.121.51.7<0.02<0.05Ammonium ( )Nitrite ( )Nitrate ( )Chloride (Cl^-^)Sulfate ( )Hardness (°dH)<0.02<0.0110.118.617.110.8Chemical properties of sparkling bottled waterCalcium (Ca^2+^)Magnesium (Mg^2+^)Sodium (Na^+^)Potassium (K^+^)Iron (Fe)Manganese (Mn)53.514.220.50.7<0.02<0.05Ammonium ( )Nitrite ( )Nitrate ( )Chloride (Cl^-^)Sulfate ( )Hardness (°dH)<0.02<0.0110.621.818.210.7The values in the units [mg/L] for the chemical components and the hardness is calculated in German hardness degree [°dH].
Step two: Inoculation of the water samples
Timing: 30–45 min
To prepare the contaminated water samples, following steps are mandatory.
- 8.Set up 3 water bottles for each condition and pathogen, e.g., Figure 1.
- a.Open a fresh water bottle or your sample and inoculate with 1 mL of the contaminant solution, you have prepared previously.
- b.Immediately close the bottles again and then gently mix your water samples by orbital movements of the bottle. Troubleshooting 3. Figure 1. Inoculating mineral water bottles with and without carbon dioxideAn example of commercial sparkling mineral water bottles (green capped) and ones without carbonization (red cap) that we used in this investigation.
- 9.Put the artificial contaminated water samples to incubation at RT for 1–31 days (dark place). CRITICAL: Due to the pathogenicity of the used strains (key resources table), please be careful during the preparation procedure.Note: Once you have inoculated all your samples, prepare non-artificial contaminated samples to determine your background-flora.Optional: If you want to do any investigations on the background-flora in artificial contaminated water, prepare the samples for the same period.
Step three: Filtration and cultivation over a period of 31 days
Timing: 1 h
After incubating the water bottles for 1 day (24 h), 2 days, 7 days, 2 weeks, 3 weeks and 31 days proceed with the filtration to get the CFU/mL over this period.3^,^11^,^12 After Filtration (Figure 2) and incubation of the agar plates count all the colonies on the plates to calculate the CFU/mL.
- 10.First, make sure that the equipment, which you have prepared before, is ready to use and open the bottle at the respective day (e.g., Figure 3).
- a.Place the filter on the cylindrical funnel and check that the funnel top is not leaking out, otherwise you will lose the feed or get no vacuum to filtrate sufficient (Figure 3).
- b.Fill in 100 mL of the inoculated water samples and filter it through the cellulose ester filter using vacuum (Figure 4).2^,^3Figure 4. Fill the respective amount of sample into the prepared apparatus Figure 3. Place the filter on the sterilized filtration apparatus for each sample
- 11.Place the filter on an Endo Agar plate for cultivating the pathogens. Troubleshooting 4.
- a.Incubate the plates for 24 h at 37°C.
- b.Afterwards count the colonies (e.g., Figure 5) and calculate the CFU/mL for both strains.Figure 5. Counting CFU/mLAfter Filtration and incubation of the agar plates count all the colonies on the plates to calculate the CFU/mL. Optional: If you work under different conditions or if you want to test new strains, vary your collection time points to gain significant results.Note: Further down the period do duplicates using 10 mL (1:10) of the samples as higher colony counts may occur.Figure 2. Make sure, that the sterilized filtration equipment is ready
Step four: Validation of strains
Timing: 1–1.5 h
The purpose of this step is to confirm the respected colonies of the artificial contaminated water samples.3^,^11
- 12.Select different single colonies on the plate for the identification and transfer them on TSA agar to get pure cultures.
- a.First, confirm your respected strains checking the morphological pattern.
- b.Take an inoculation loop to test whether your single colony is oxidase positive or negative.
- c.Pick the same colonies from pure cultures and place them on the well of the MS-chip. Note: For the determination of the respected strains, MALDI TOF analyses can be performed.
Expected outcomes
After the bacterial strains adapted to the minimal nutrient conditions of the bottled water they started growing in mineral water. At day one, we found a reduced CFU/mL in sparkling mineral water (E. coli). Moreover, E. coli showed a decreased lifespan in mineral water without CO_2_ due to the fact of low nutrition in the water. In contrast, the CFU/mL for P. aeruginosa in mineral water without CO_2_ escalates after an incubation of 31 days. However, the low pH values due to the carbonation of the water and the damaging effects of CO_2_ lead to decreased CFU/mL (Table 2) of both strains in sparkling water.Table 2. Mean values for CFU/mL of E. coli and P. aeruginosa in mineral water with and without carbonizationStrainE. coli**P. aeruginosaTime [day]Bottled waterSparkling bottled waterBottled waterSparkling bottled water145 ± 128 ± 286 ± 294 ± 4262 ± 44 ± 0170 ± 220795 ± 60120 ± 301485 ± 20220 ± 602128 ± 40380 ± 70312 ± 0076000 ± 00
Limitations
Our method of artificially contaminated water is not investigating the interaction of different pathogens in a consortium. Therefore, the CFU of the pathogenic strains or any other bacterial strains in the contaminant solution has to be adjusted. Our protocol determines the CFU/mL of the single pathogen with no data of interaction or biofilm formation.
Troubleshooting
Problem 1
If the sample is containing high amounts of chloride ions (≥3 g/L) or a carbonate hardness ≥30°dH (German Hardness degree), see the solution below.
Potential solution
Prepare a dilution, e.g., 1:2 or 1:5, (step 3) to gain valid values for TOC.
Problem 2
Cross-sensitivities or insufficient resolutions are rarely observed, but can occur at large concentration differences between the anions in step 5.
Potential solution
Proceed with the instruction of EN ISO 10304-1:2009.
Problem 3
If the water sample touches the screw cap it can consequently lead to cross-contaminations, especially in Step 8.b.
Potential solution
Mix the inoculated water carefully to avoid any contaminations.
Problem 4
Transferring the membrane to the agar plate is fussy, referring to step 11. The transfer membrane disc should have no cracks or air inclusions among. Moreover, any of those defects will lead to loss of CFU and consequently a wrong outcome (Figure 6).Figure 6. Avoid air inclusions and folding in the membraneIn the case of air inclusions, you may lose CFU, since the nutrition of the agar cannot diffuse through the membrane.
Potential solution
- •It is important to take forceps with no bended tips or any damaged parts. Since the forceps are broken, you will easily damage the membrane.
- •The membrane should be placed down in a constant movement and don't jerk. Otherwise, it will cause air inclusions or a rippled membrane surface (e.g., Figure 5).
Resource availability
Lead contact
Further information and requests for resources and reagents should be directed to and will be fulfilled by the lead contact, Dr. Michael Schalli ([email protected]).
Technical contact
Questions about the technical performance should be sent to the technical contact, Sabine Platzer ([email protected]).
Materials availability
This protocol did not generate any new resources, all the materials are commercially available.
Data and code availability
The raw data of this investigation and analyses are available on https://doi.org/10.1016/j.heliyon.2023.e21634. If any additional data or information is needed regarding this investigation, please contact the lead contact.
The reference list from the paper itself. Each links out to its DOI / PubMed record.